Want a souped-up fanless case for your music server but don't want to overspend, are willing to roll up your sleeves a bit, but you don't know where to look? It turns out the HDPLEX H1 V3 just might be your end game!
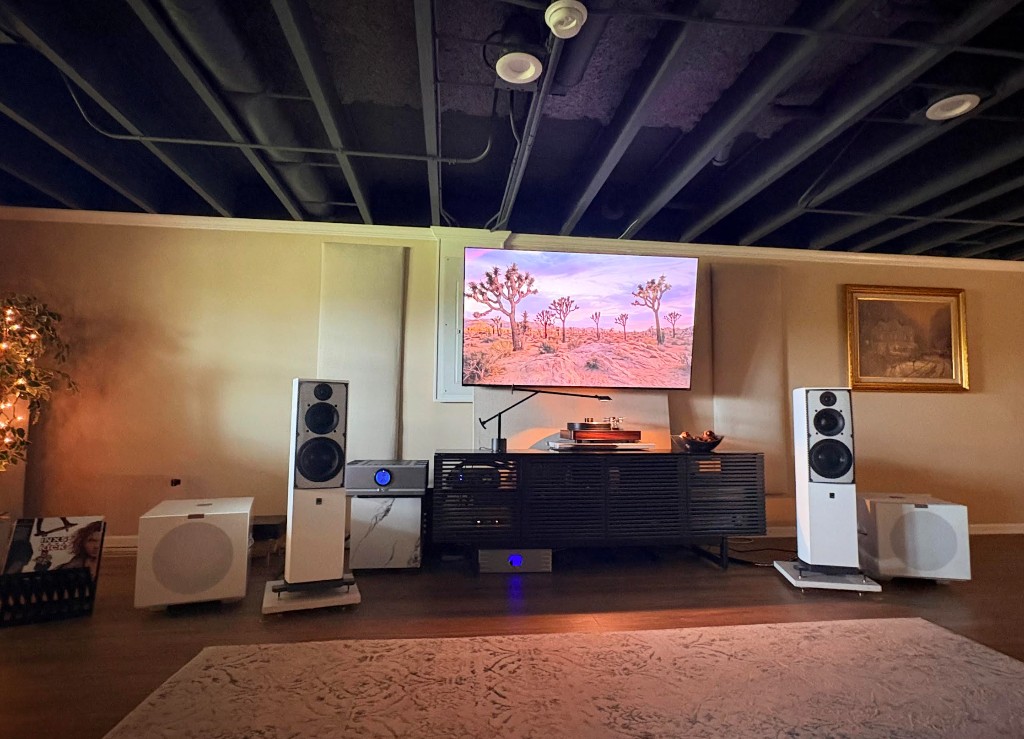
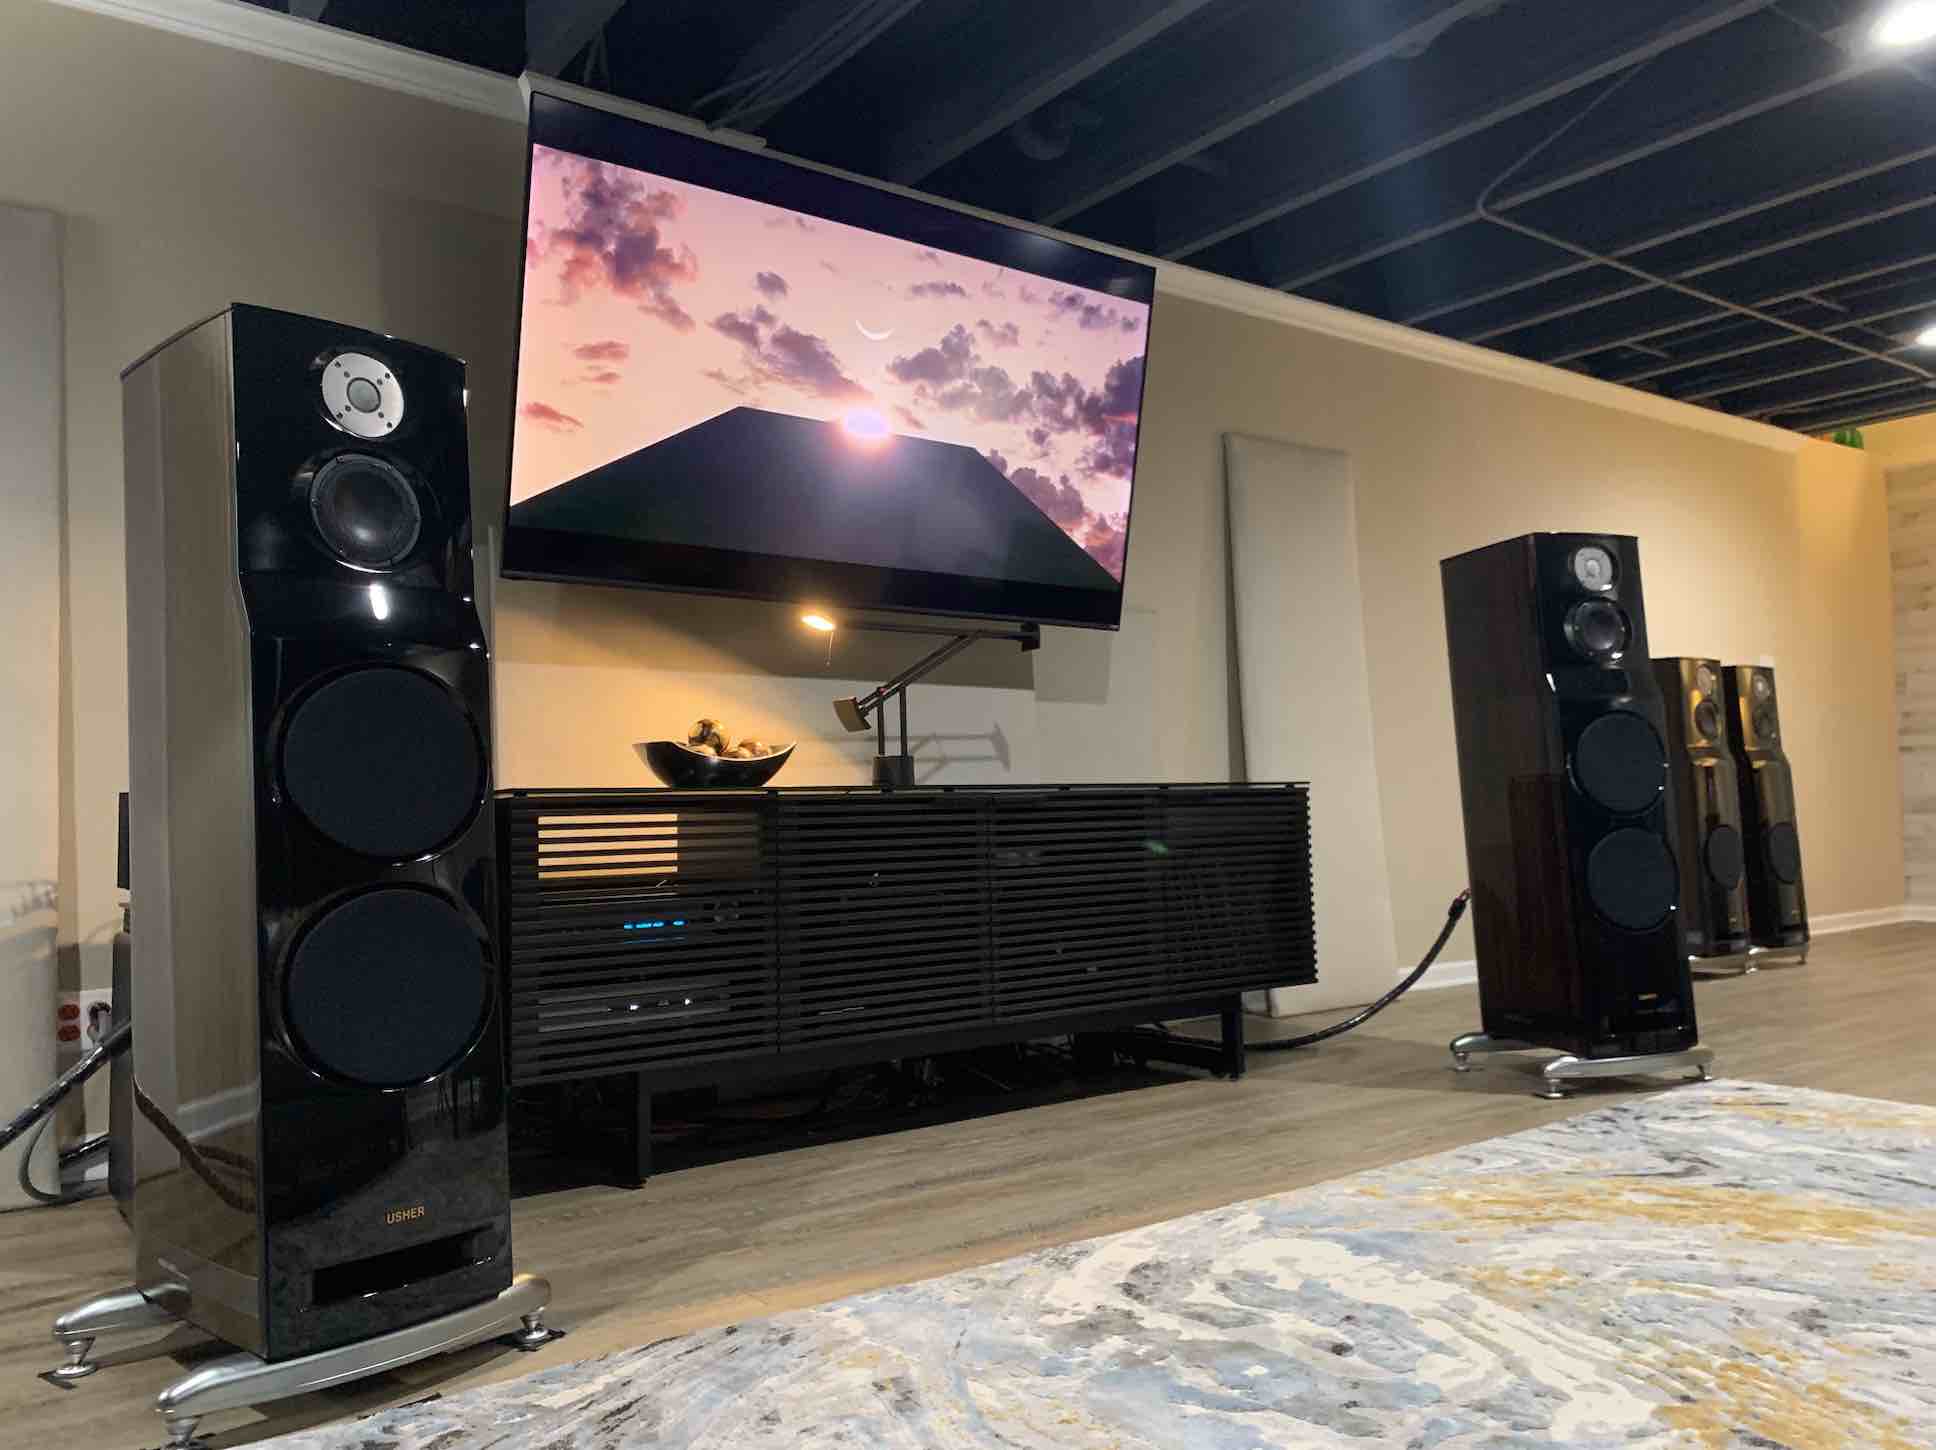
Several years ago, I built my reference music server by purchasing an Intel NUC10i7FNH kit, installing an M.2 SSD hard drive, RAM, and the free Roon Optimized Core Kit software (ROCK). Being relatively inexperienced with such tasks, I spent roughly five hours to complete the job following Roon's online instructions (you can find them HERE). However, with some effort and a total cash outlay of $750, I was able to employ Roon Lab's superb music player software to manage and play my digital music file library and stream high res services like Qobuz and internet radio stations with great aplomb; paired up with an excellent DAC like my reference Schiit Audio Yggdrasil or the bargain Ayre QB-9 Twenty, for example, my NUC performs on a par with music servers costing thousands more (read more HERE and HERE).

Ban the Fan
For all its merits, the NUC employs a tiny fan that, though hardly noticeable, emits a little noise that can worsen over time. Hence, to address that issue and eliminate moving parts for longer life, I sought out suitable fanless cases. Then after some research, I opted to explore two solutions: the more economical and less labor intensive Akasa Turing FX fanless case ($149) and the higher end but more expensive HDPLEX H1 V3 fanless case ($265 U.S.) with the NUC Kit ($78.50).
The HDPLEX H1 V3 really caught my eye, as it reminded me of the $7000 to $19,000 supercharged servers by ACER that impressed me last year at AXPONA (Audio Expo North America), with their bundled cables, massive heat sinks and impressive, copper cooling pipes coursing through their overbuilt interiors.
"You don't need all that for your NUC," my IT friend, John Brenner, offered as he spied the network of copper piping running through the H1 V3 on my workbench.
"Oh, but I do... I really do!" I thought. Why settle for a Toyota Corolla when you can drive a hot rodded Dodge Charger?
After building and putting both through their paces, I concluded that if your priority is lower cost combined with smart looks and functionality, the Turing FX is an excellent choice (you can read its review HERE). However, if you prefer a more upscale, burlier aesthetic with a more robust feature set (like six swooping, high performance six mm copper CPU cooler pipes inside, and options like accommodating a larger PCIE expansion card)—and you don't mind spending a little more cash, time, and effort—the HDPLEX is superb.
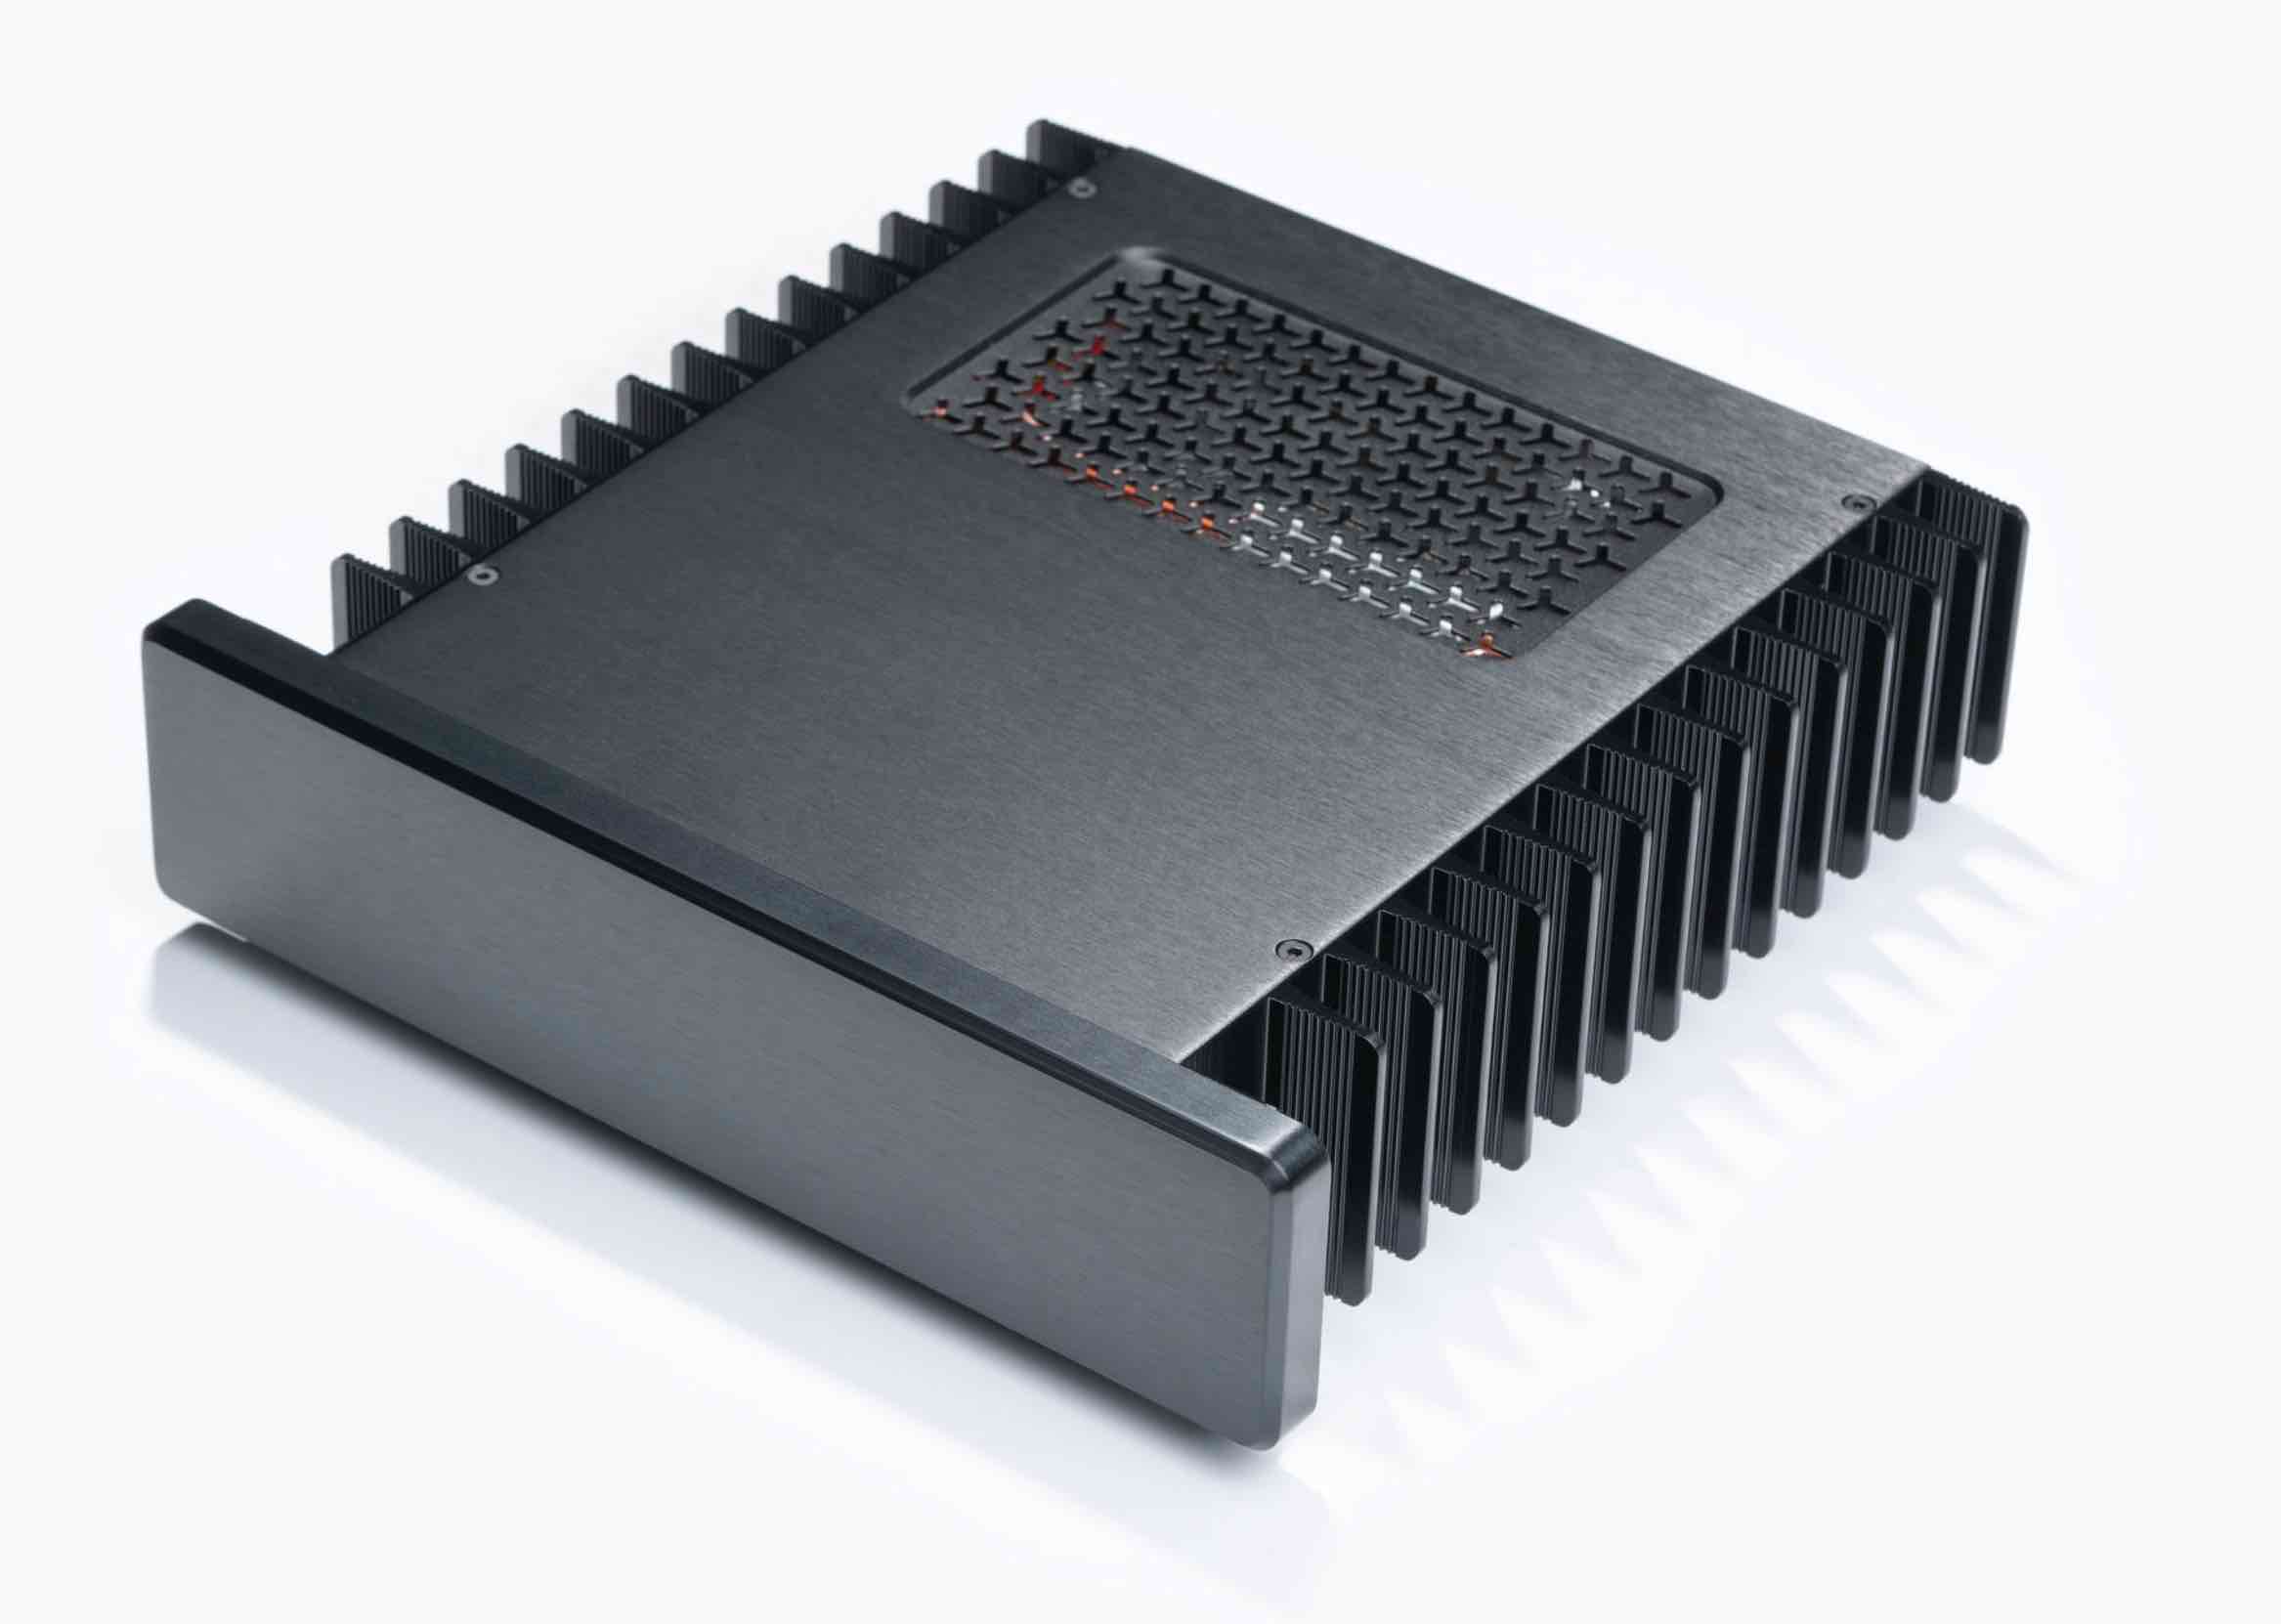
Image courtesy of hdplex.com
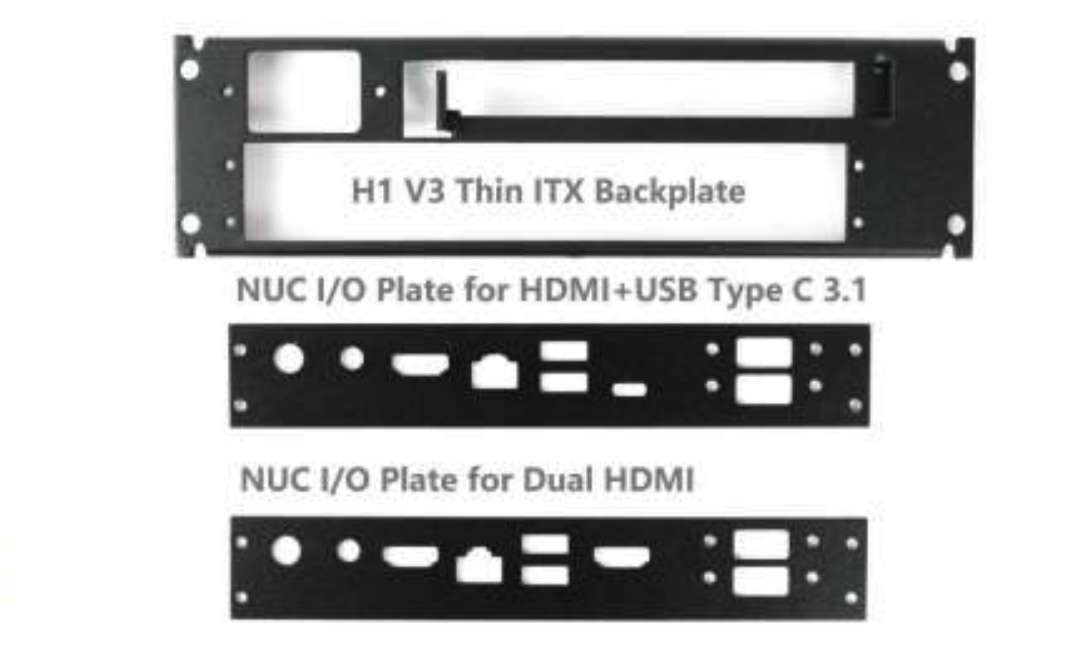
According to their website, the H1 V3 supports the 7th Gen NUC board such as the NUC7i3DN with dual HDMI I/O by working with the HDPLEX Fanless NUC kit, which uses six heat pipes augmenting a beefy heatsink system and supports the 65W TDP which is the best passive NUC system on the current market. It also supports 8th and 10th Gen NUC board with HDMI+USB 3.1 I/O such as the NUC8ixBEB. With a M.2-PCIE adapter card, the H1 V3 case can support one PCIE expansion card for the NUC system. This, HDPLEX asserts, is the first NUC case in the market which supports the addition of a PCIE expansion card (for further information, click HERE).
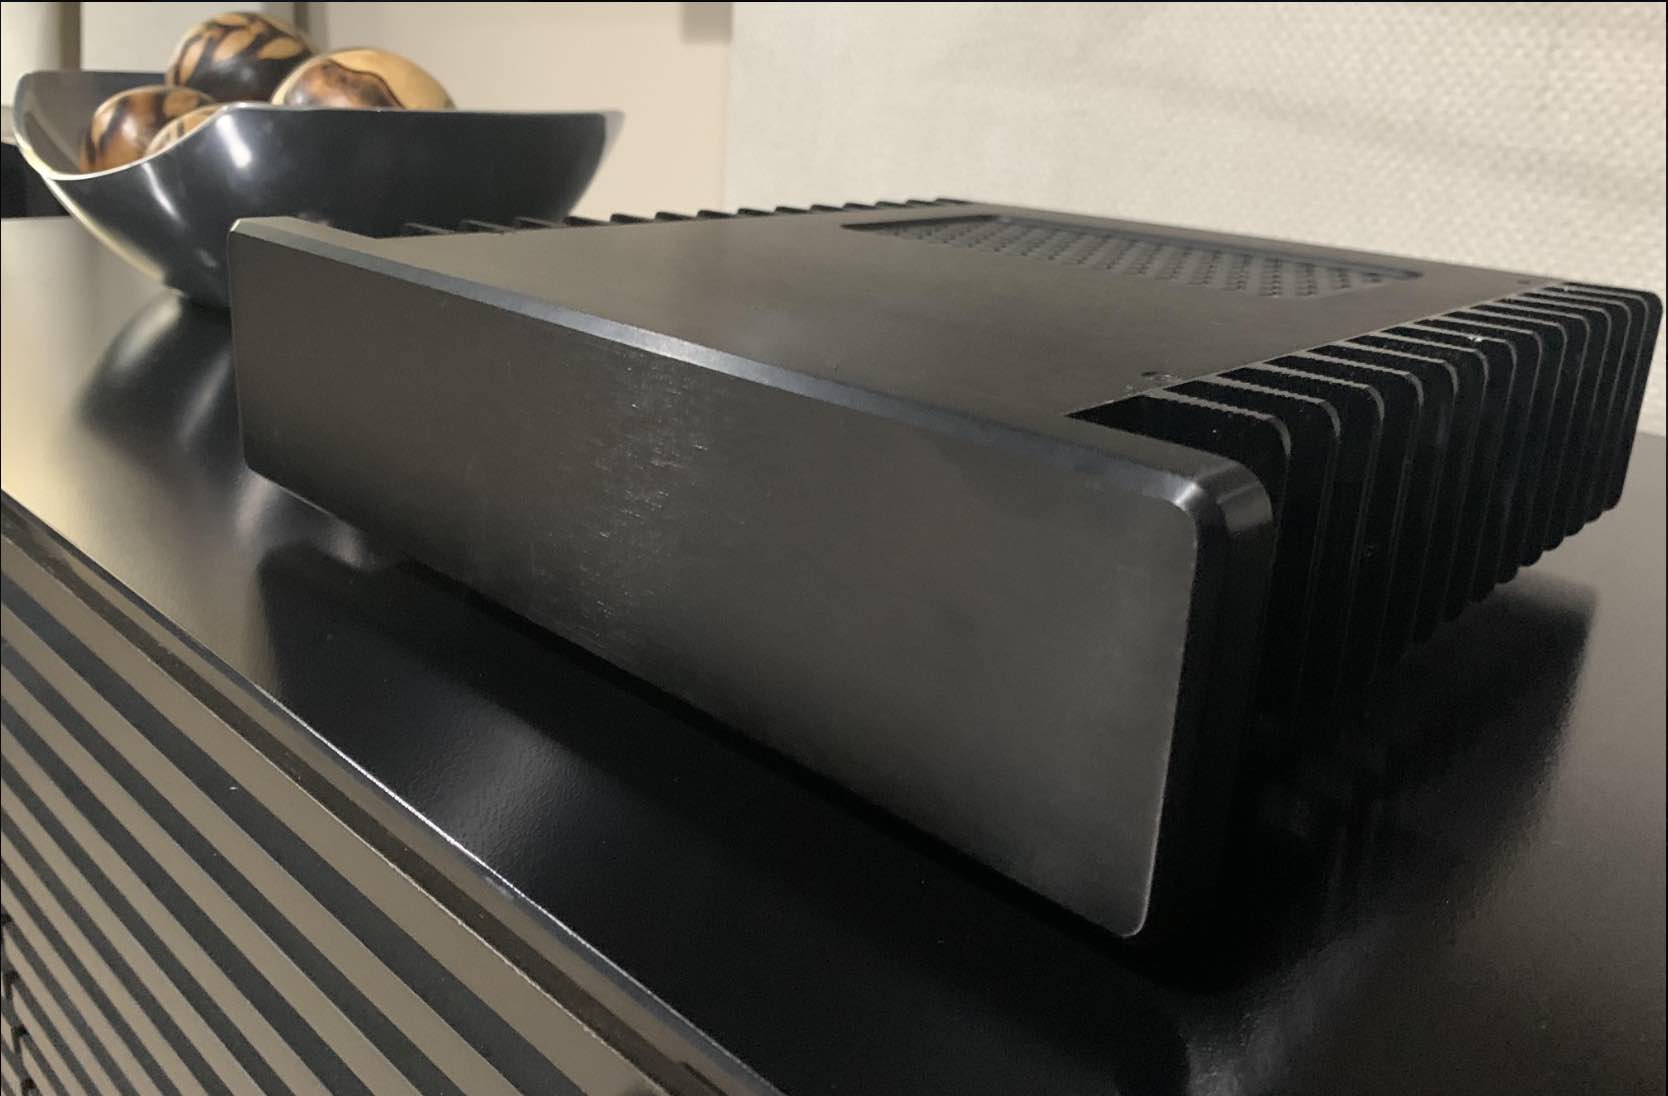
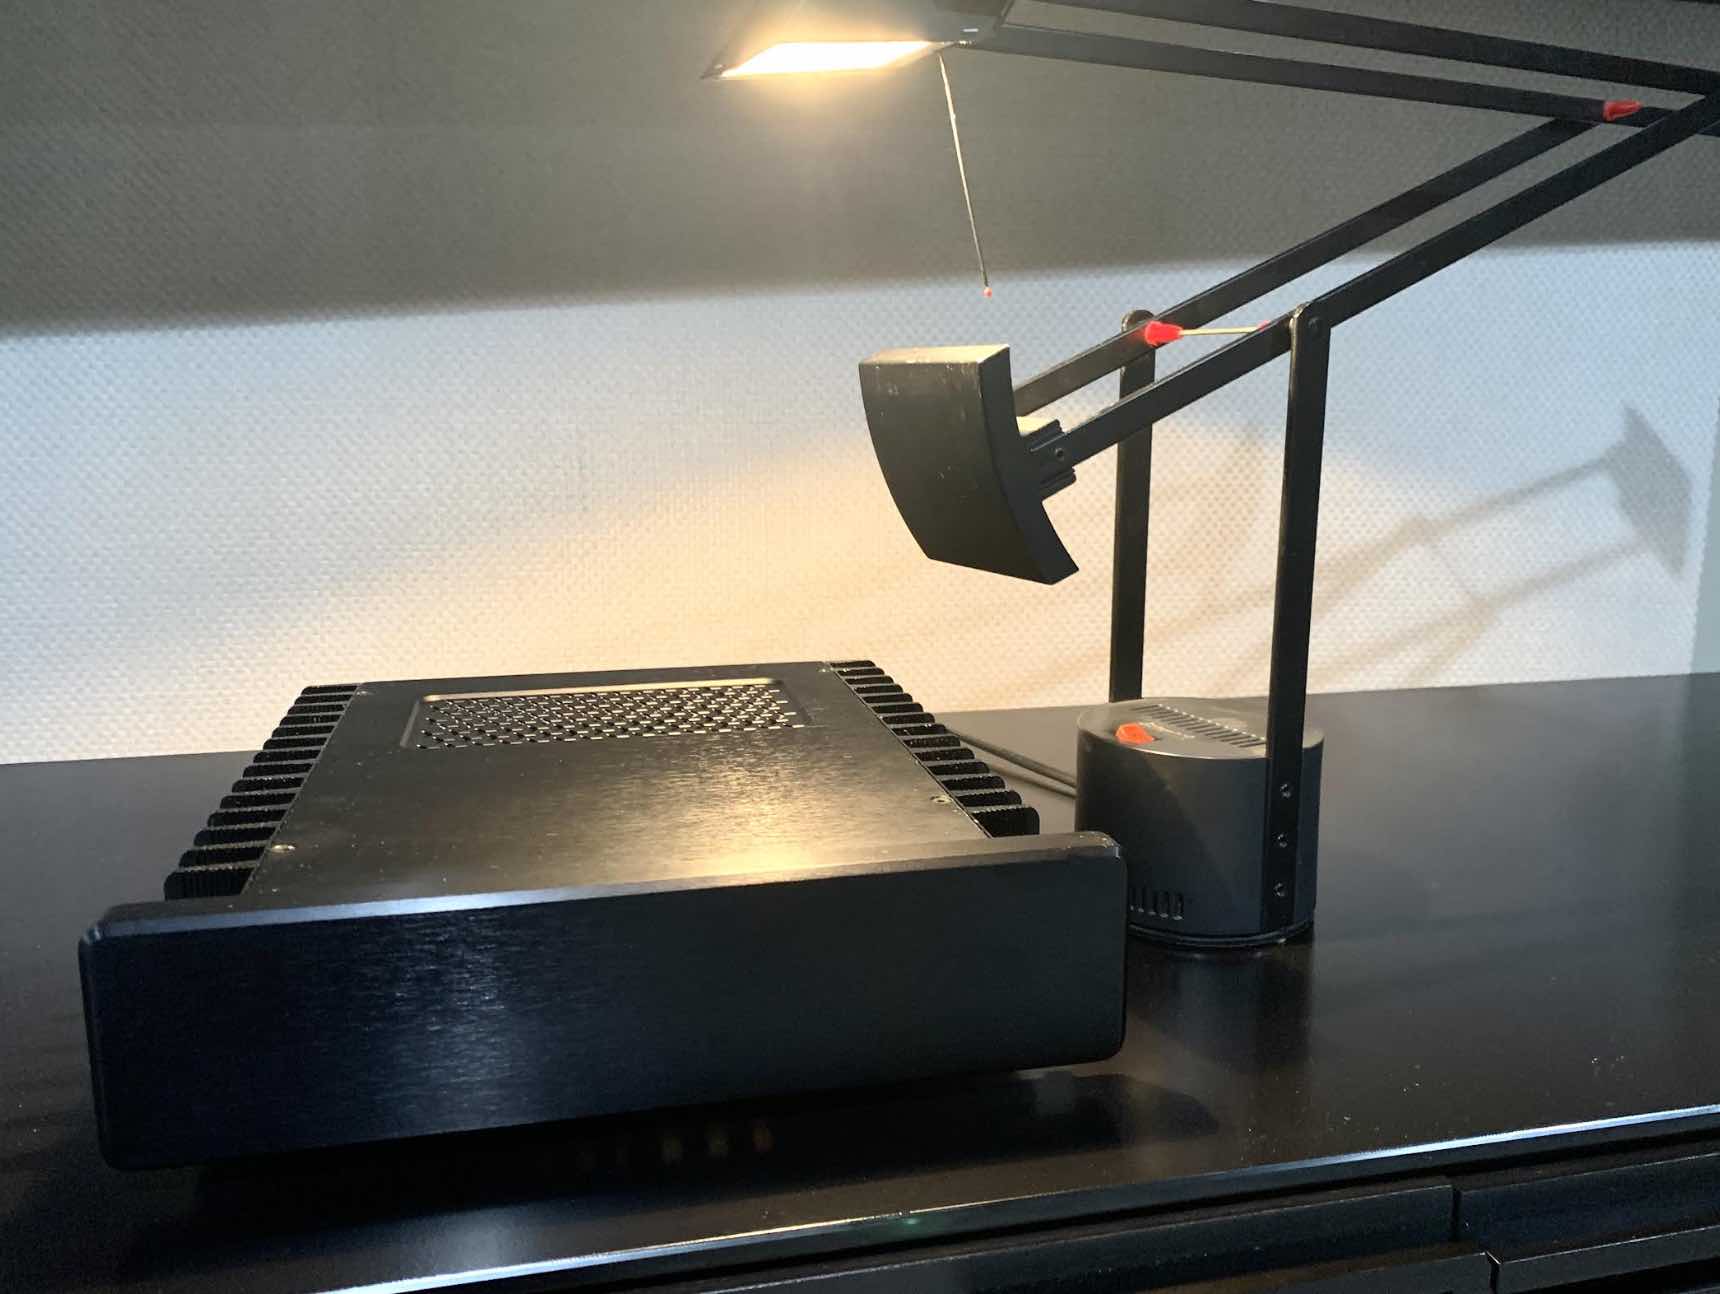
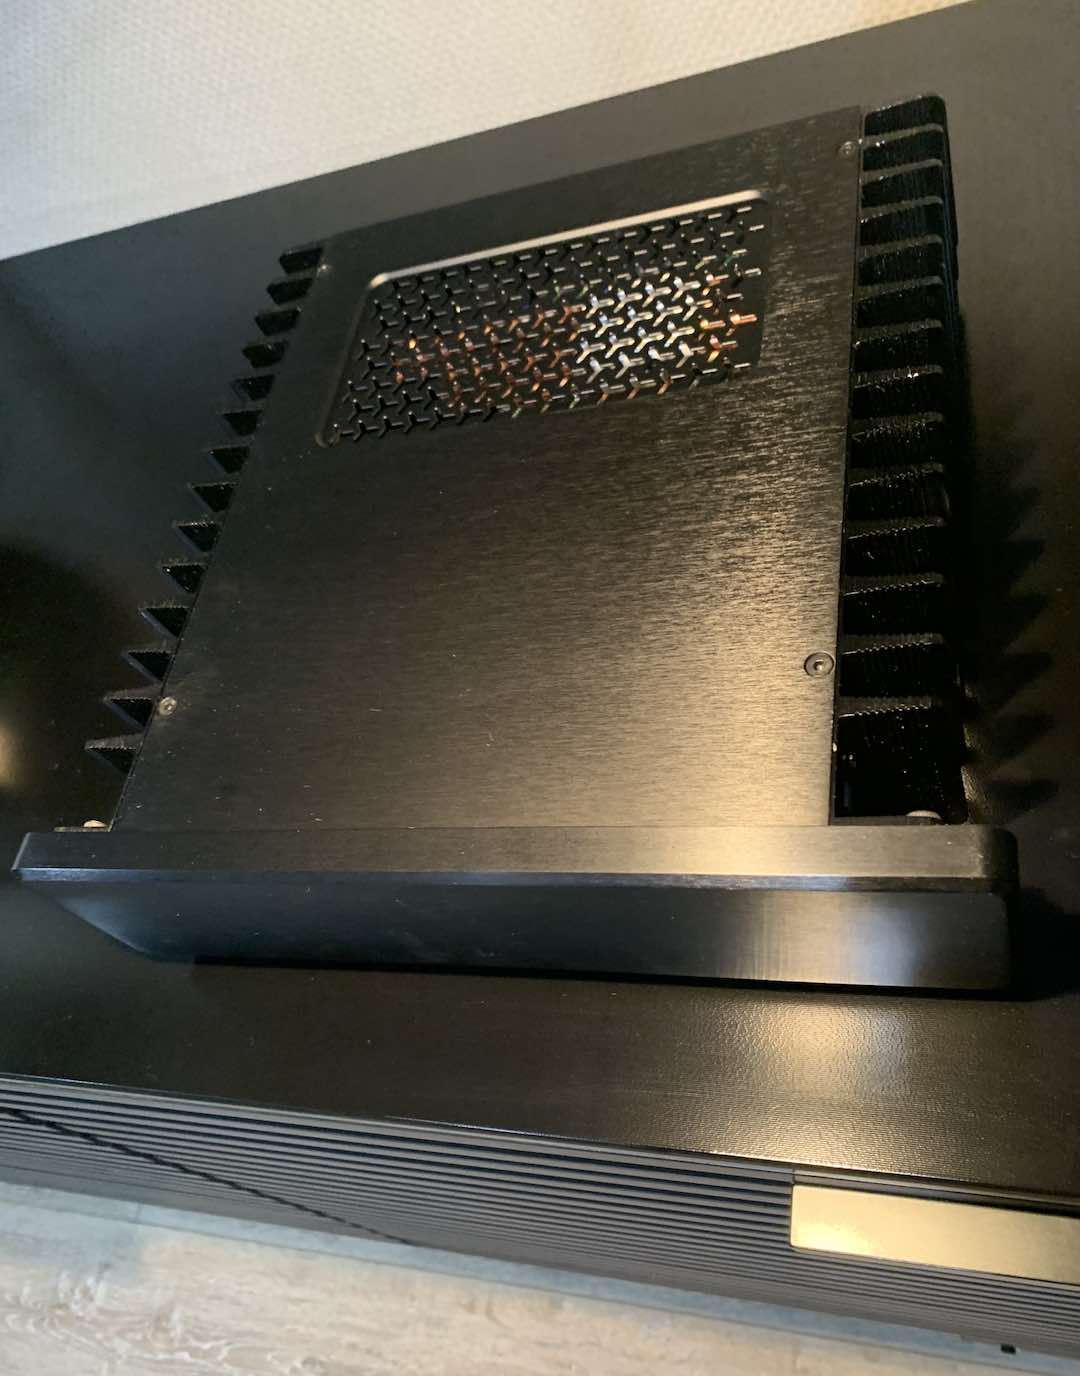
Stocky and angular in a young Burt Reynolds kind of way, at 11 1/2" W x 11 1/4" D x 3 1/4" H, the brushed aluminum case had a long, rectangular faceplate with rounded corners that's blank and .6" thick, 1" deep cooling fins running down its sides with an LED light up power button near the front right corner. It sports decorative air vents on its top rear half giving vent and view of its copper heat pipes below, and at the rear—on mine—features three USB 3.0 inputs, one USB 2.0 input, am ethernet port, a NUC DC input jack, a 19 V DC output, and an opening for an optional IEC female receptacle (to accommodate an optional internal power supply mine doesn't have this or the IEC receptacle, but a nice rectangular opening for one, should I need it). It also has four rubber feet underneath. The H1 V3 is available with either a black or silver brushed aluminum faceplate.
For all its merits, be forewarned that instructions may be a little challenging.
A Little Background on HDPLEX
During Saturday's Happy Hour at AXPONA 2023, I visited with an industrial rep based out of southern California and mentioned a small setback I had in building the HDPLEX H1 V3 case. He said that he knew HDPLEX's proprietor, Larry, well for years and that he made wonderful fanless computer cases, but as a one-man shop, his written directions weren't his strong suit.
That said, Larry Lieu has been making noteworthy fanless computer cases and, later, power supplies since he founded HDPLEX in Alhambra, California in 2007.
Two of their prototype products, the H5.S and the H10.ODD, gained immediate recognition after they they hit the consumer market. In 2012 they released their H3.S and H3.SODD, which their site says "became instant hits as well." Their H5.TODD, which has a tray loading optical drive, was also released that year (currently, the H1 TODD which is basically the H1 V3 with a tray loading optical drive, retails for $285).
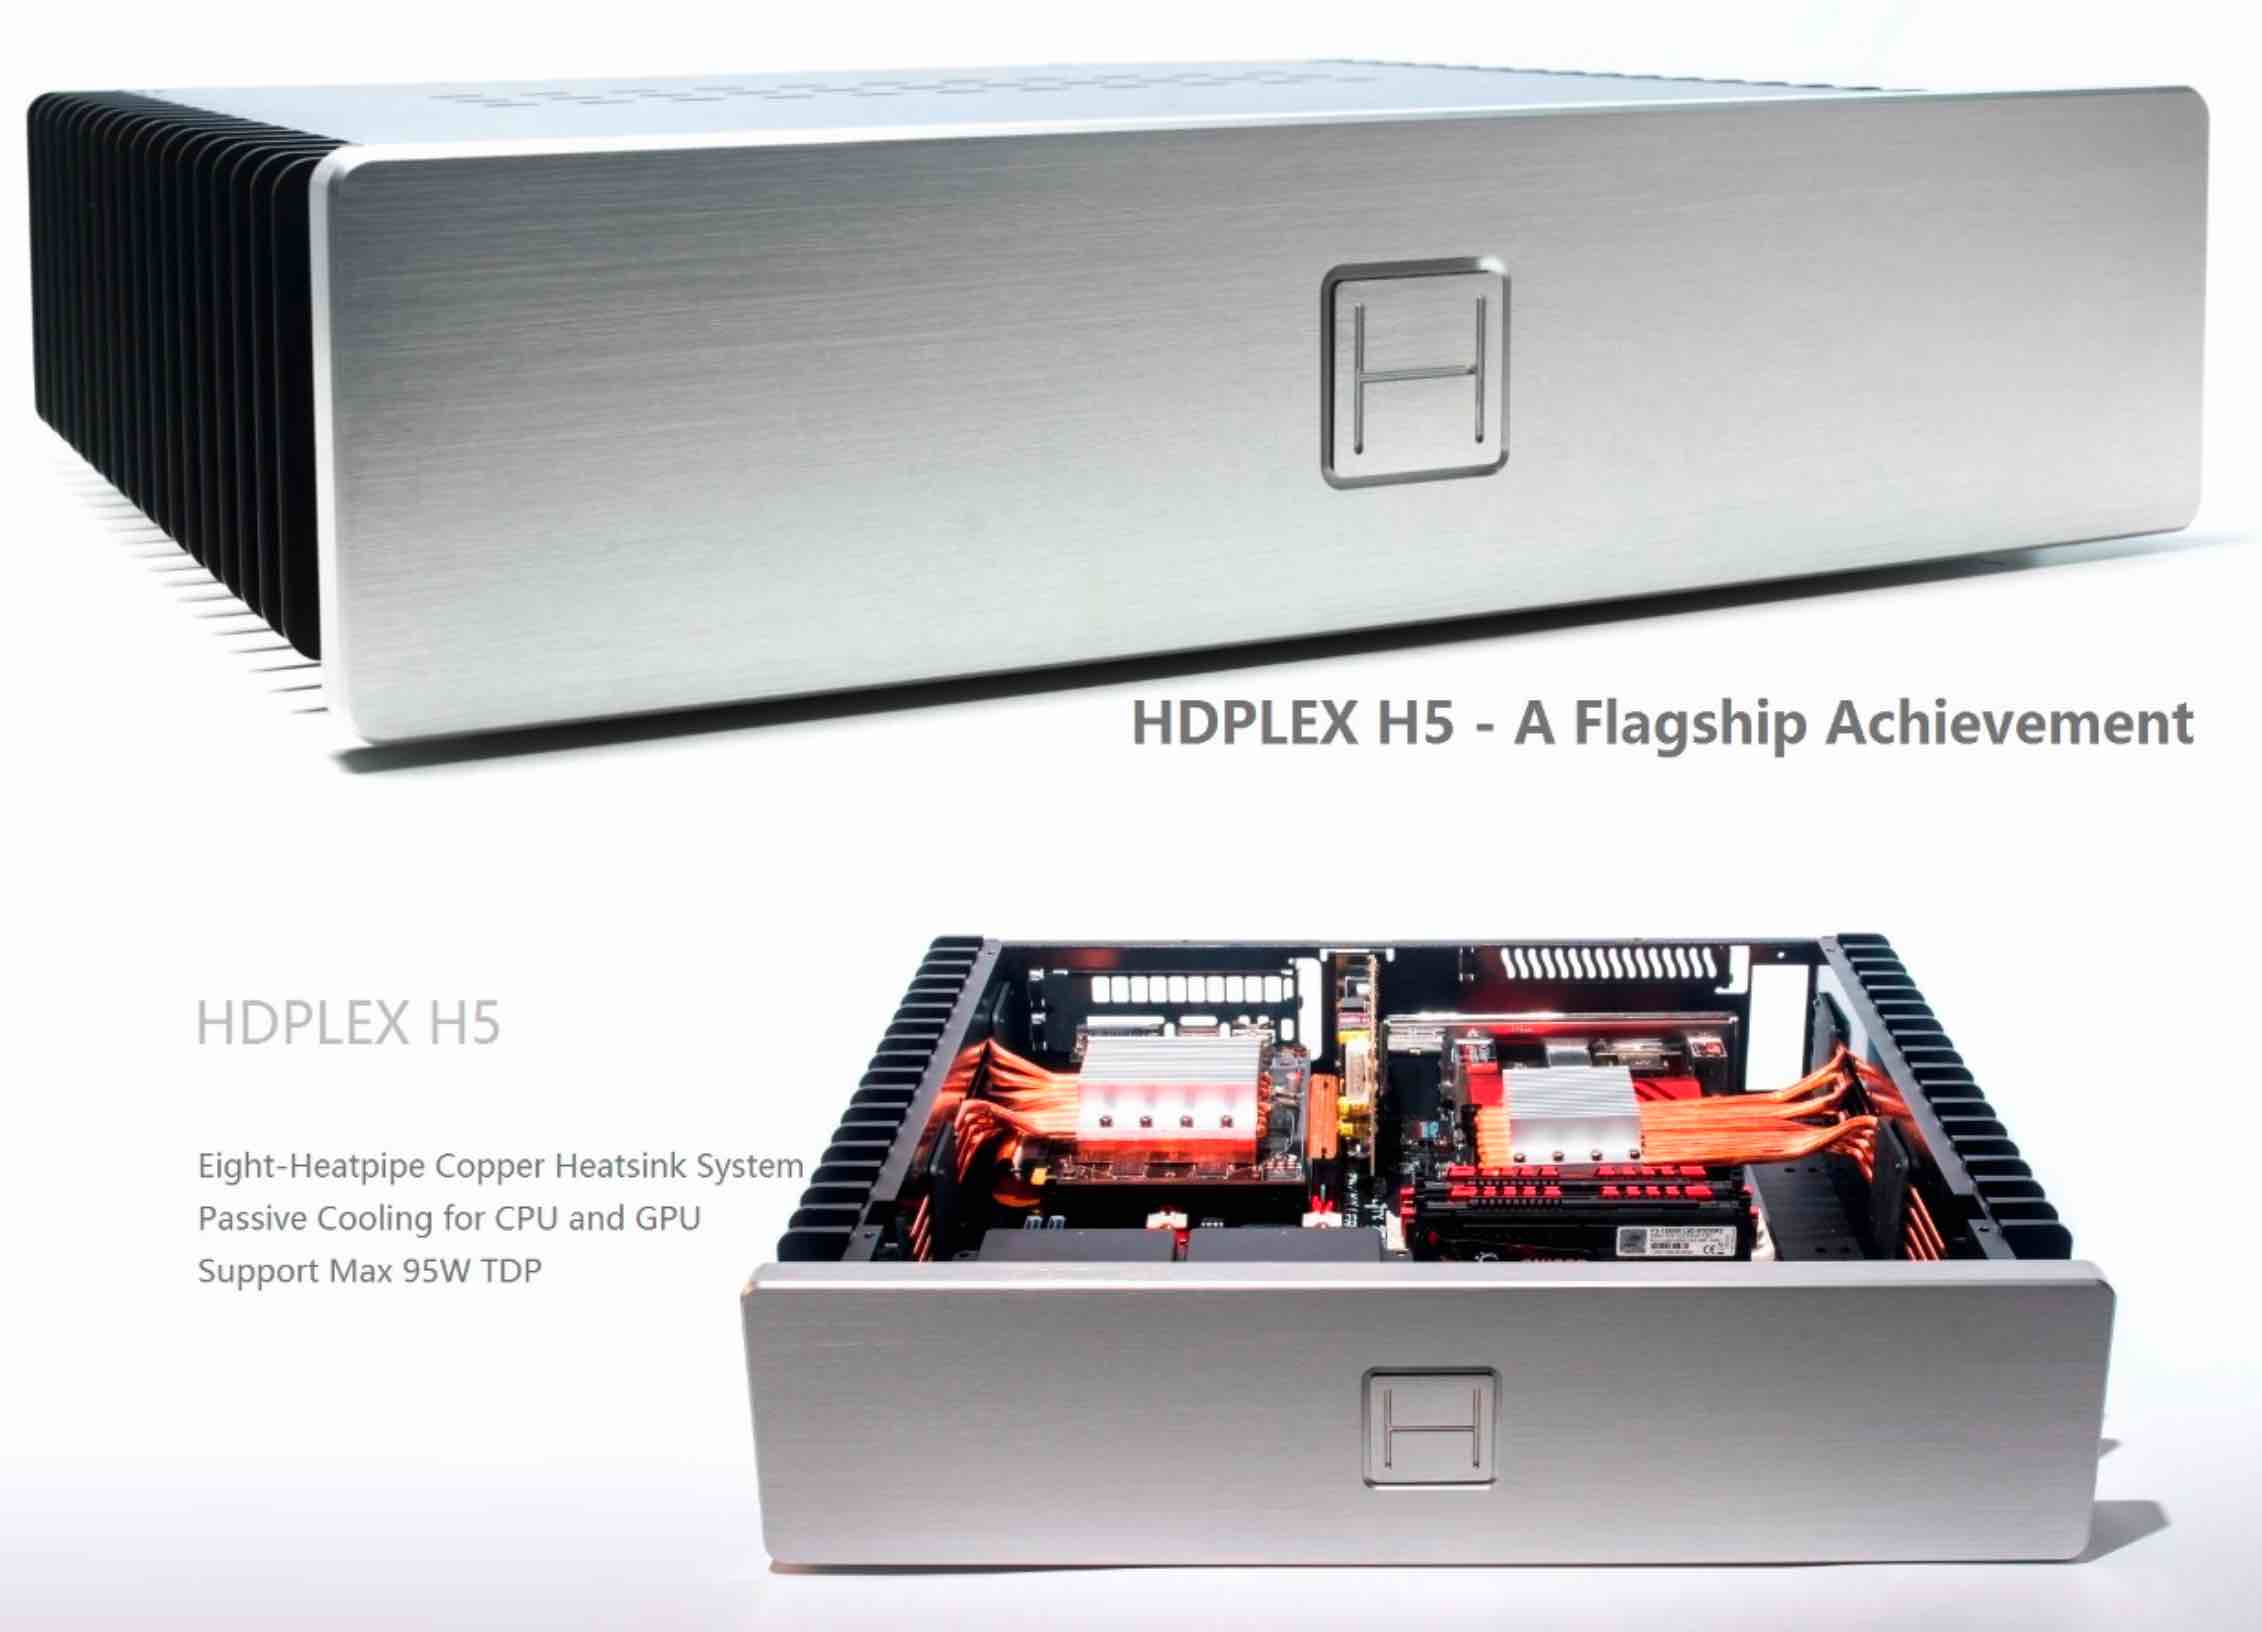
Currently, HDPLEX's flagship fanless case is the H5 2nd Generation Fanless Chassis, which took two years of design and modifications to bring it to market.
Featuring eight copper heat pipes, "it is a true milestone in our company history," HDPLEX.com says, "as this product combines minimalism, internal power supply, and copper based heatsink system into one fantastic package. It is the fruit of accumulated experience and ongoing refinement; because it has a number of features differentiating it among its competitors, the 2nd Gen quickly becomes one of the company's bestsellers. Upon its release, the H5 2nd Gen with 16 heat-pipe solution has gained immediate coverage from quite a few leading media outlets in the CE industry."
In order to meet the growing consumer market demand for high powered fanless PC cases and accommodate those who use PCs for high end audio playback, they introduced their 250W HiFi DC-ATX linear power supply in 2014.
"The NanoATX Power Supply is an internal AC-DC adapter + DC-ATX converter combination, which is fully ATX compliant," says their site. "Such combination is compact, fan-less yet rather powerful, replacing bulky and loud ATX/SFX power supply for small form factor PC. Our NanoATX Power Supply has enjoyed tremendous popularity in many SFF PC projects, such as the NFC S4."
Their first power supply was their 120W AC-DC and 160W DC-ATX combo that was released in 2013.
Constantly improving the design, circuit, and components, they produced the 300W HiFi DC-ATX in late 2016. Then in 2017, they replaced it with a monster-sized 400W HiFi DC-ATX, "thus permanently eliminated the coil whine that is unable to handle peak 12V current. (Read more HERE.)
Freeing the NUC from Its Case
What follows are some highlights and observations on retrieving the motherboard from the NUC's case (this section originally appeared in my Akasa review and, if you've already extracted the motherboard, you can skip it).
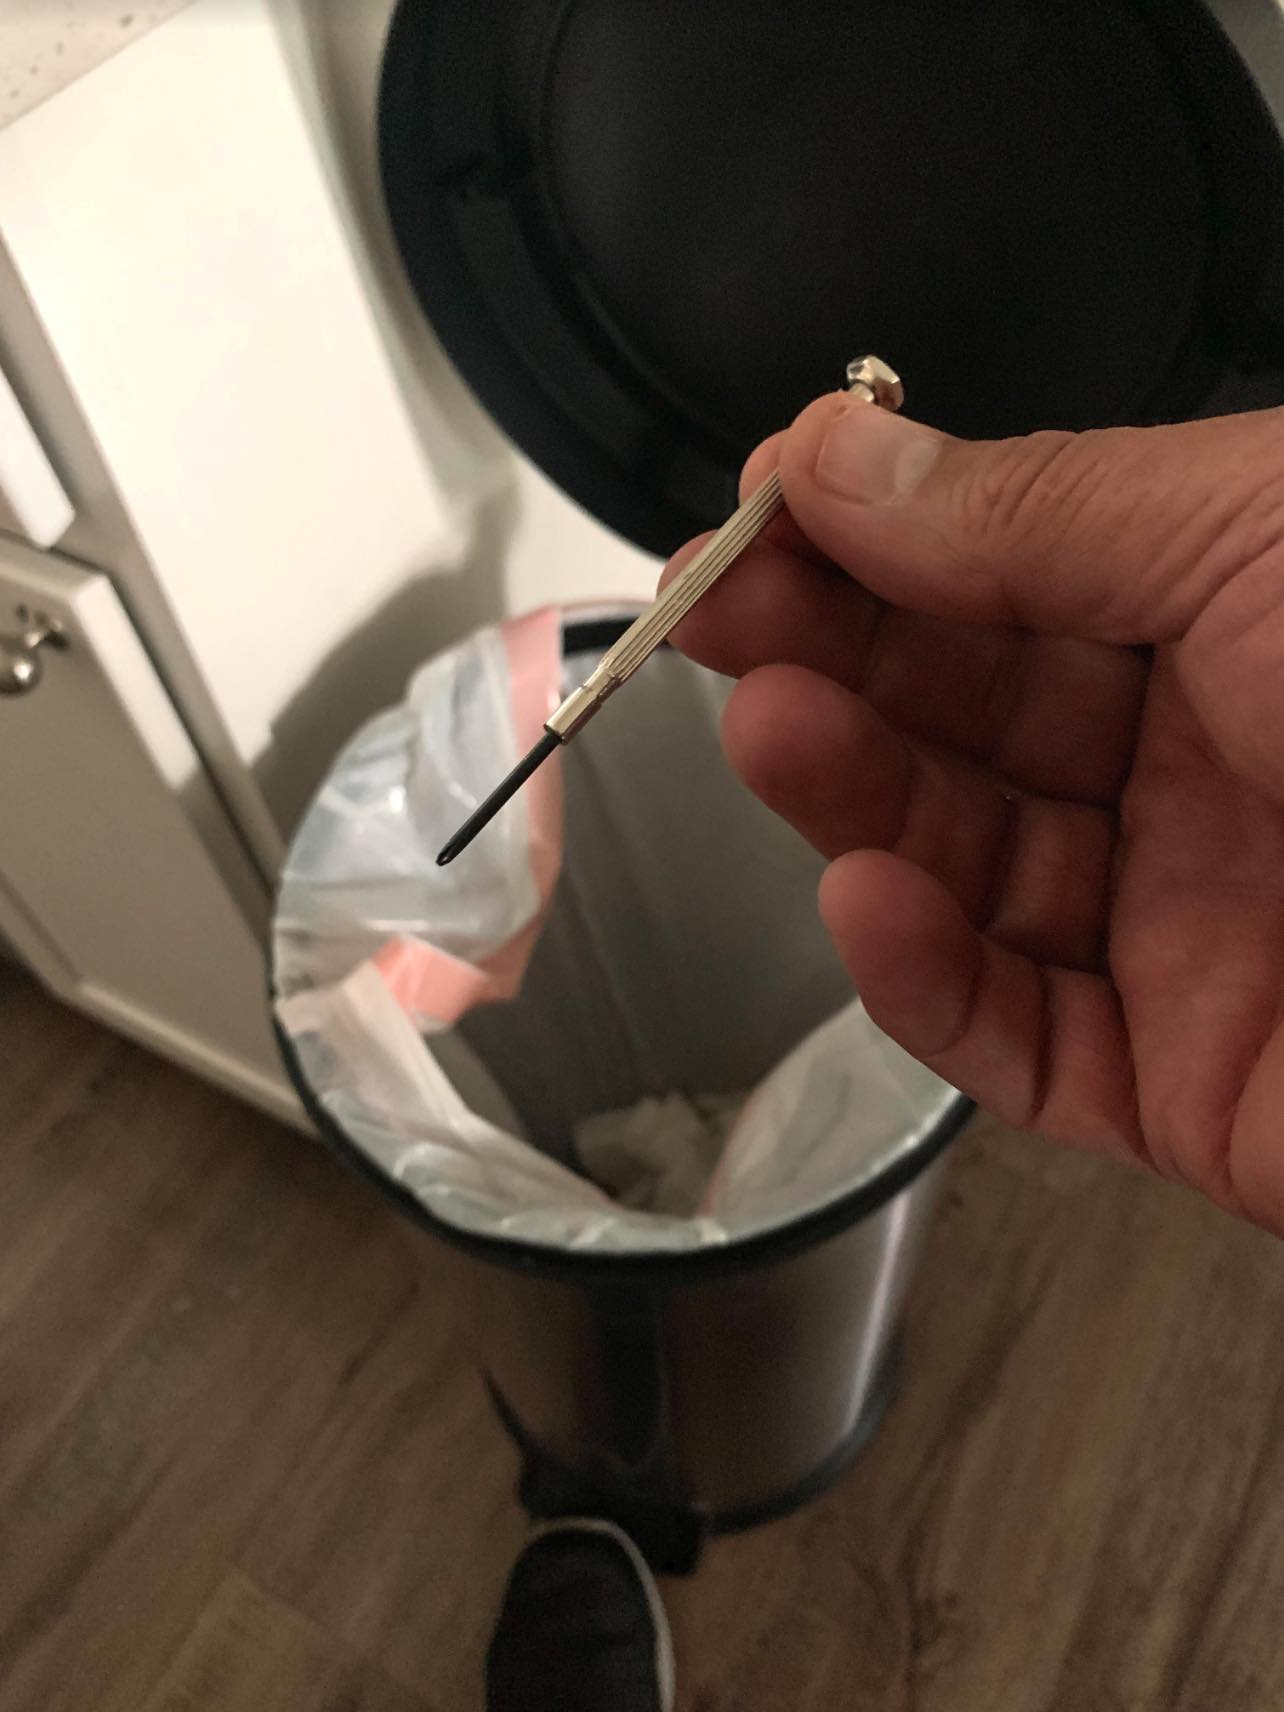
Tip Number One: When attempting to extract the motherboard from the NUC's case, don't use a jeweler's screwdriver to remove the tiny screws holding it in place. It won't work, and you will get aggravated! Apparently, its assemblers use Loctite, an adhesive applied to their threading in drops that harden to a plastic, locking the threads together to keep them from loosening. And after I repeatedly held a heated soldering iron to the head of one of these recalcitrant screws and failed to budge it (a YouTuber suggested it to melt and release the Loctite) I called my computer programmer, industry, and audio friend, Joe Jurzec, and asked for help.
"What you need is a larger screwdriver so you can really bear down and torque on it," he assured me.
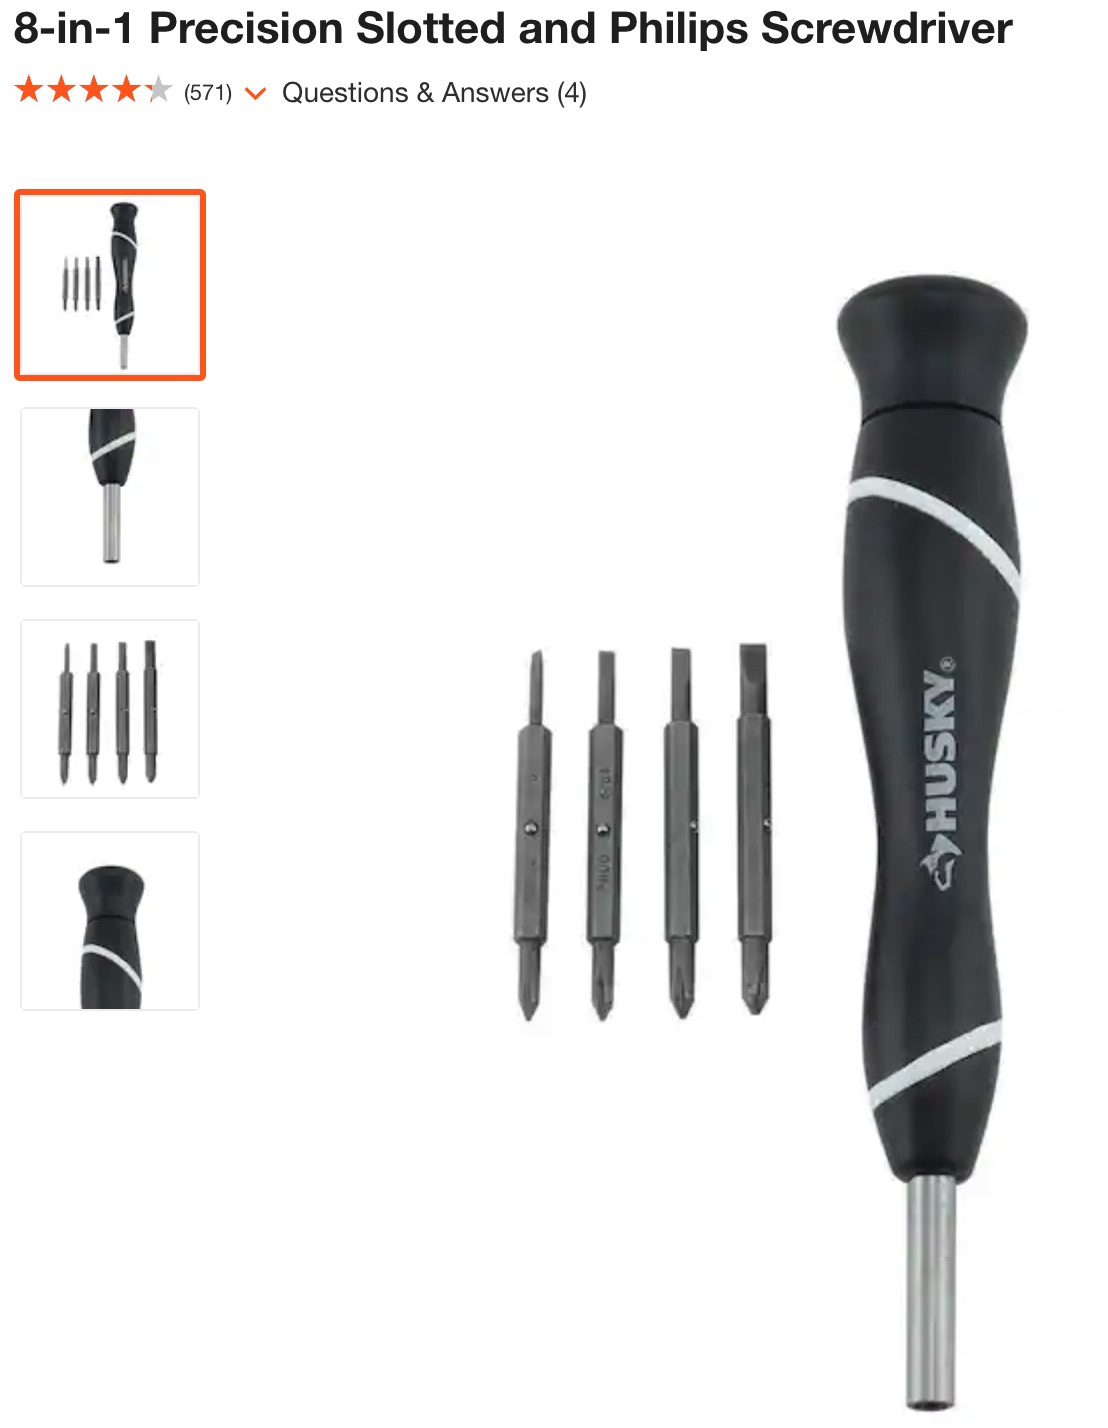
Image courtesy of homedepot.com
Tip Number Two: Use a larger precision screwdriver instead. Grabbing the jeweler's screwdriver for reference in regards to head size, I drove to a local Home Depot store and purchased a Husky "8 in 1 Precision Slotted and Phillips Screwdriver" for $8.97 plus tax. Use that and you'll feel as if you've been suddenly imbued with the strength of Hercules as, one after the other, the tiny screws turn with a little effort!
Tip Three: Play it safe and use an anti-static wrist strap. While scouring YouTube for tips, I also took heed to a suggestion that popped up several places and purchased an anti-static wrist strap with a grounding wire and alligator clip for little over seven bucks at a local Best Buy store, as apparently the risk of a static charge zap to your internal storage card is very real. Having spent several long hours installing the Roon Optimized Core Kit (ROCK) linux program to run my NUC server, I would hate to lose it due to an errant static electricity zap!

Tip Four: Use a disposable plastic knife as a handy substitute if you don't have a proper plastic pry tool. After removing the securing screws, the use of a plastic pry tool was called for to help remove the motherboard from the NUC case. I didn't have one, didn't want to drive to a hardware store or order one online—and I certainly didn't want to risk bending or damaging one of my ports with a steel screwdriver—so I grabbed a spare disposable plastic knife from our kitchen cupboard, and following YouTube instructions, after unplugging several connectors, I slipped it in between the HDMI connector in its port and the frame, pushed and leveraged the motherboard upwards and out. It took some finagling, and at one point, I carefully inserted a small screwdriver through one of the slots in the chassis and pushed it out so I could grasp the board and pull it out.
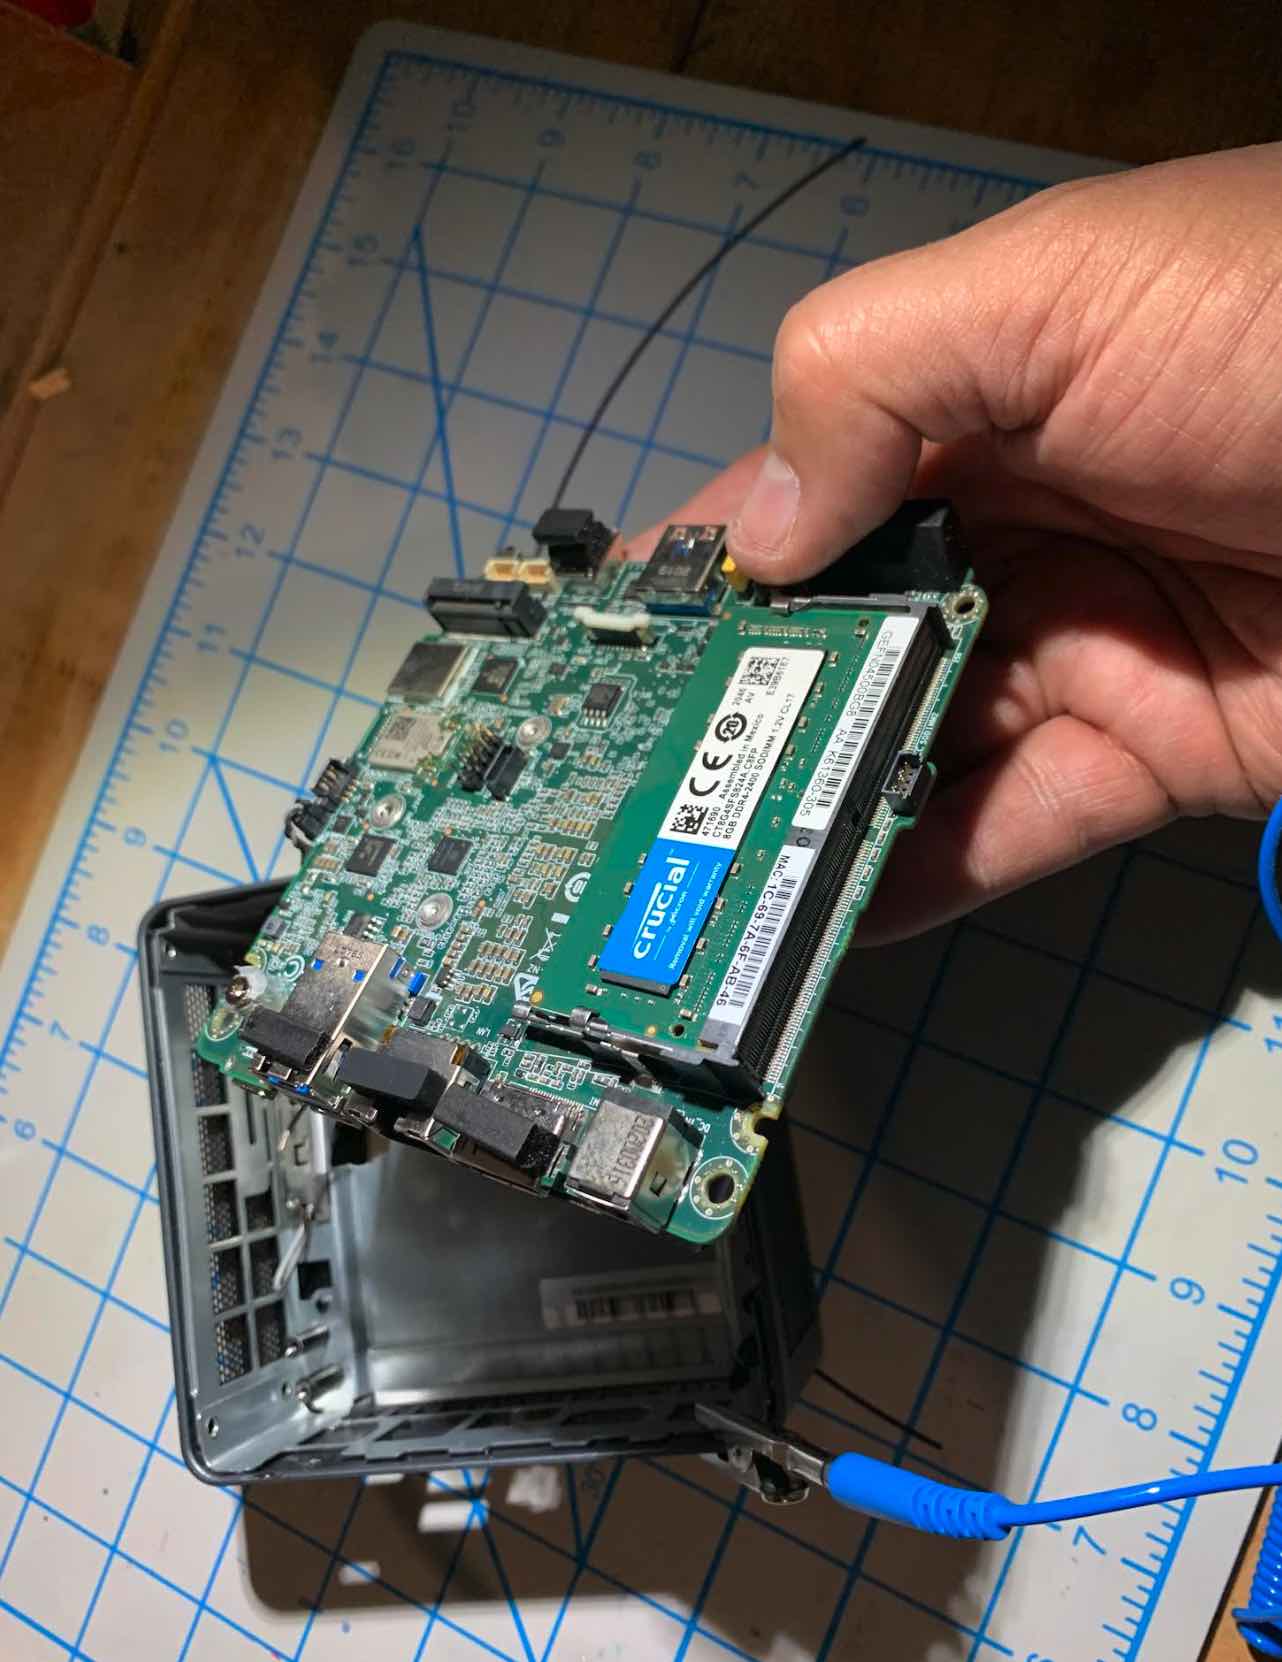
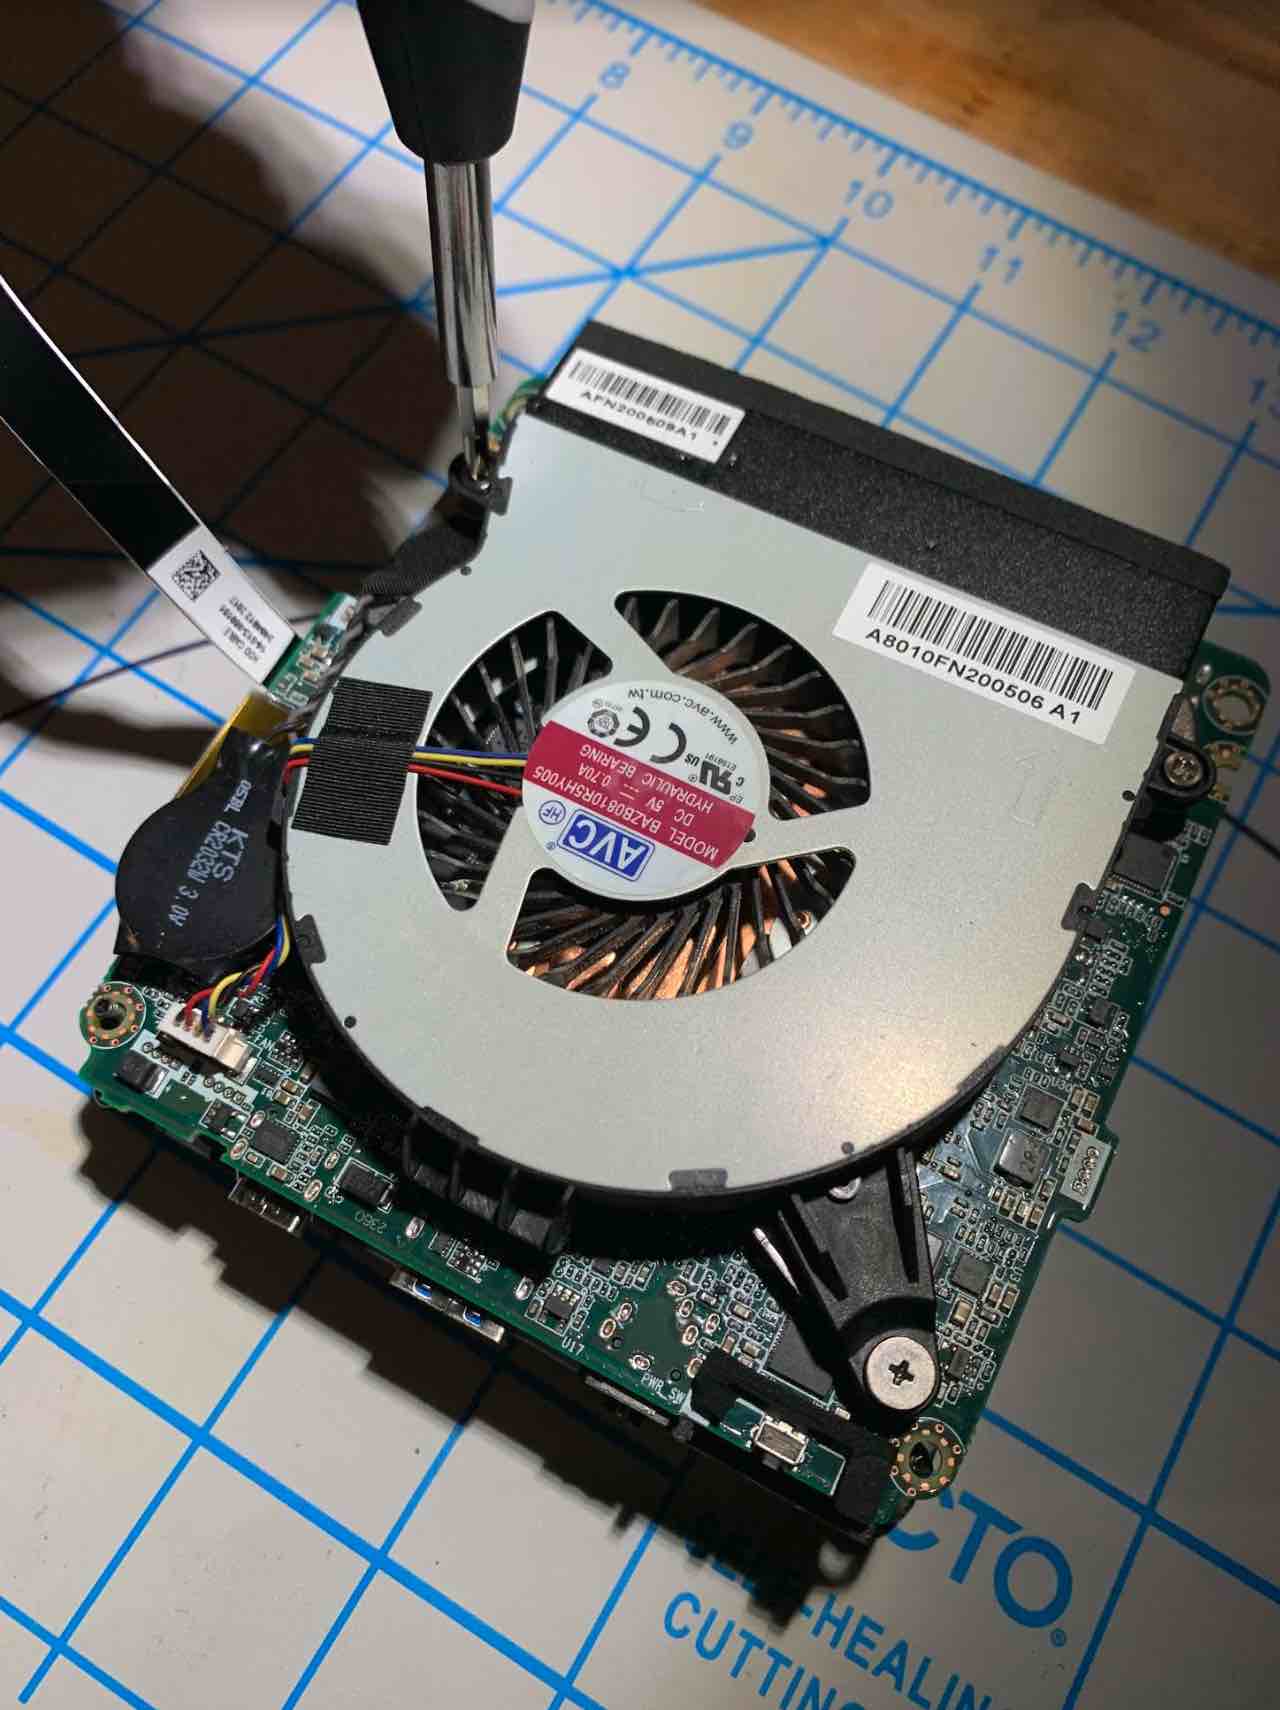
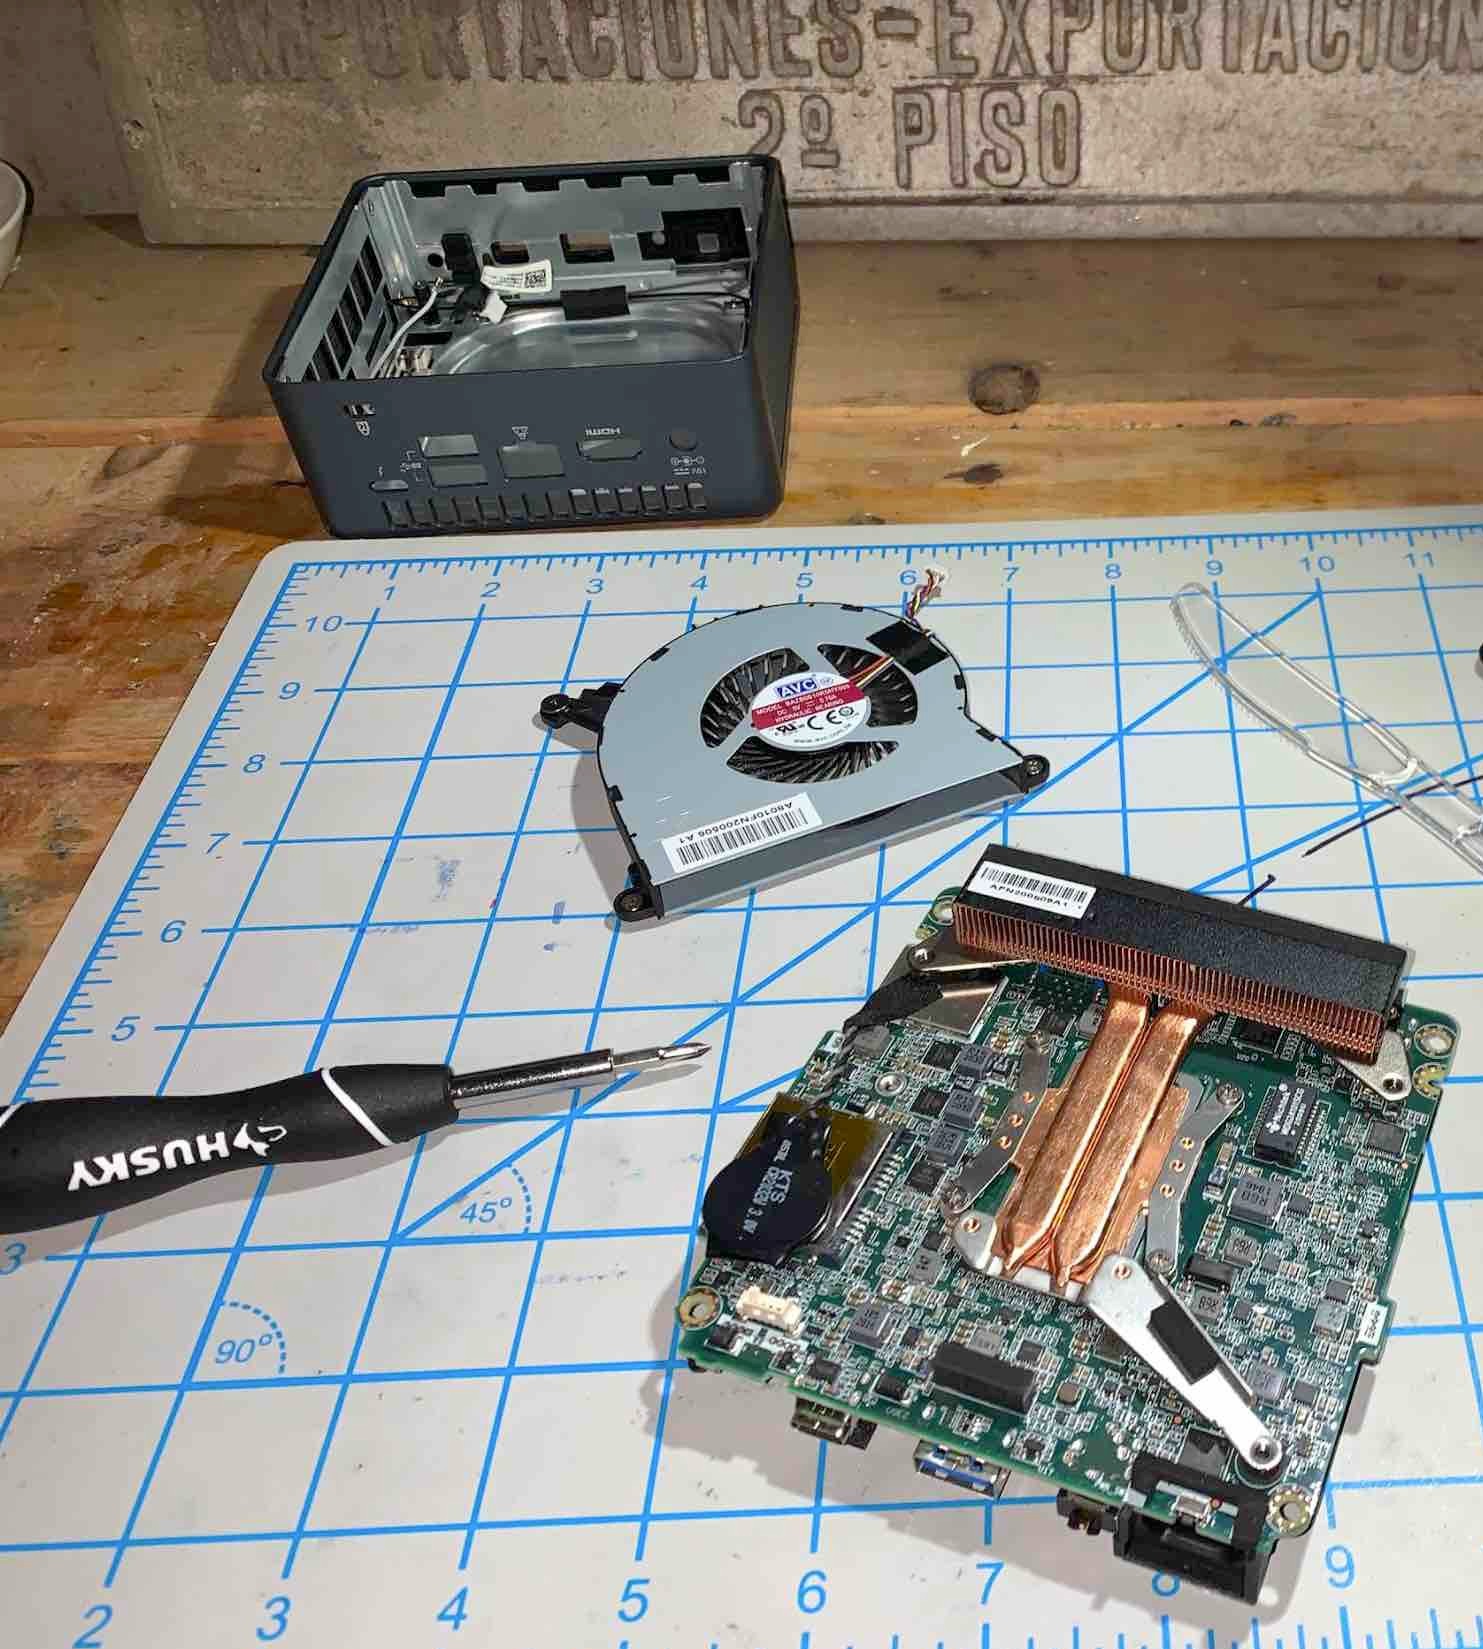
To my surprise, removing the fan wasn't particularly hard after I freed the motherboard from the NUC's chassis.
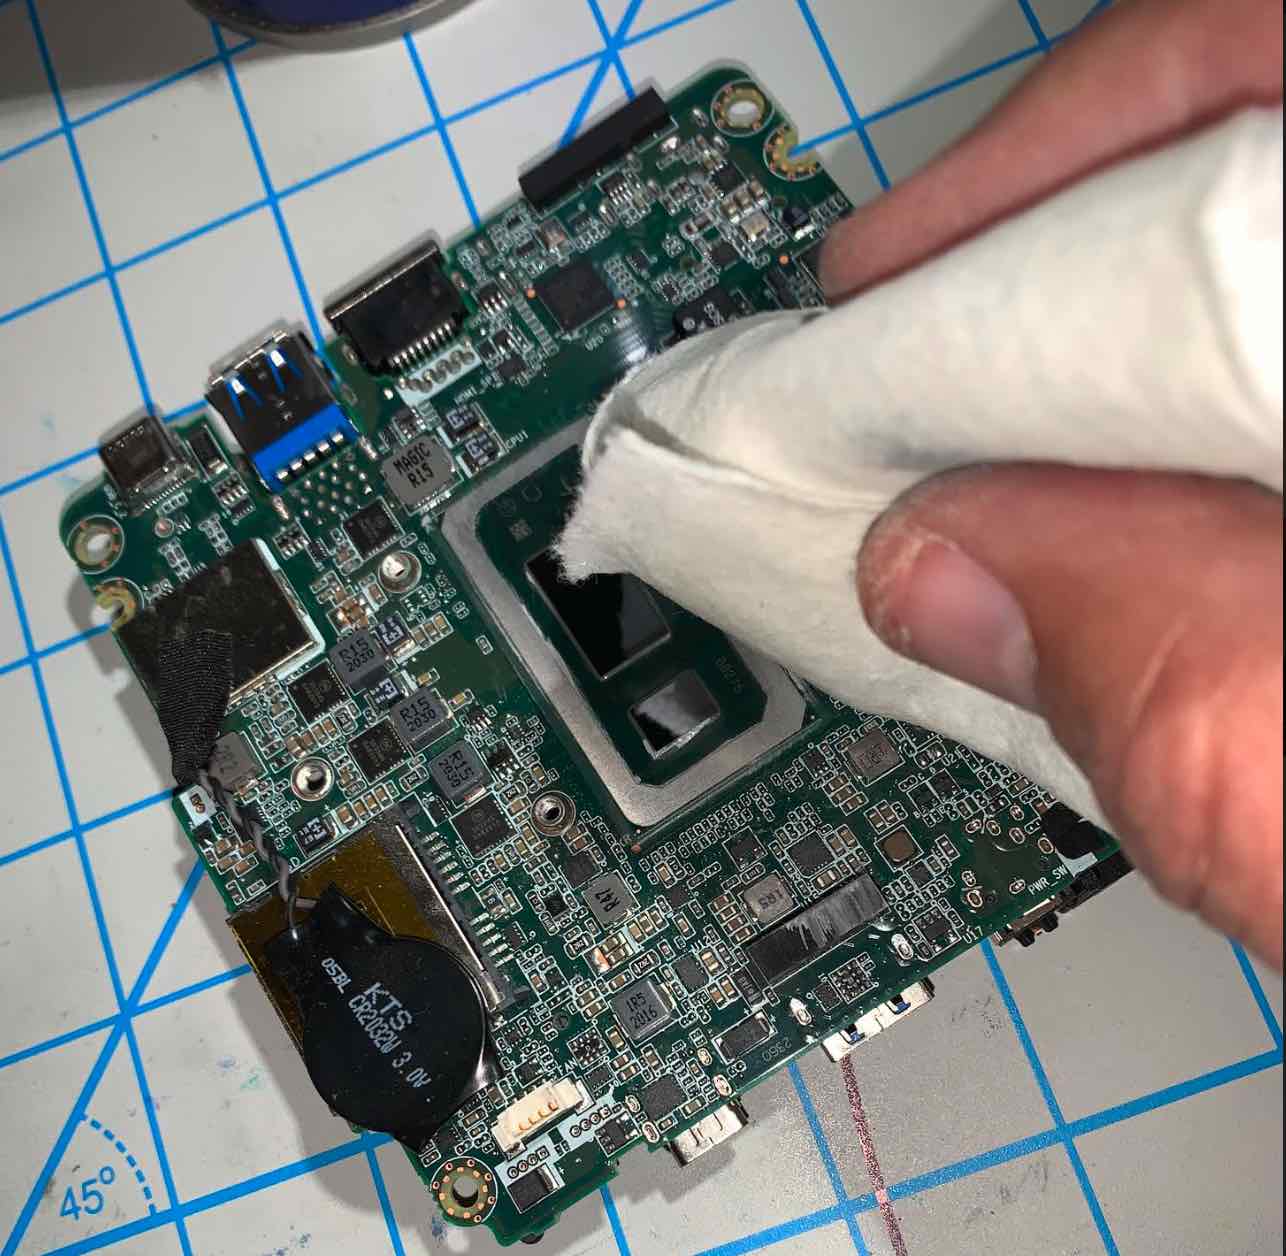
I applied some contact cleaner onto a paper towel and used that to wipe off and remove the old thermal paste from the CPU lid (isopropyl alcohol is recommended) and let it dry before moving on.

Building and Birth Pains
There are online instructions for both the H1 V3 fanless case (HERE) and the NUC Kit (HERE), and due to their brochure sized printed versions, I regularly access their online PDFs, where I can zoom in closer for a better look at the illustrations.
Comparing notes from both instruction sets, taking stock and inventory of all the parts, large and small, I deduce that I should begin attaching the feet to the bottom of the chassis, followed by the power button on the front plate (see the screenshot above).
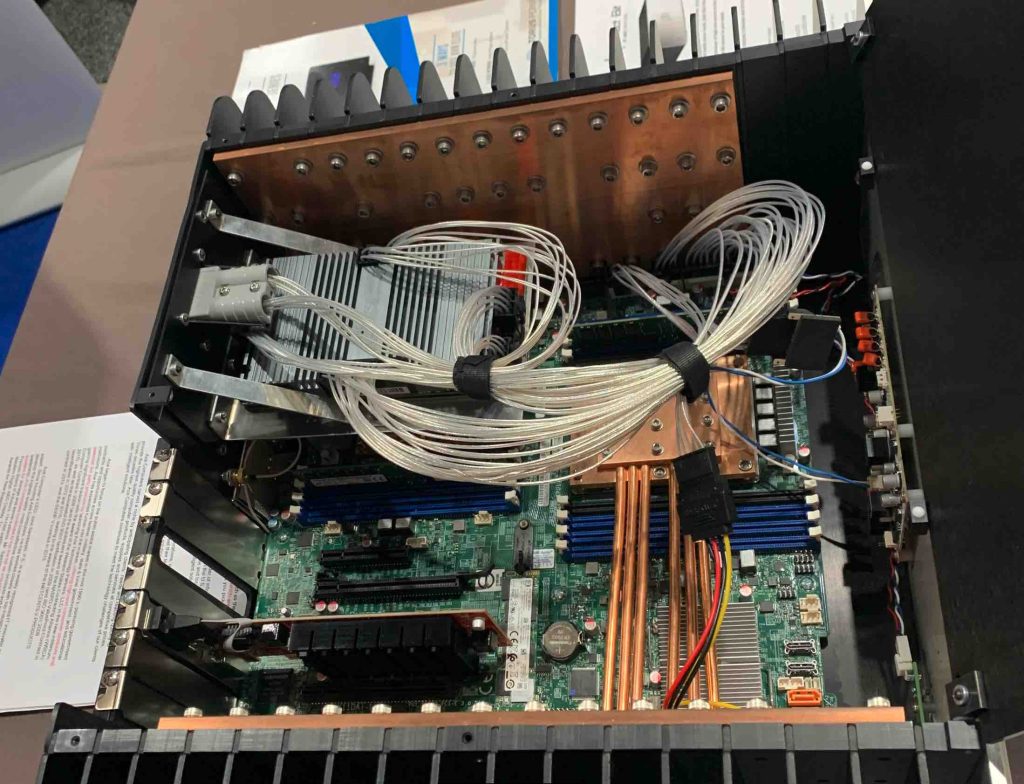
I assemble the larger heat sink that comes with the H1 V3, attaching the H5 rack before realizing that I won't need that; there's a separate heat sink and assembly that comes with the NUC Kit, so I set that aside and segue to the NUC Kit instruction guide. Picking up there, I attach a USB 3.0 cable to the proper NUC I/O plate using M3*8mm screws from the H1 case set, which is tricky, as there are several I/O plates—each specifically tailored to the rear HDMI and USB configurations of different NUC motherboards—so this takes some time, as I must hold several of the plates up to my NUC's motherboard to get the correct one (and then I screw the USB 3.0 onto the wrong side, so I must redo it).
I also mount a six pin Molex female to 5.5/2.5mm DC jack to the I/O plate for an optional 80W/2000W AC-DC power supply that I don't have (or use)—because, disclaimer aside, it was there in the instructions and I didn't want to regret not putting it there down the line. I also determine that, despite not being mentioned in the instructions (it's inferred a few steps later), I must attach a USB 2.0 cable to the I/O plate, and eventually do so.
As per instructions, I attach the I/O backplate to the internal side of the larger backplate, which is also confusing, as it's not inherently clear, nor demarcated, which side is the interior versus the exterior. I figure this out after a false start or two and attach a dust screen (dust cover bracket). I attach four copper studs to the H1's bottom plate onto which I will be mounting the motherboard. I am gaining momentum.
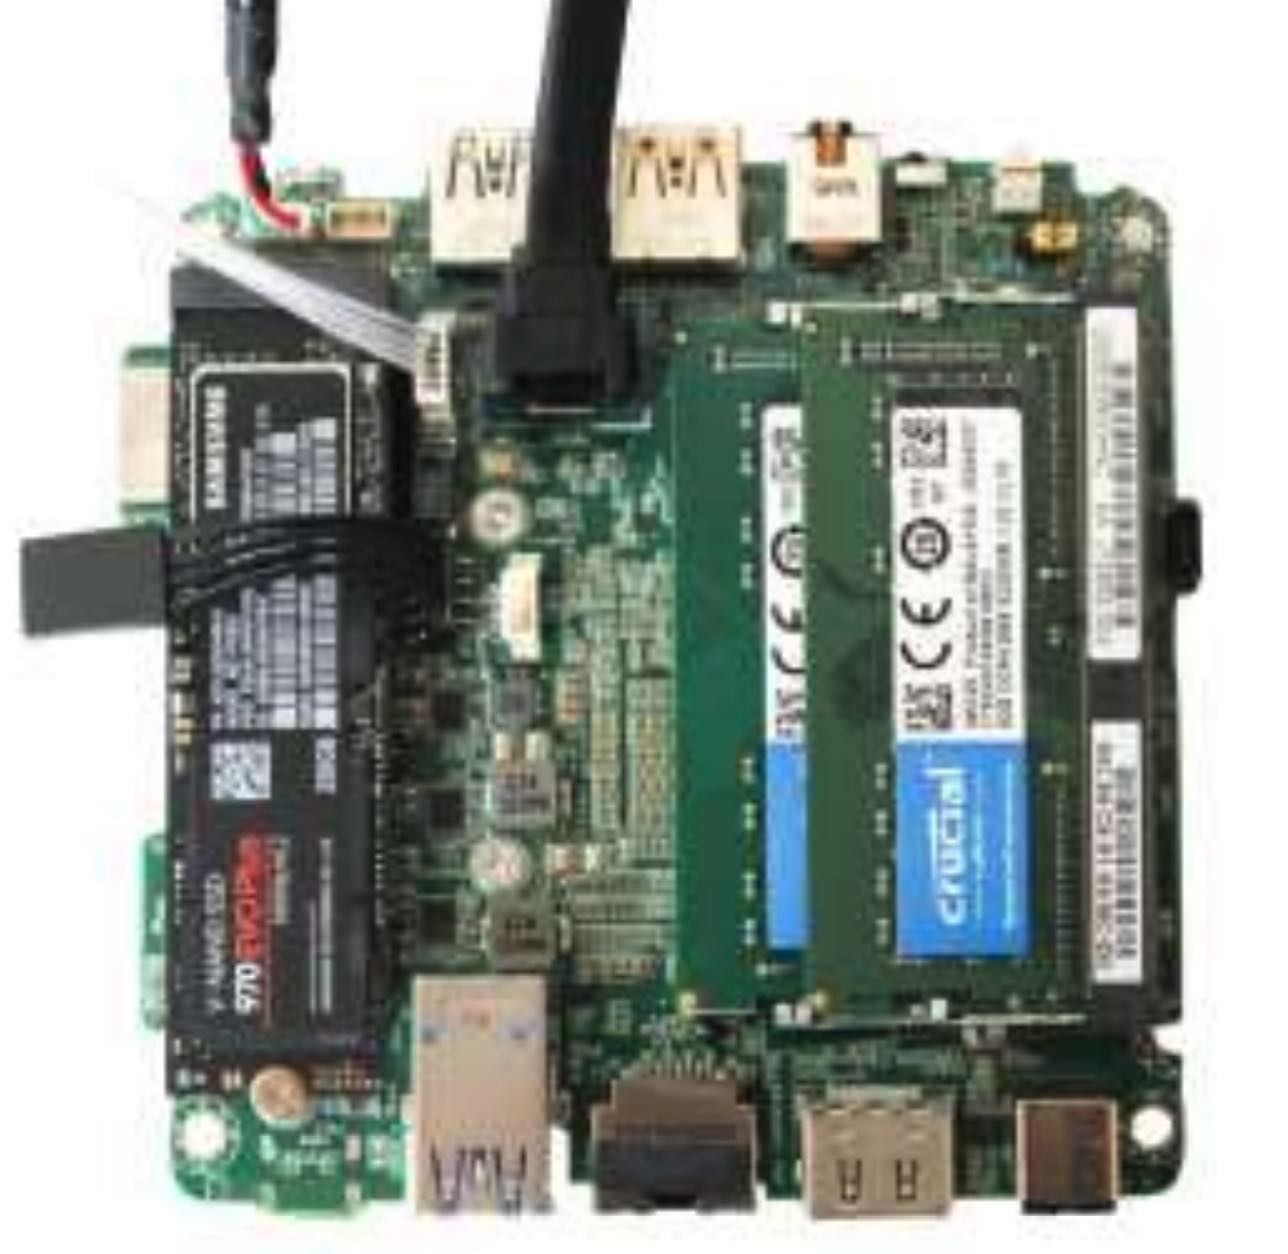
I get confused with the following instruction: "Plug the 2.53mm to 2mm pitch front header adapter to the NUC front panel for PWR and PWR LED," and my eyes strain at discerning the detail of the illustrations. Thankfully, I locate the online PDF of the instructions and am able to zoom in closer. I locate and plug it into the proper slot, then get confused again when it says to "install the USB 2.0 cable in either one of the USB 2.0 1.25mm pitch header."

Where is the USB 2.0 pitch header, I wonder. Screwing up my face, I scrutinize the tiny illustration. I scour the internet in a panic and reach out to Larry at HDPLEX. Calmed down, I recognize the tiny plug at the upper left hand side of the motherboard in their photo illustration and connect the USB 2.0 wire to its pitch header receptacle.
Taking stock of the corresponding photos in the directions, I locate the proper screws via trial and error, and secure the HDPLEX case's side panels (it's not explicitly spelled out in the directions, but inferred). Then, I install the motherboard to the four copper studs with the appropriate screws and plug the USB 3.0 cable into a 3.0 port at the motherboard's front.
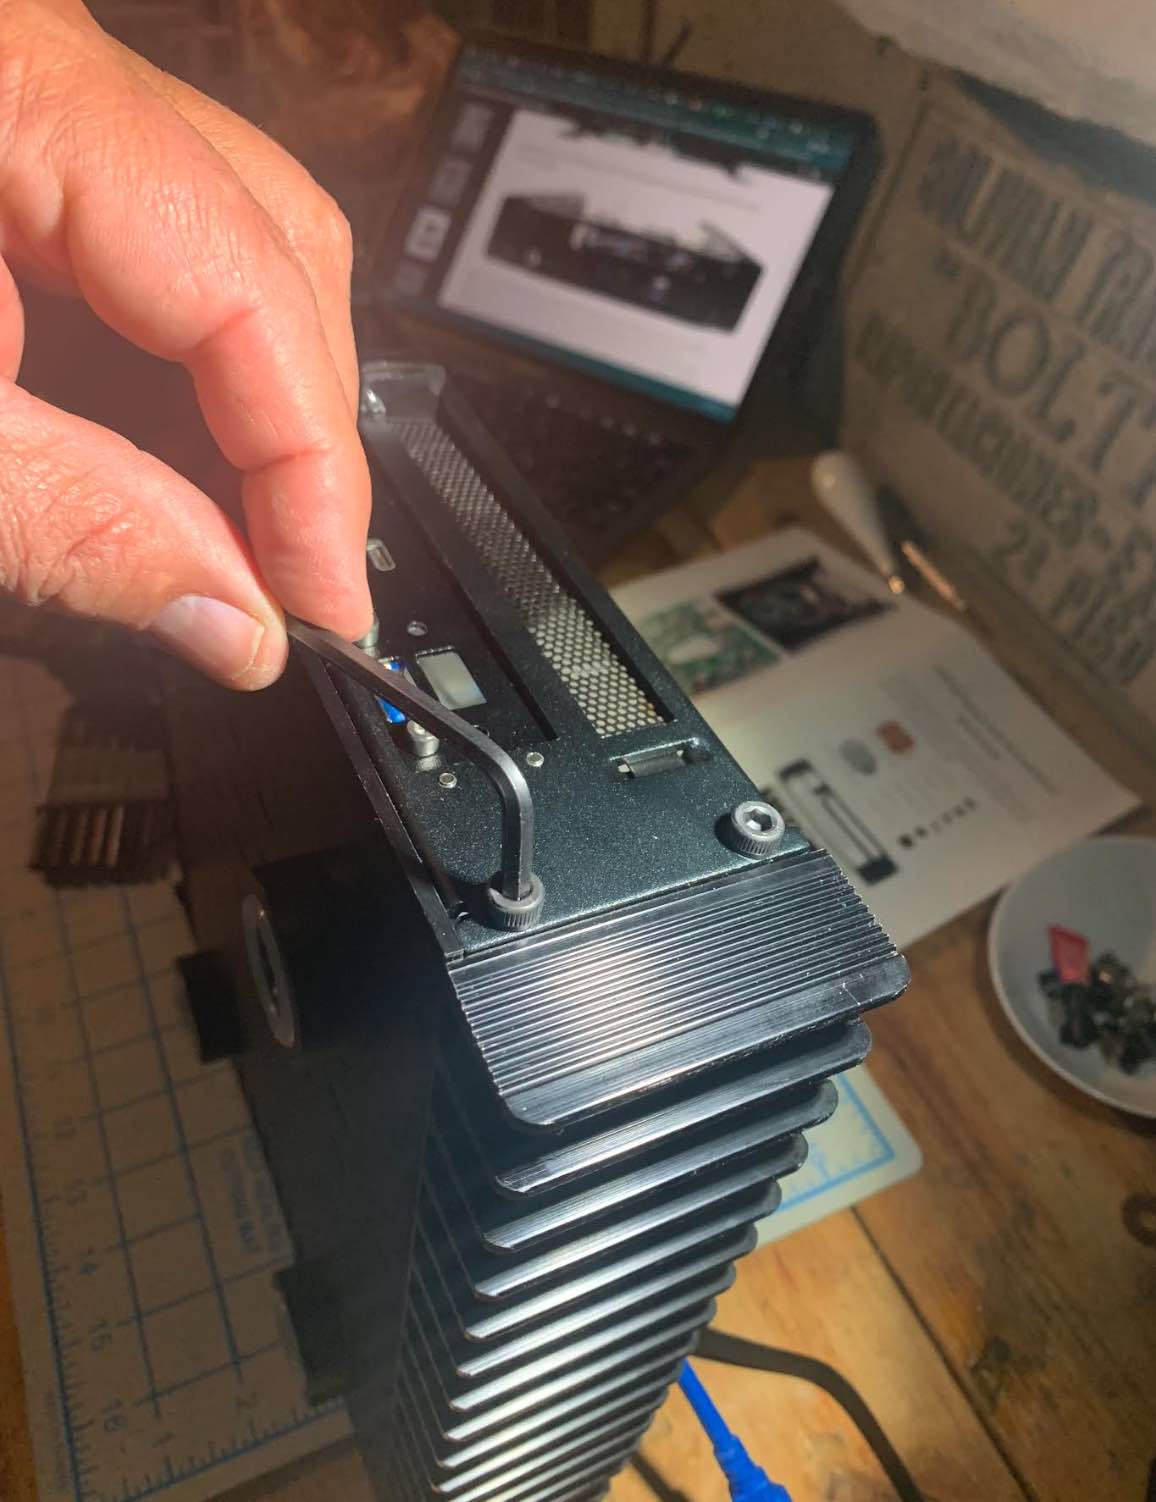
Then, as the directions state, I install the backplate to the H1 two side panels using four "M5 CUP Head HEX screws" and use a metric Allen Key wrench to tighten it securely.
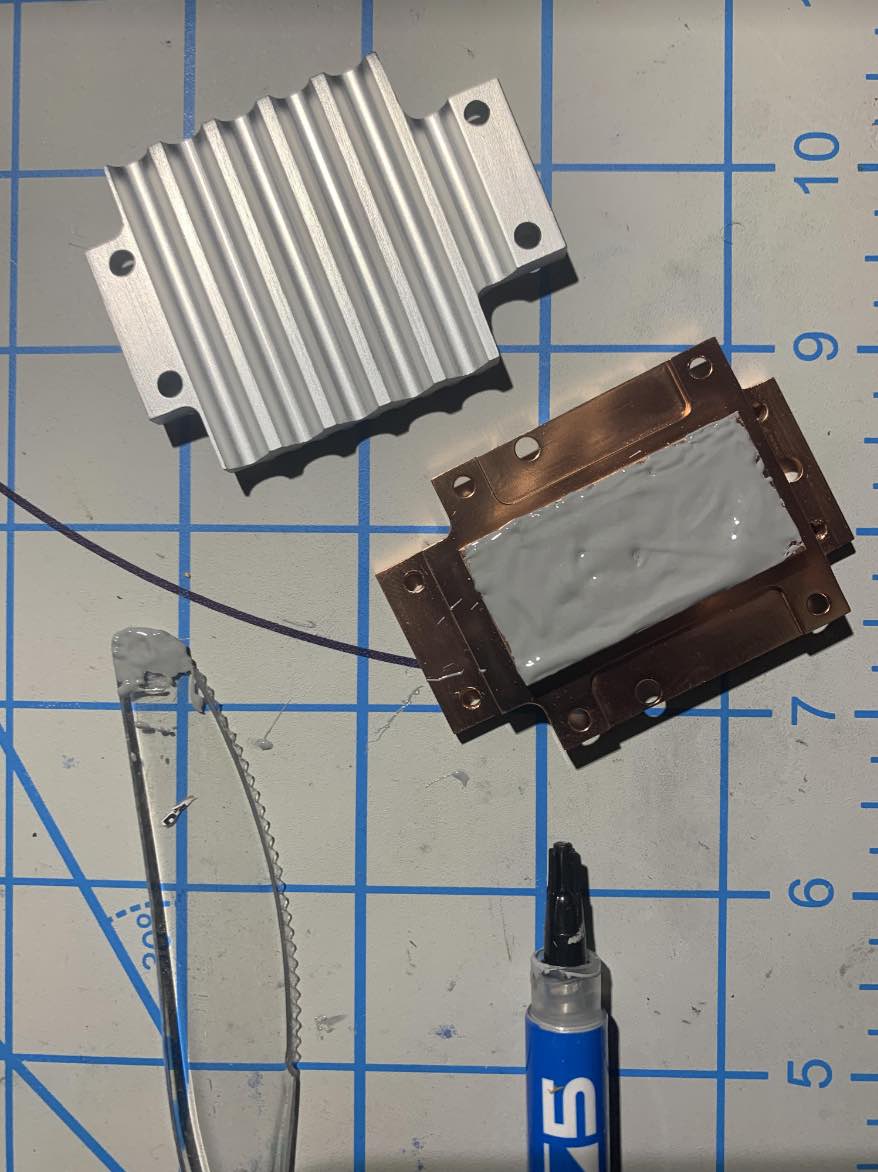
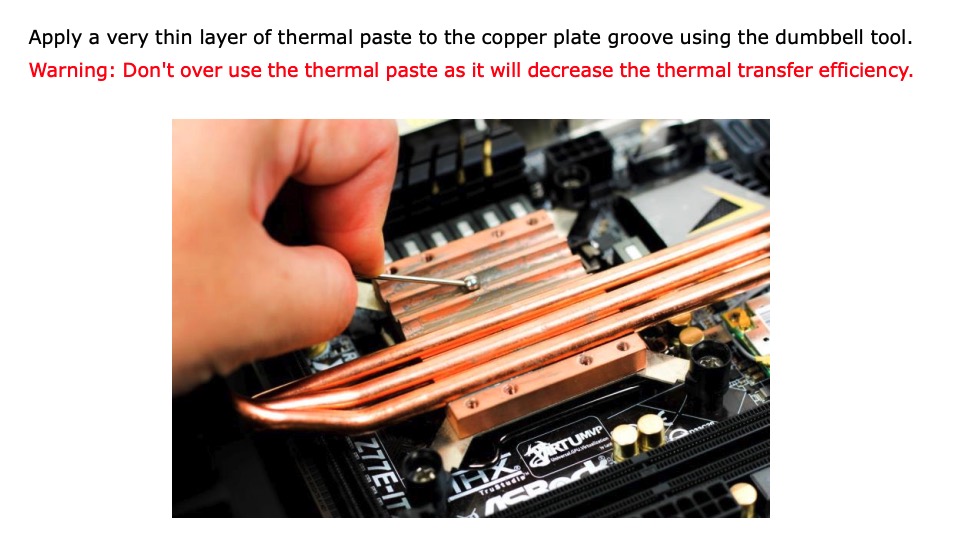
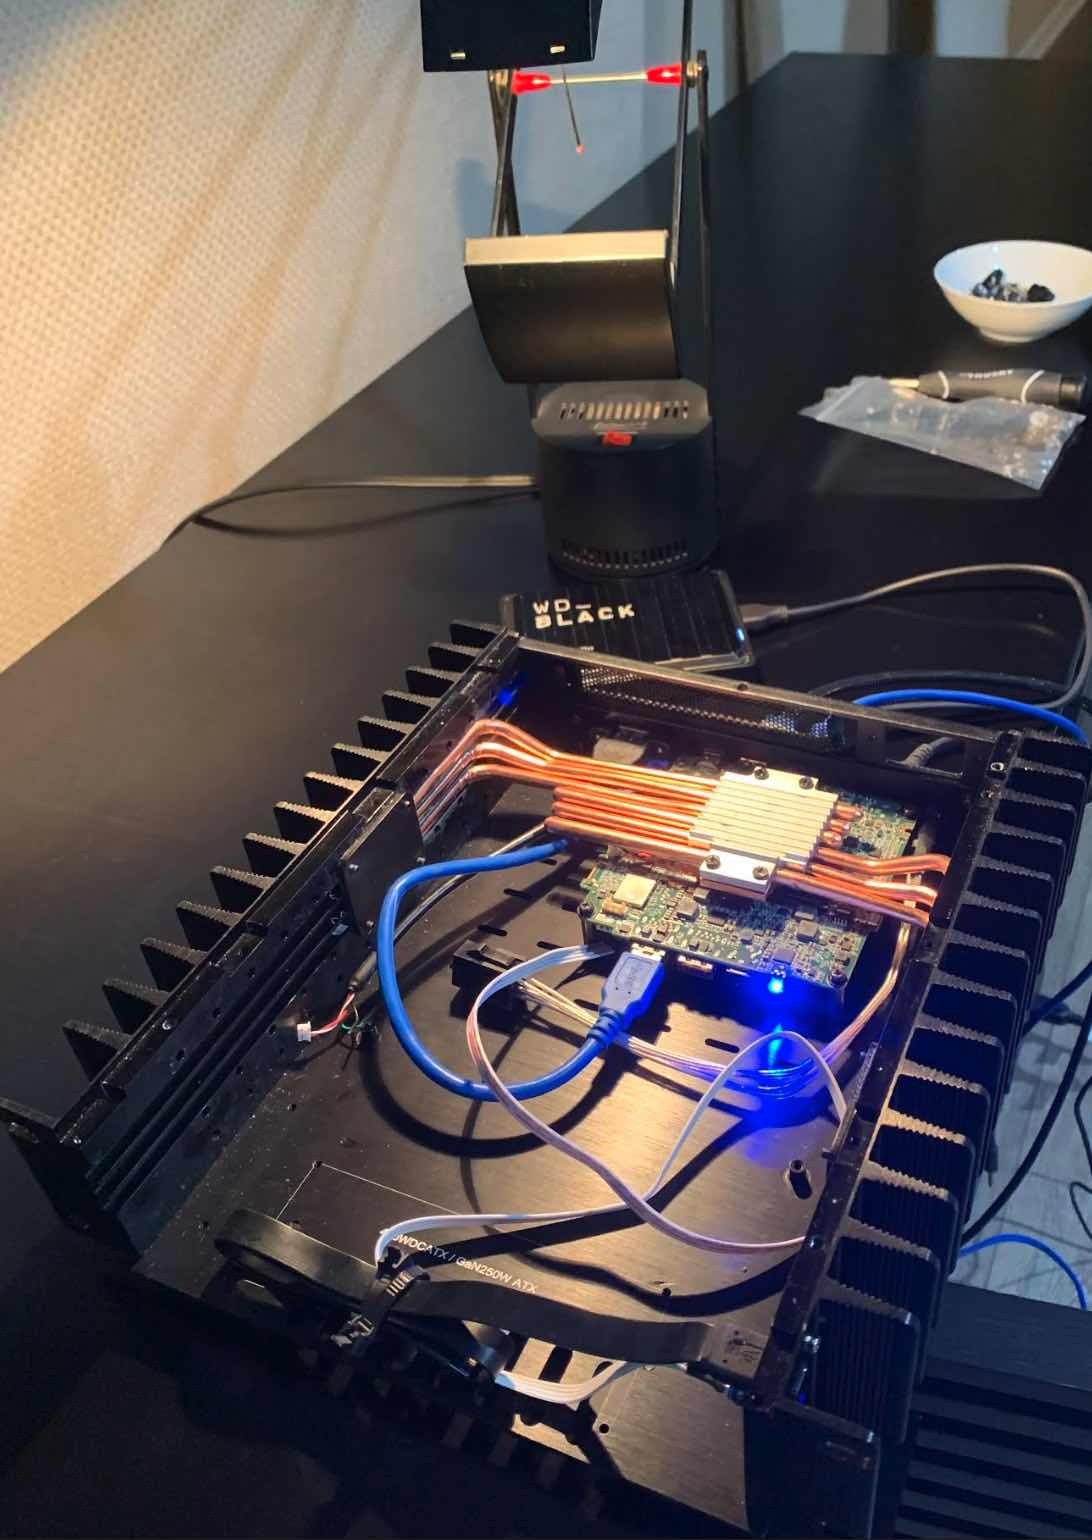
From there, I applied a thin-ish layer of thermal paste to the NUC's CPU top surface (later, I found out my mix was excessive) and the Heatsink's copper base's bottom and secured them with the appropriate screws. I applied more thermal paste to the copper heatsink base's grooves on top where the heat pipes go, as well as the heat pipe grooves on the interior of the sidewalls of the case.
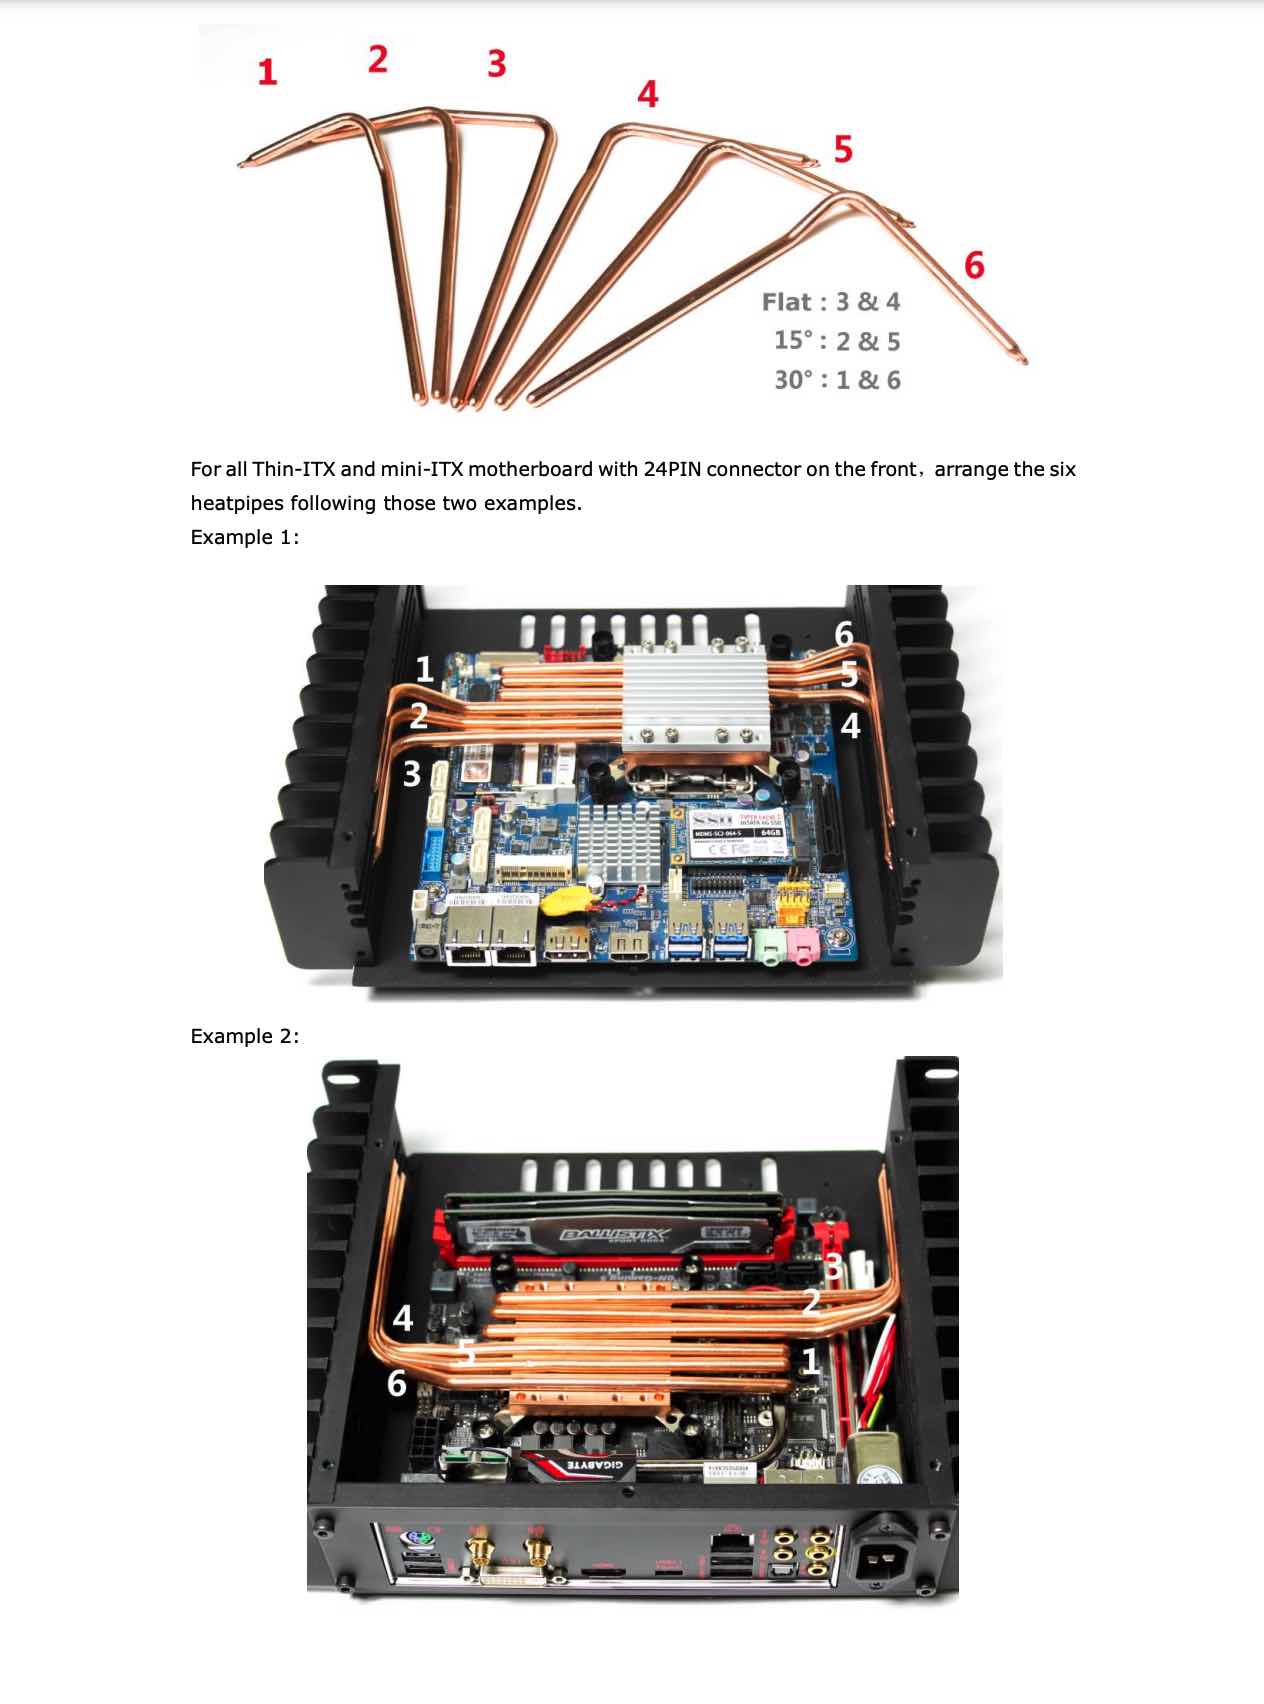
Referring to the H1 V3 instructions, I took note of the the pipes' layout (see screenshot below), carefully laid out them in place, longer sides running across their heatsink grooves, placed them into the sidewall's corresponding runways, then secured them to the sidewalls with thin, metal plates screwed over their ends, and, rummaging through my assortment of screws, found some that seemed and threaded just right and battened down the top portion of the heatsink. Little did I know that I'd soon regret my haste.
Things were looking good as I bolted on the front and end plates. Connecting my power source, USB inputs from my Schiit Audio Yggdrasil DAC and external hard drive, the power light went on, but nothing else happened. I couldn't get Roon to run or connect with my NUC. Moreover, I couldn't access the NUC server from my MacBook Pro over my network via SMB protocol access.
I was horrified.
Measure Twice and John Brunner to the Rescue
In carpentry, there's an axiom that goes, "Measure twice and cut once," suggesting you should double check measurements before cutting lumber to avoid having to cut again and waste time and materials.
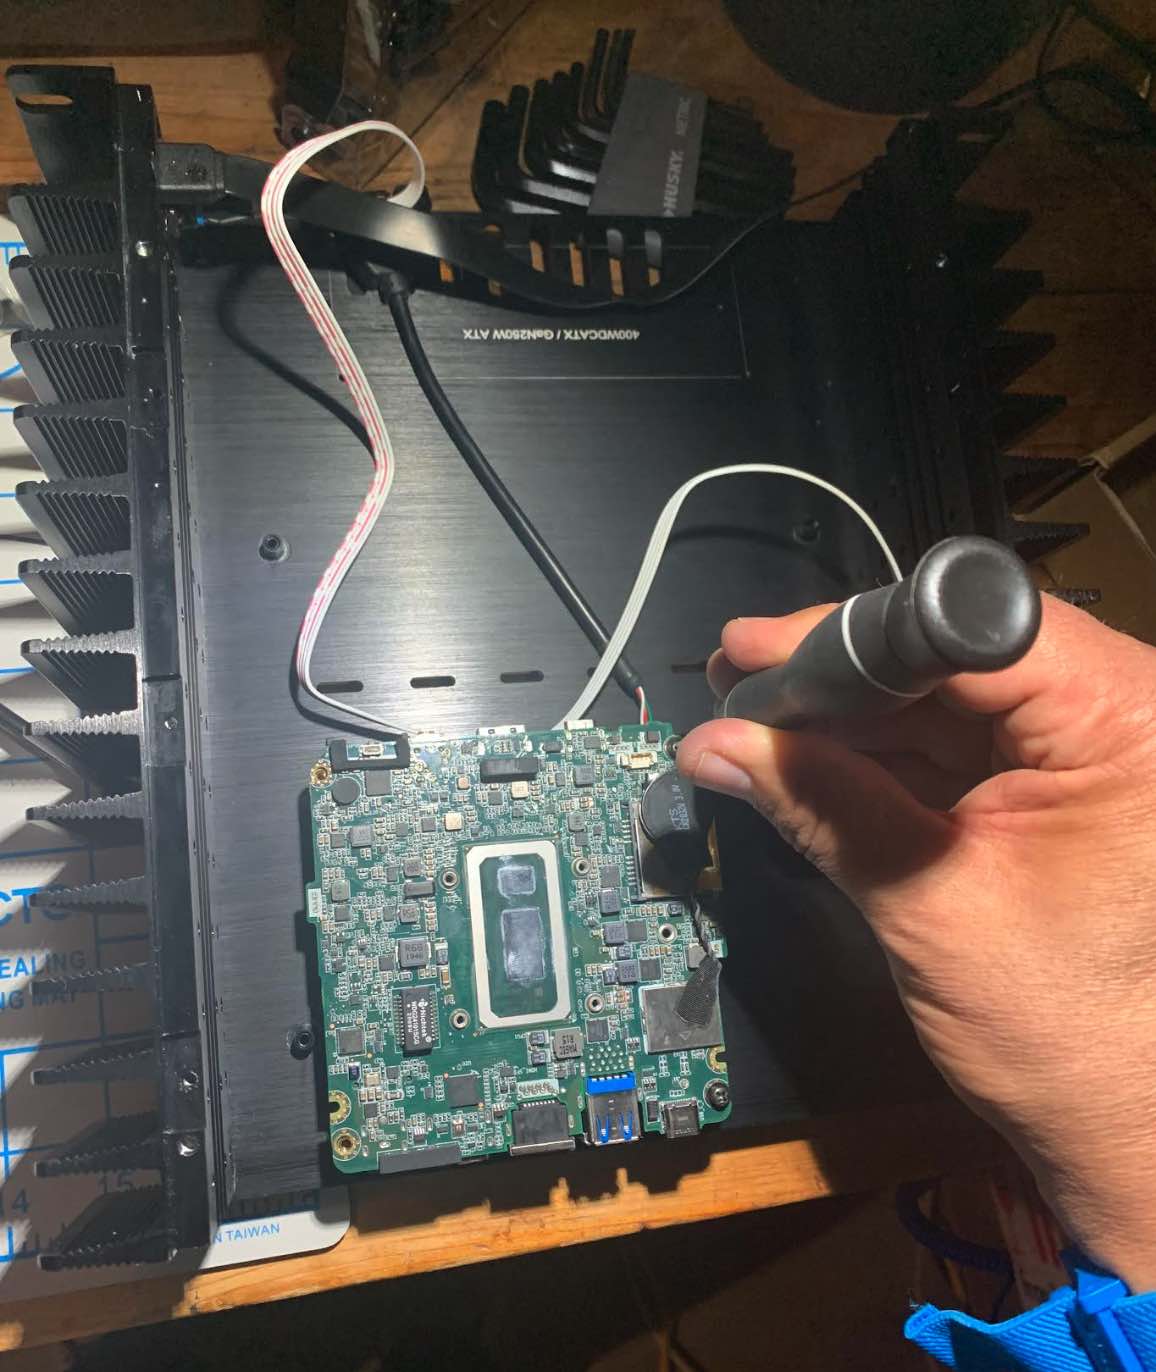
I needed to retrace my steps, but complicating things, the power switch and power switch light up LED cable plugs into their header on the what turns out to be the underside of the motherboard, so in order to access their connection, I have to unscrew the top of the heatsink, loosen the plates securing the heat pipes securing them to the chassis sidewalls, unscrew the motherboard, carefully rotate the heat pipes, and lift the motherboard out from underneath.
Panicking, I emailed the following message to Larry:
1) I cannot tell if the on/off power switch is turned on or off, as it does not make a clicking sound or change color after I press it in and out.
2) the ethernet switch does not light up where the ethernet cable from the NUC plugs into it.
Now, I connected the Power and LED power cable to the 2.53mm to 2mm pitch front header adapter to the NUC front panel for PWR and PWR LED. I am not sure what I am doing wrong. Can you please help?
Larry wrote back:
"If you plug the PWR and PWR LED correctly, the PWR LED should light up once the NUC is powered on. Do you have a link for the NUC manual which shows the front panel PIN diagram? The PWR LED should have polarity while PWR does not have polarity."
I couldn't find any useful diagrams of the NUC's motherboard online, however, I took encouragement from his next comments:
"If you think you plugged it wrong, you can just switch the PWR LED two pin 180 degree and try again," he continued. "From your description, it seems that you could actually connect the PWR to the PWR LED PIN by mistake."
I hauled my ailing server back to the workbench, opened it up, removed the heatsink top, rotated the heat pipes, unscrewed the motherboard and carefully extracted it, rotated the power and power LED inputs 180 degrees, reconnected everything, and tried again. Only this time, the power switch LED did not light up.
I was on a mission, so I repeated this excruciating process over and over again well past midnight.
Convinced that the there was something wrong with their connection, as they could be flipped, rotated, and plugged independently into an array of four pins, I reached out to Larry, and he sent me this key illustration below:
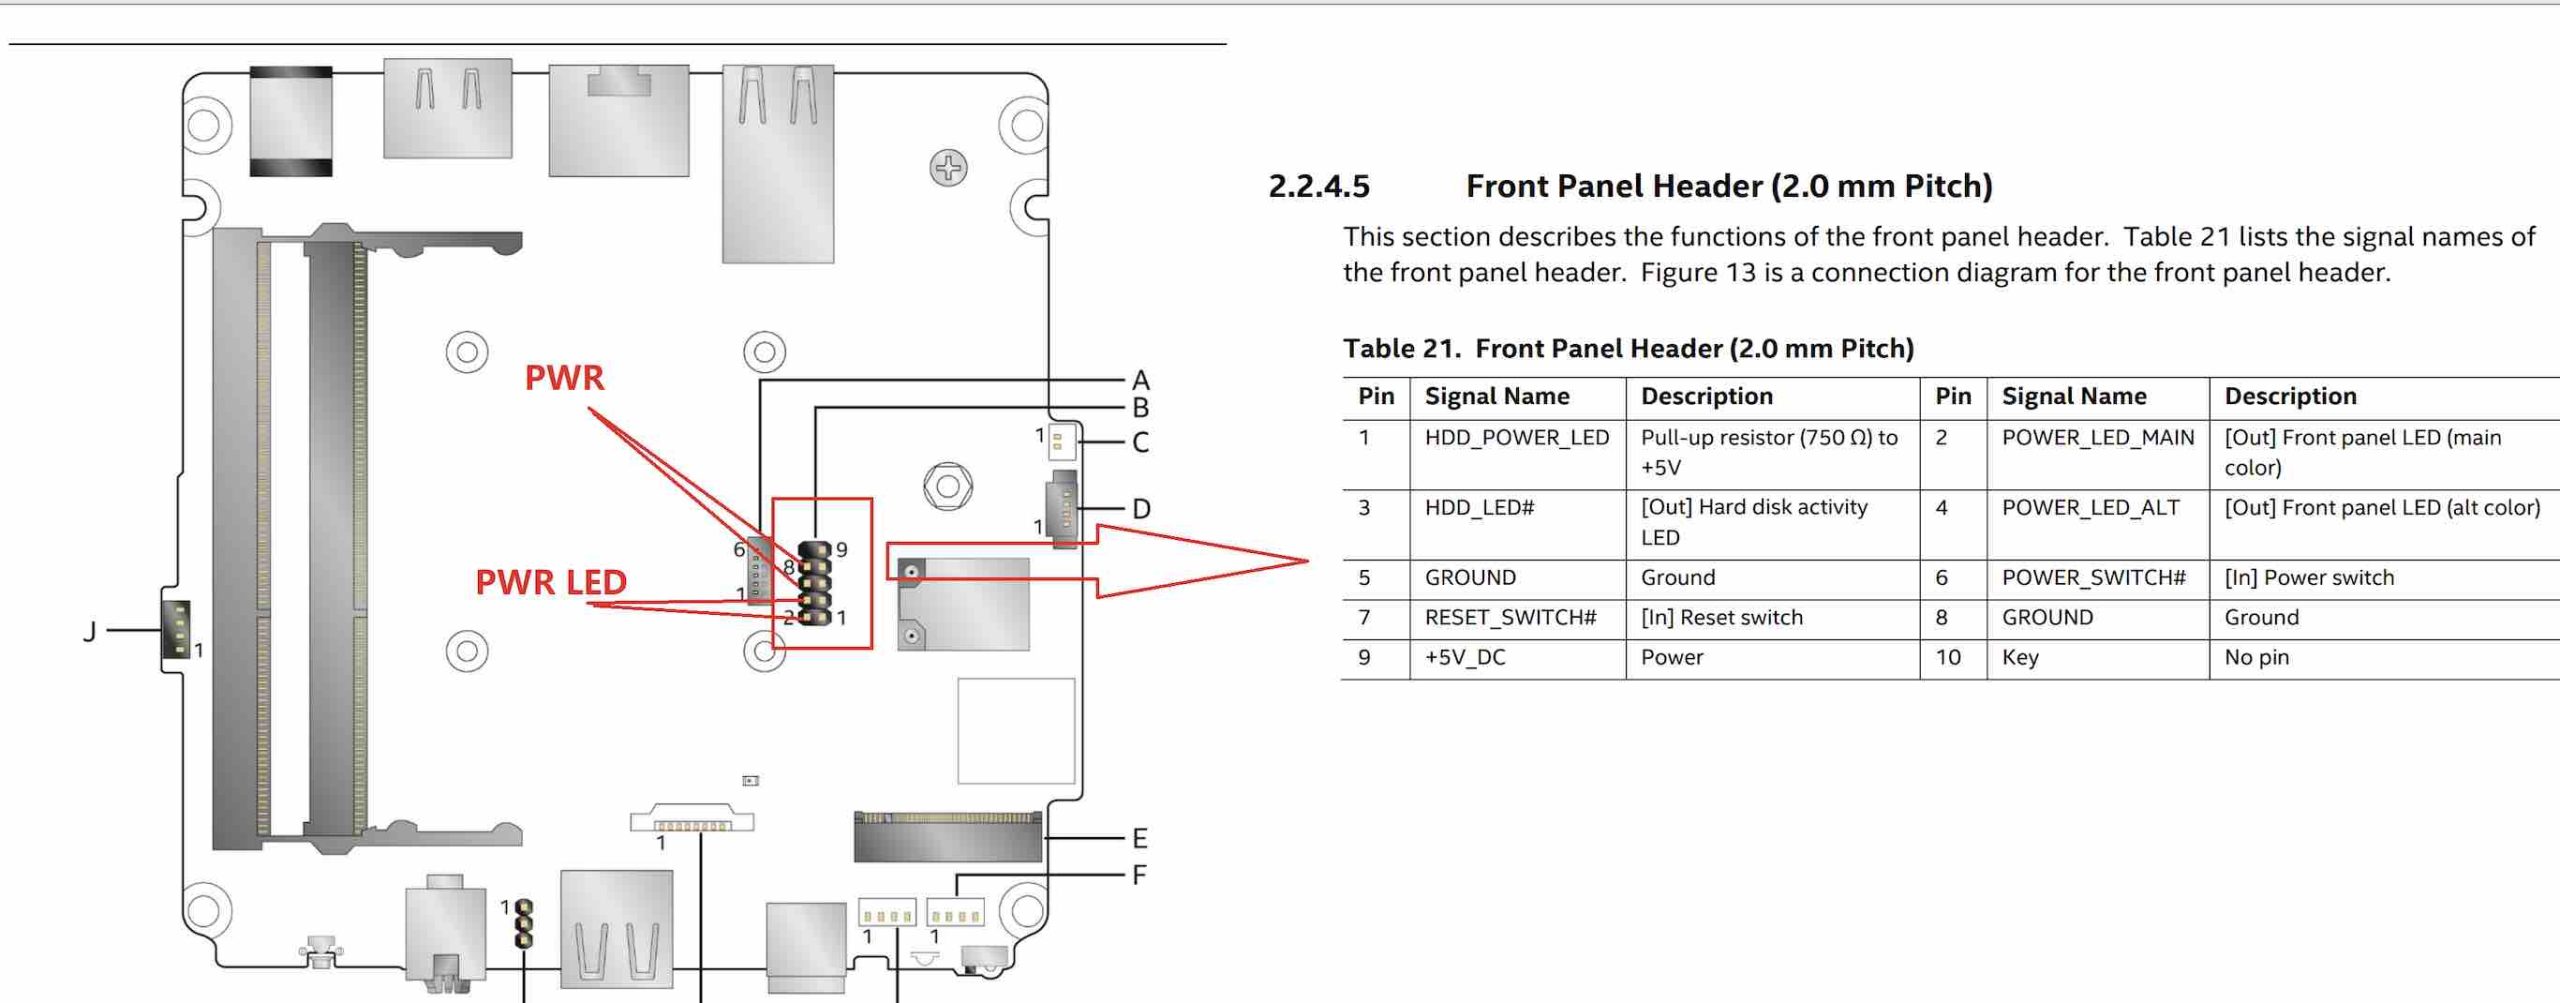
This was crucial for my understanding, but try as I might, I couldn't get my server to operate.
Perhaps it was a problem with a faulty power and LED cable, I thought. I asked Larry to send me a replacement cable, however, he didn't think that was a case and asked me to try the power cable from the original NUC case. I couldn't get that to turn it on either.
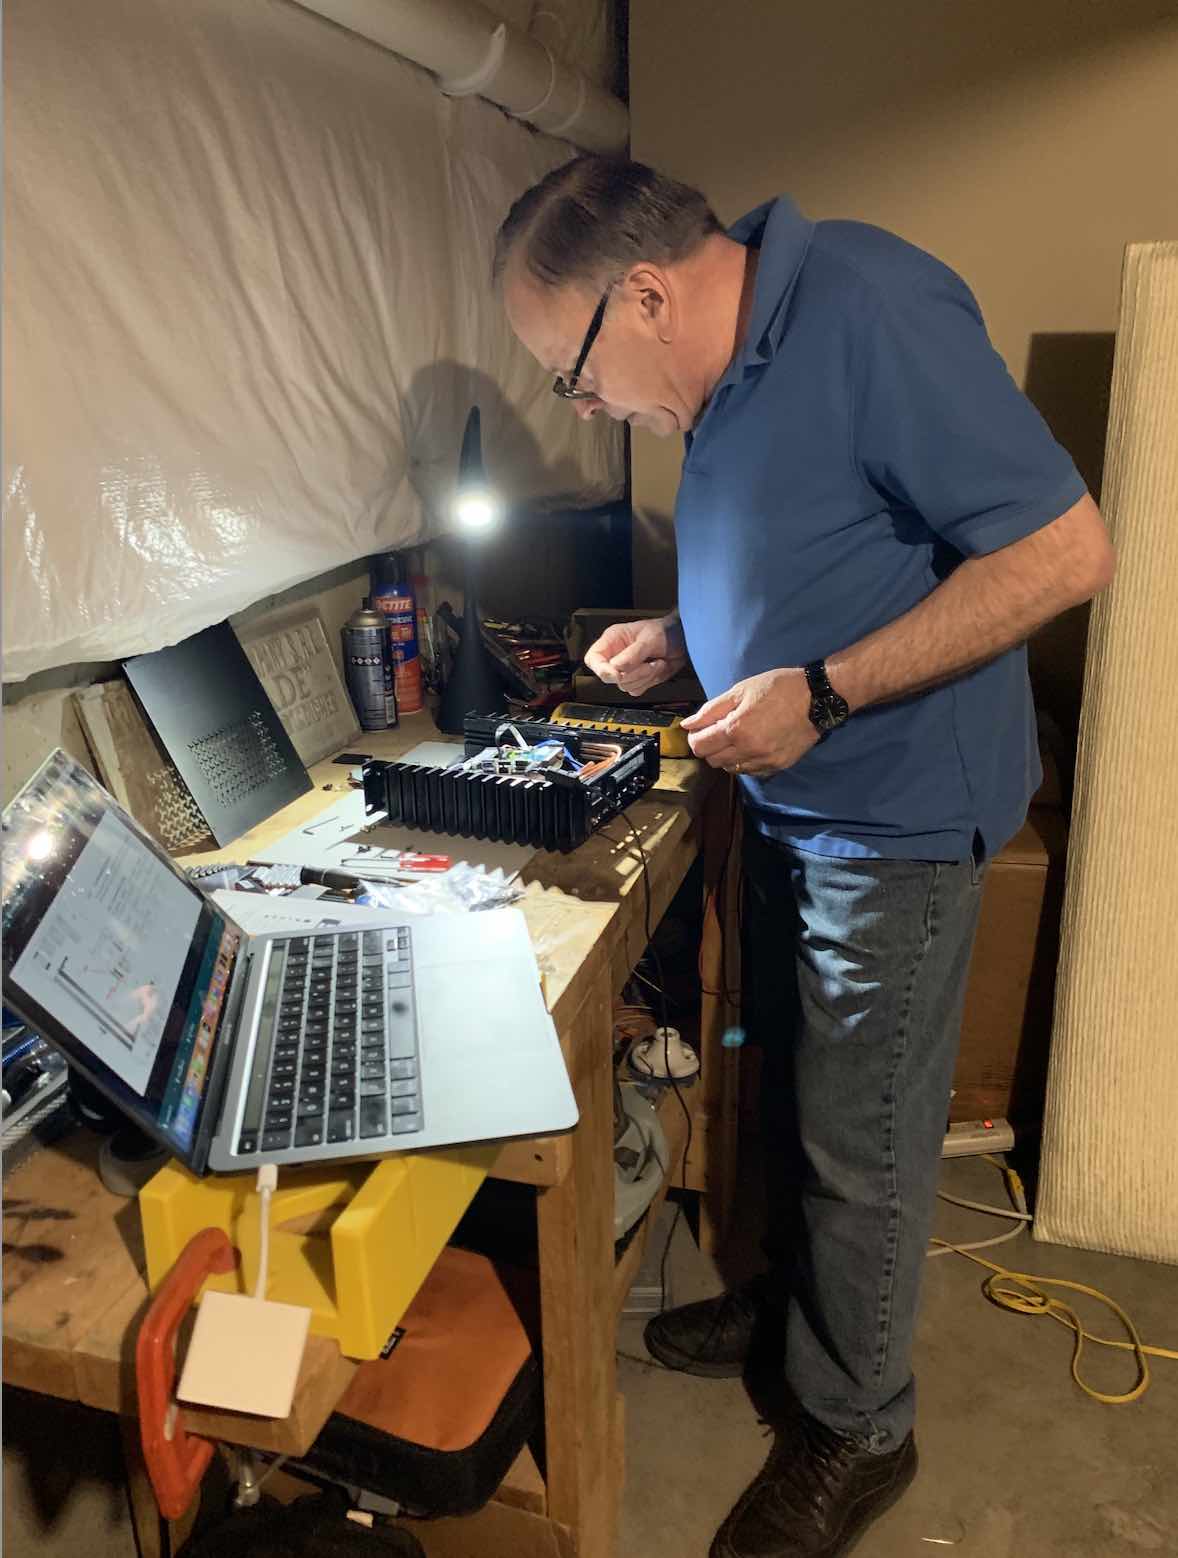
Frustrated, I called John Brunner, a retired IT professional, former partner of Gudebrod Audio who also builds his own DACs, preamps, and amplifiers, and on the promise of a free meal, he drove out to trouble shoot my NUC server.
Powering it up on the workbench, John examined it. We removed the motherboard, unplugged and rotated and swapped the PWR and PWR LED cable connections at the front panel header, but this time, at John's suggestion, we placed the motherboard on a piece of cardboard, then later atop a porcelain sauce cup where I kept various screws that came with the NUC kit. John noticed that the motherboard was slightly bent, but added that it should be okay, as they generally have a little give.
"You put on too much thermal paste," John noted. "You only need a very thin layer."
He added that motherboards tended to get pretty hot fairly quickly, but we could still power it up briefly to test it without reconnecting it to the heatsink, so connecting the power cable, we did just that and experimented with various connections. It was getting power, John said, but its blue light wasn't turning on.
After looking it over for some time, he asked me to remove the base of the heatsink from the motherboard. Unscrewing and lifting it out, I handed the motherboard to John.
"Wow!" he exclaimed. "You really crushed some surface capacitors with the screws!"

Belle stands in front of a vintage car at Buona Beef, a favorite diner of ours during another outing
Indeed I had. When I mounted the top portion of the heatsink that secured the heat pipes, I used screws that were too long, extending past the heatsink's base, pressing into the motherboard and bending it.
I felt ill.
The motherboard was ruined. So after I treated John to an Italian beef sandwich lunch at Buona Beef and said goodbye, I was on a mission to find a new one.
A Little Light at the End
Surveying individual NUC motherboards online, they weren't cheap! Ones like mine were listed for around $330 to $400 online, which was more than I wanted to spend. After some research, I located a company, OEM XS Inc. out of Salem, New Hampshire that offered a NUC7I5BNB motherboard for $160 retail, which would support Roon ROCK, so I purchased it (you can find them HERE). Their president, Kalley Cutler, charged me a lower industry accommodation price—thanks, Kalley!
Unpacking it a week later, I attached the M.2 SSD and memory card, applied less thermal paste on the CPU, and selected shorter screws to secure the top half of the heatsink that wouldn't press into the motherboard when tightened. Connecting the PWR and PWR LED plugs, I set the motherboard atop the sauce cup and connected the power cable.
Ugh! The power button failed to light up. However, looking at that diagram that Larry sent me and flipping the cables 180 degrees, I tried again and, immediately, it was Christmas again as both the power button light and the blue LED light on the motherboard lit up!
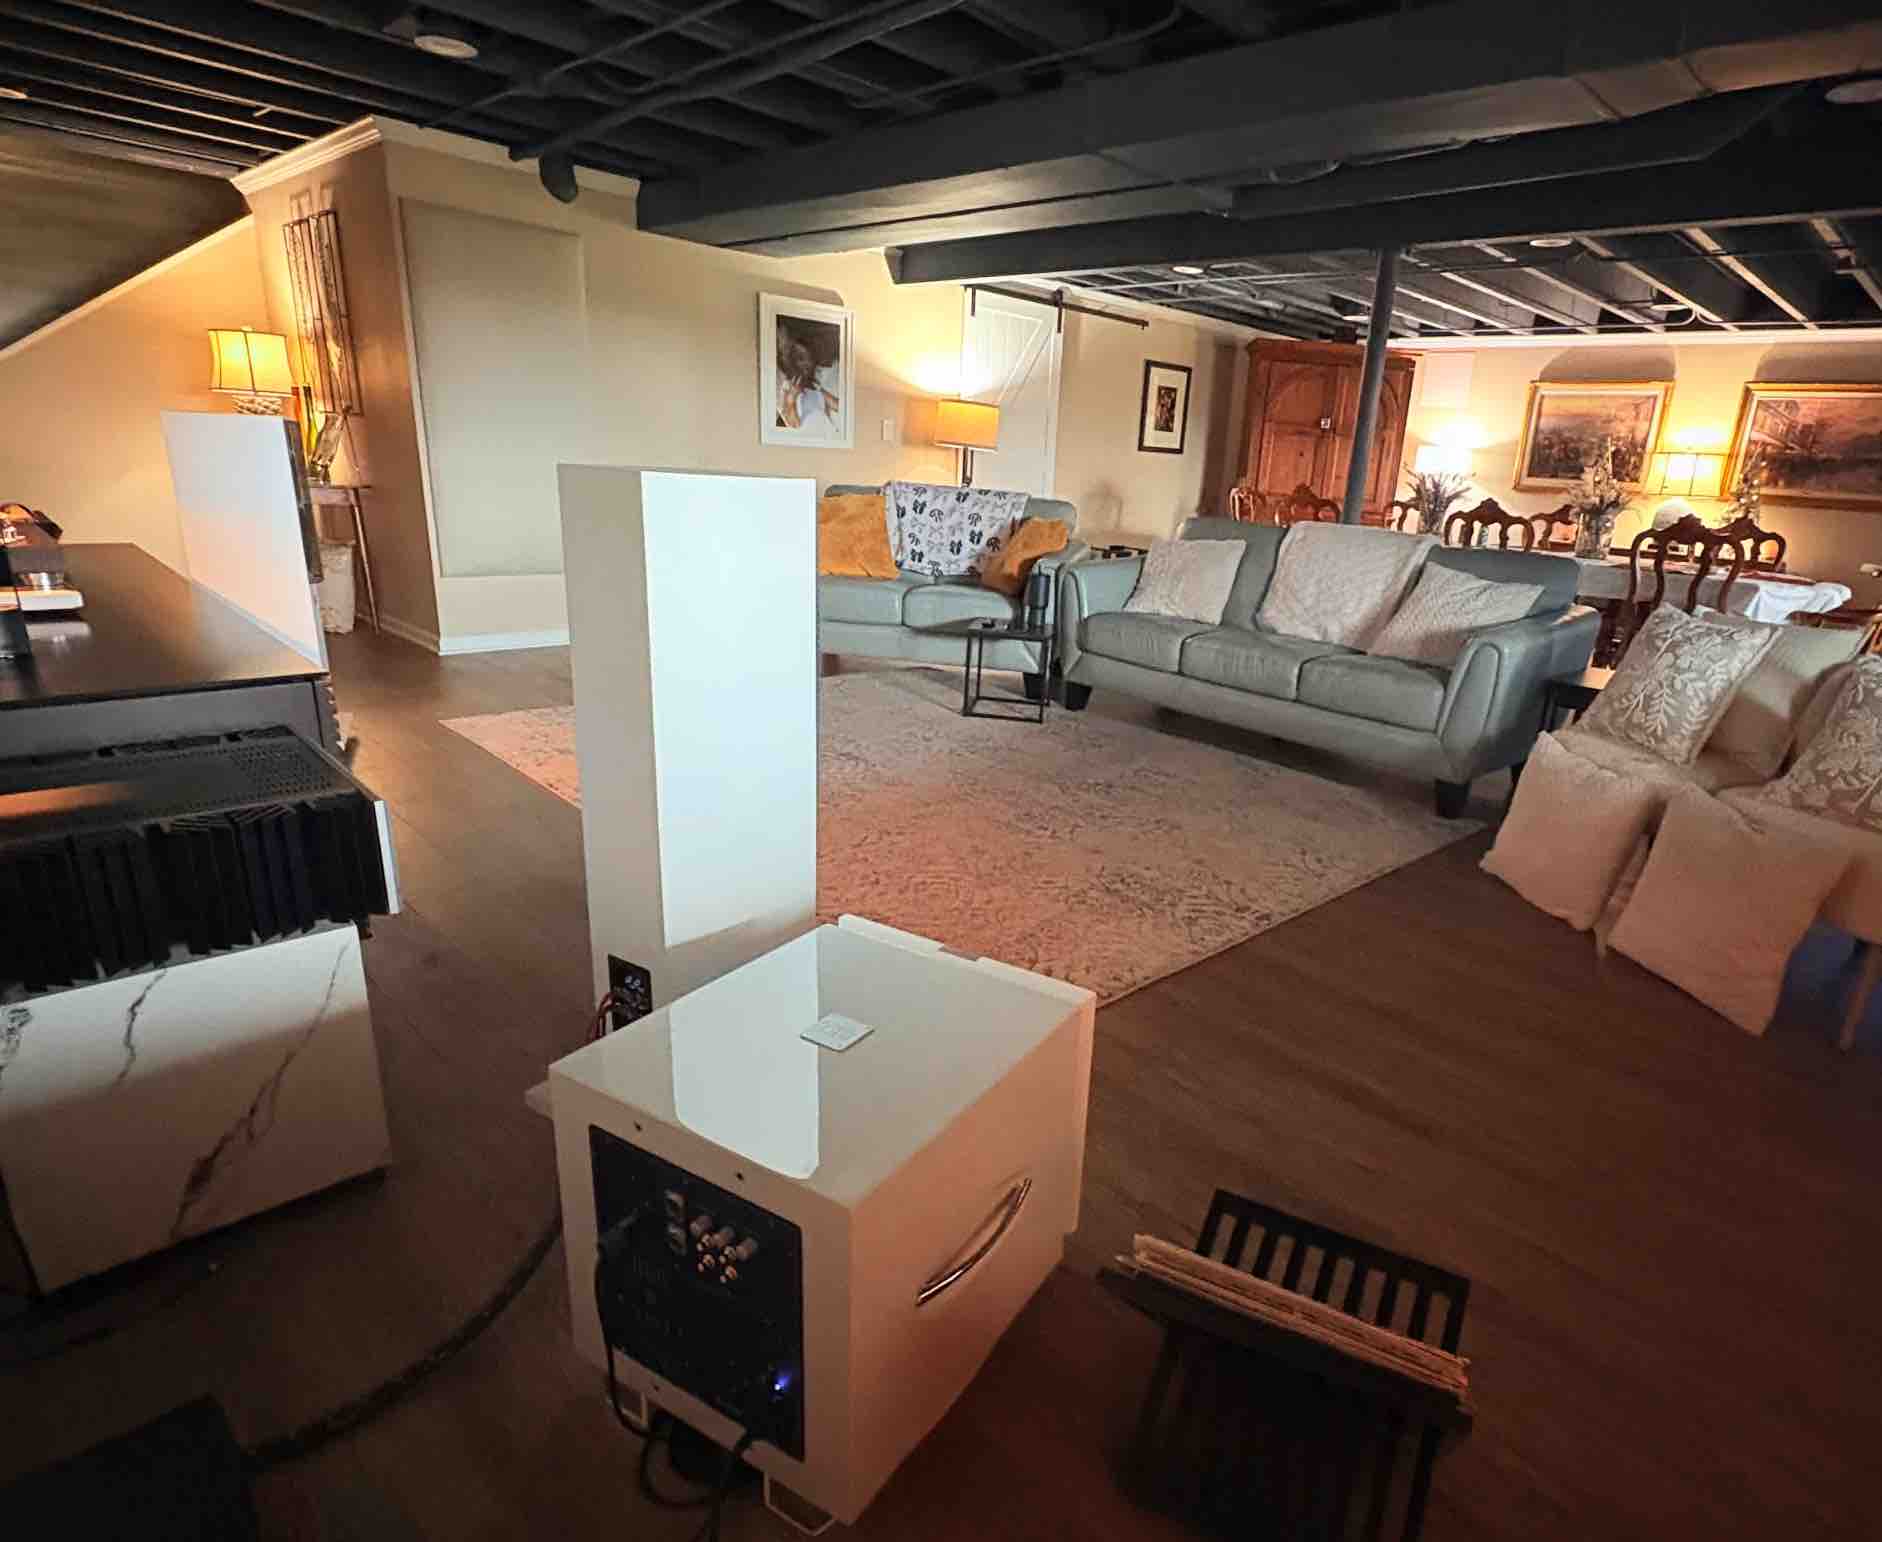
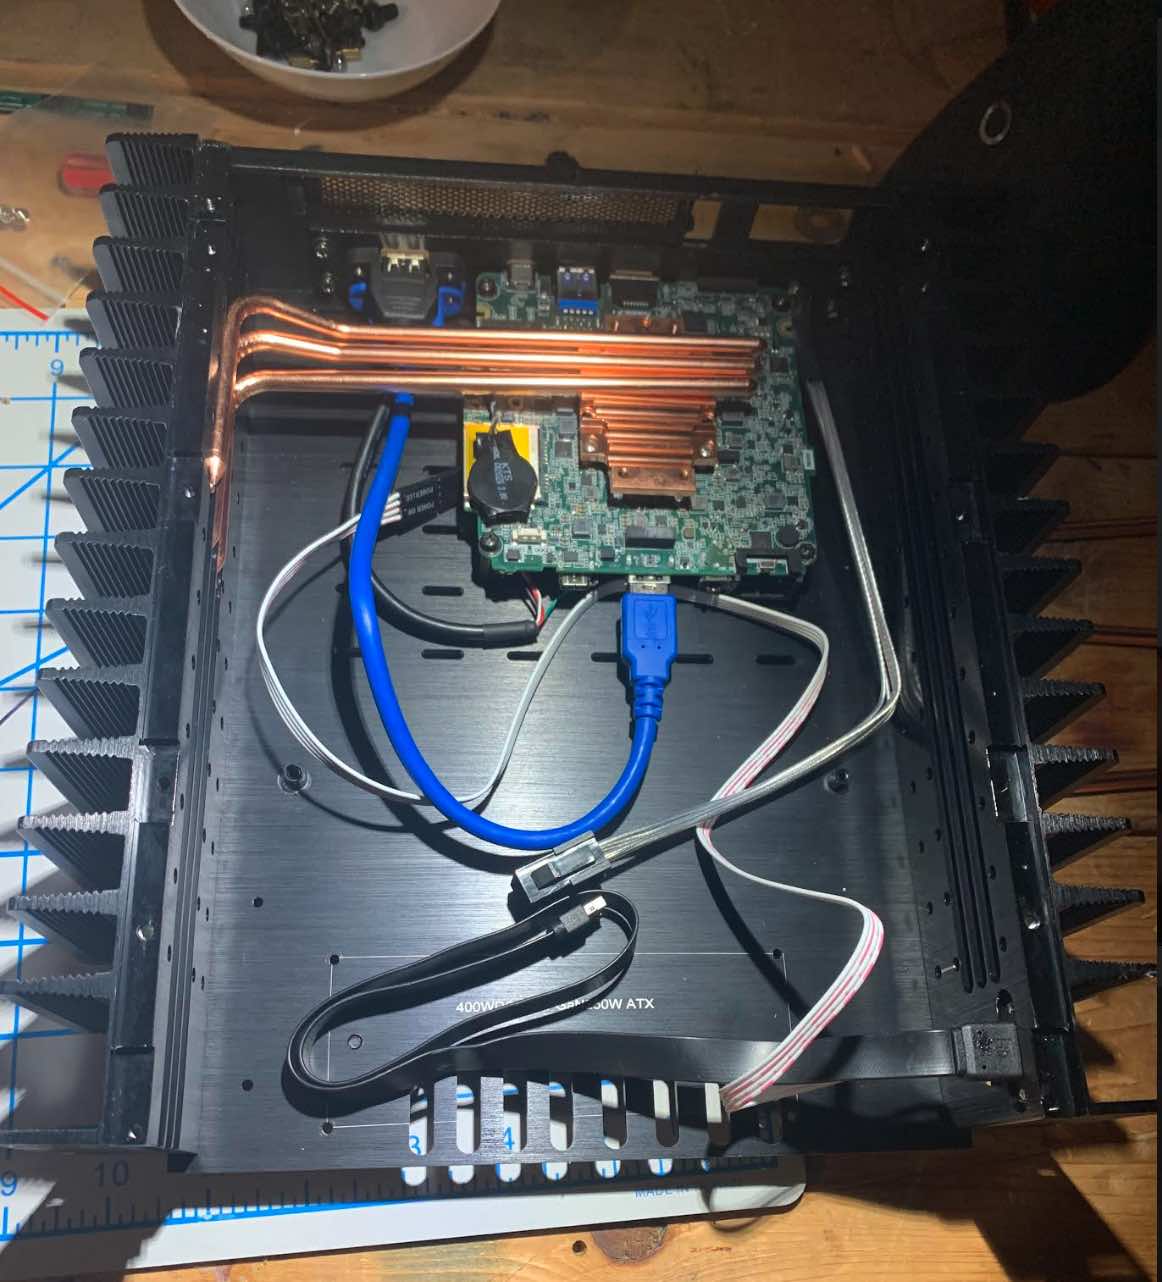
Mounting the motherboard, heat pipes and all in the HDPLEX case, I hooked it up to my sound system, sans its top (in case I needed to access the motherboard again), and pressed the power button.

There Was Jesus
Now the i5 CPU runs slower than the i7 that was in my original motherboard, so starting up Roon on it takes roughly five long minutes. However, after what seemed like forever, I finally had connection! Using my iPhone's Roon controller app, I selected a song and hit play. Suddenly, glorious music poured out of my Usher ML-802 loudspeakers. Elated, I played Zach Williams' and Dolly Parton's hit single, "There was Jesus" and, let me tell you, that song never sounded sweeter playing on my system!
My server working, I still had to replace its USB 2.0 cable connector; one of the small wires at the header connection had pulled loose when I was taking the motherboard in and out, but that was an easy fix (Larry shipped one out to me quickly after I notified him of my success). With three other USB inputs, I don't currently use that one, but it's always nice to have just in case!
Conclusion
As I mentioned earlier, my replacement NUC motherboard, with its i5 CPU, is slower than its predecessor, so reengaging Roon after it's been turned off is excruciatingly slow at about five minutes. However, once it's on, it plays flawlessly and, it turns out, I can leave the server on even when I'm not listening to the system. So, that's exactly what I do, but to save on bandwidth consumption, I hit "stop" on the app so it's not constantly streaming music when not in use.
I love the look of the HDPLEX H1 V3 case with its rugged and sleek, minimalist aesthetic! Peaking through the metal mesh on top, I can view the copper heat pipes, and with no fan to contend with, it delivers marvelous music, in all its splendor, with an exquisitely low noise floor, verve and style. What's not to love about that?
HDPLEX H1 V3 Fanless Chassis
Retail: $265
HDPLEX NUC Kit
Retail: $78.50
HDPLEX, Ltd.