Part 3 - In which we get down in the weeds: the files, the library and how this all gets lashed together…
"Nobody knows everything, nobody has everything [i.e., tools, equipment], but if you're lucky enough to add friendship to your life, you have so many more opportunities for joy and accomplishment and satisfaction."
Scott Wadsworth, "The Essential Craftsman"
Scott is a carpenter, general contractor, and artisan blacksmith sharing his experience and wisdom on his YouTube channel, "The Essential Craftsman." His stories are not about audio, but they are about creating, execution, and excellence. The paraphrased quote above is from a recent video and it struck home for me because this is just what Ann and I have experienced building our new audio system.
As I've said before, I knew nothing about digital when I started on this journey. Audio, yes. But not digital audio. Fortunately, friends were willing to help. Some with an empathetic ear, others with the heavy work of really explaining, suggesting, challenging on what to do and how to go about it. Today, I now know just enough about digital audio to be dangerous, to ask a question, to (somewhat) understand the answer.
If you're willing to hang in here with me, I'll try to pay forward some of this kindness to me by walking through what we considered, what we chose, why and why not. Let's dive in…
Why not just stream our music?
Hodor, Hodor, Hodor!! Ho du door on your files for your very life.
This was my thought contemplating a files only system. Hold the door and backup, backup, backup…
Says one friend who'd switched to streaming music only: "Life is so much simpler and the entire musical world is at our fingertips. No back up required. No hard drives to manage. Just stream what you want for a monthly fee." Ah, how tempting this sounded. My first question was: "and can you get the same quality of sound you and I always raved about when listening to your system in the past?" Well… no. But it's so convenient!
Okay, we're not streaming says Ann.
For us, we're seeking the best sound quality we can achieve. Plus, Ann is just not a subscriptions kind of person. So, move on to the hard work of figuring out storage and back up.
File Storage
The alternatives for file storage are many and I have friends using each of these:
- Thumb drives or SD cards – not enough capacity for our expected needs
- Solid state drives – fast but limited capacity
- Internal hard drives – good possibility
- External USB hard drives – good possibility, with USB 3.0 quite fast access
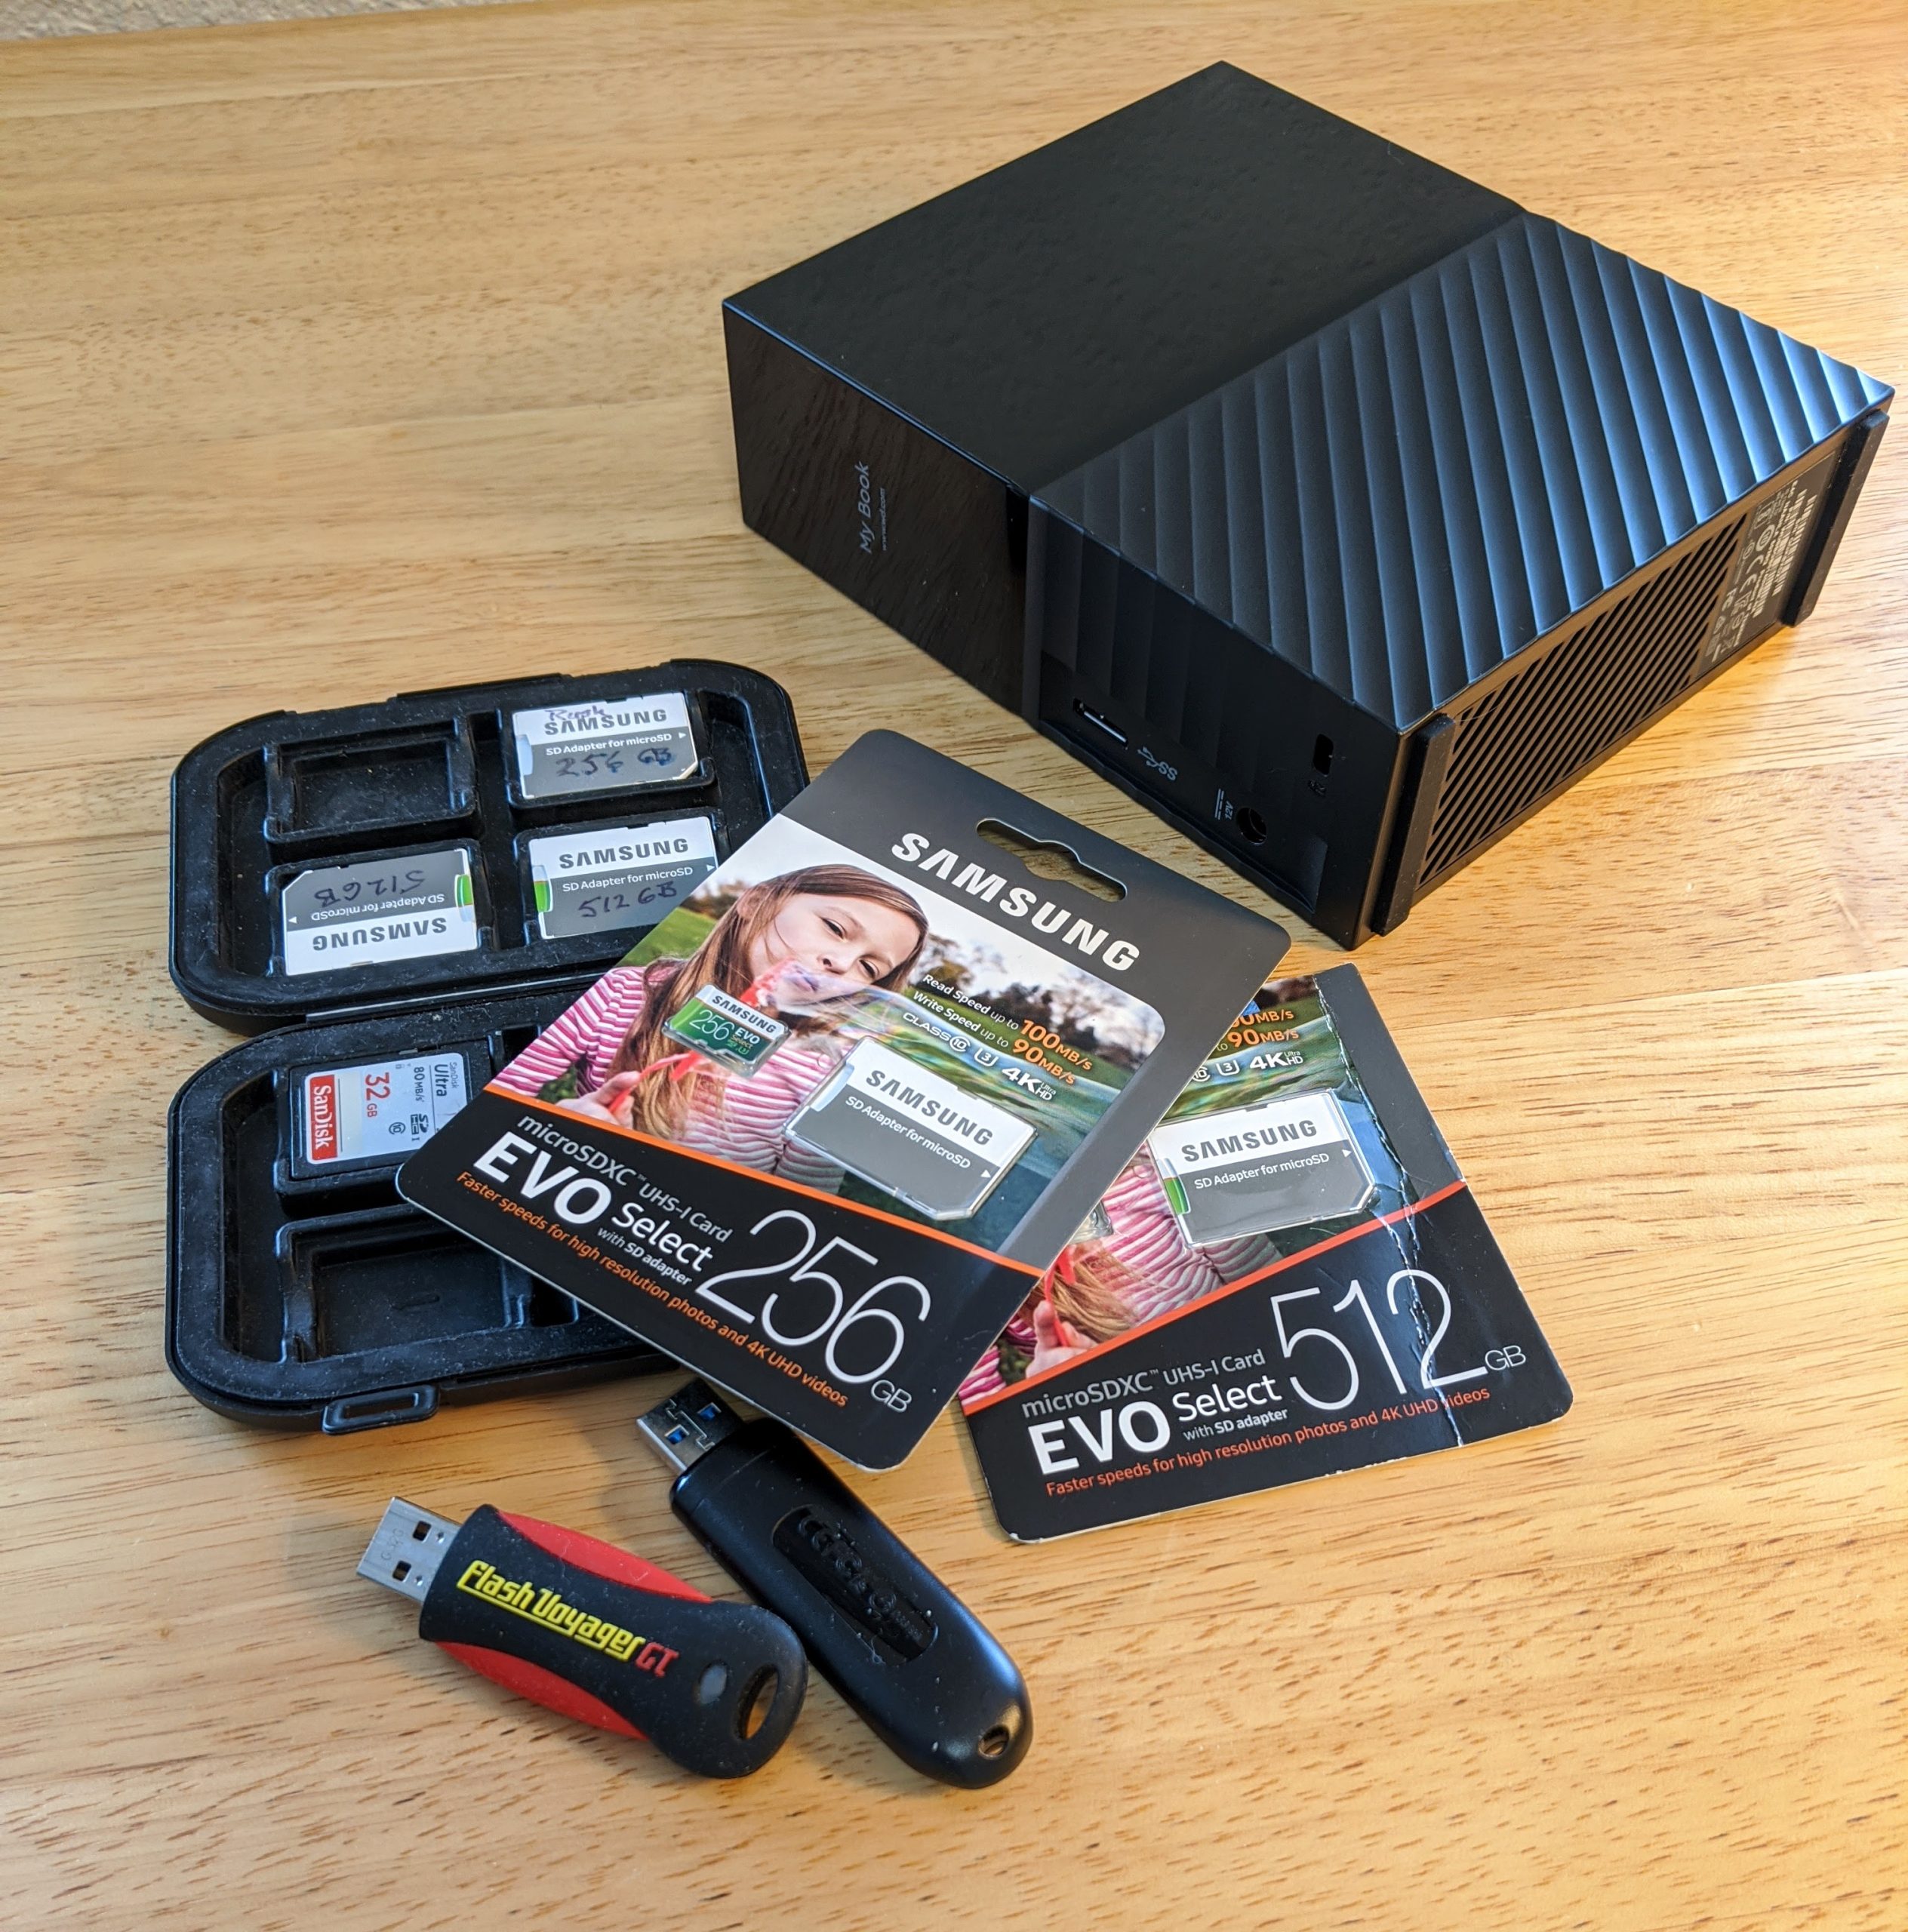
We chose to go with 8TB external USB hard drives. With USB 3.0, the file transfer speeds are quite good both for making backups and for moving the large files that make up hi res albums. We could start with one or two, then add more as space needs dictated. At the time, the 8TB capacity was a very cost effective per terabyte solution. The most recent hard drives I've added are now 14TB at a little higher cost per terabyte but a nice increase in per drive capacity.
Backup
There are two kinds of people in the world—those who have had a hard drive failure, and those who will. Make sure this common occurrence does not lead to the loss of your music collection. Backup Overview article from the American Society of Media Photographers
Using files requires a backup strategy. Drives fail. Occasionally, very occasionally, a file becomes corrupted even though the drive has not failed (more on this later). This is the very manual process that we've adopted:
- Each drive has a matching drive that will be its backup drive. So, we buy drives in pairs.
- Apply a strategy of full backups (a full copy of the drive) followed by incremental backups using software designed to do this. In our case, we use Acronis True Image. There are other backup software solutions (such as Second Copy for Windows users)—get the one you trust. Both Windows and Apple have rudimentary backup solutions built into their operating systems that might be serviceable for your needs.
- Backup drives are kept unpowered and disconnected until a backup is to be written to them, one at time.
- In an abundance of caution, I never do a full backup by directly overwriting my only current backup drive. I rotate in another drive on which I write the full backup and then rotate out the now former backup drive that I'd been using as I made incremental backups. Once the new full backup completes successfully, the former backup drive gets placed in rotation for the next time a full backup of another drive is required.
I won't say this third drive routine (last bullet above) is necessary; it just makes me feel safer. My friend, Brian, doesn't do this third drive routine and he taught me how to set up my drive structure. He's never had a problem in over 14 years of using external hard drives for his extensive audio and video collection. Still… Hodor, Hodor, Hodor.
The additional step in a good backup strategy is keeping a third copy offsite. This is the third leg of a good three legged backup strategy. Either a) maintain a third physical disk that you hand carry to another location and build into your rotation strategy or b) use a cloud storage service. And while I know this is "best" practice, I have to admit I do not do it. No good reason, not making excuses, just being honest.
My daughter is an engineer and thinks like one. She has automated her backup strategy with nightly automated backups to her onsite storage array, combined with cloud storage replication, and then optical media backup for critical files. Yep, belt, suspenders and sky hooks.
At the beginning of this section I said I'd come back to the problem of a file occasionally becoming corrupted even where the drive has not failed. This is a true nightmare for any backup strategy. If you don't notice that a file no longer plays (e.g., a given track) and you then do a full backup of your drive, that corrupted file is now part of your backup. Given enough elapsed time, the backup strategy I've outlined means that, eventually, you will overwrite the original non-corrupted backup copy without ever realizing you needed it. Just hope you play that track and find it is corrupted before this happens.
Because this makes me anxious, I have adopted one partial solution. For "high value" albums that I'd really never want to lose, or the several "one of a kind" recordings that can't be replaced (they are pure "unobtanium"), I keep an ARCHIVAL hard drive to which these get copied. That archival hard drive is placed offline, not connected to power or computer. But because magnetic media does have a shelf life and the magnetic encoding will fade if not refreshed, some re-write/refresh of the archival drive is needed at some point. Guess what? Yet another risk factor.
Additional resources:
- Best practices in data backup using the 3-2-1 rule by the U.S. Computer Emergency Readiness Team
- How to Backup Your Computer - The Complete Guide to Computer Backup by Backblaze
What about RAID?
Nope, don't use it here.
RAID (Redundant Array of Independent Disks) is great for immediately mirroring data. It's also great for speed when the data is written in chunks across multiple drives. And it certainly allows for a level of redundancy when written across multiple drives. But, RAID is not backup.
RAID Is Not Backup
Here's one important caveat about RAID and backup. Although RAID writes data to two disks simultaneously, it is not a backup. If your operating system or software, rather than the hard disk, corrupts your data, this corrupted data is sent to both disks and simultaneously corrupts both drives. However, a backup is a copy of data, which is stored somewhere else and is detached from the original data both in space and time. Backup data is not corrupted unless you specifically back up corrupted data. In short, even if you use RAID, you still must use an effective backup software. What is RAID 10 and Why Should I Use It by Acronis
One implementation of RAID is to set up mirrored hard drives, called RAID 1. Everything on Drive A is immediately copied to Drive B. Backup right? Well, no.
This response from "Sminial" in the Tom's Hardware forum captures my thinking:
- RAID 1 isn't a substitute for backup because there are a lot of risks that it can't protect against.
- If you accidentally delete a file, it will instantly be removed from both mirrored copies.
- If your disk is corrupted by a software bug or virus, the corruption will be done to both mirrored copies simultaneously.
- If you're hit by a bad enough power surge, it'll probably fry both disks at the same time.
- If someone breaks into your house, they'll steal the box that holds both disks.
- If your house gets flooded or burned, both disks will be ruined.
- Don't discount these risks!
I don't discount that many people have used RAID 1 for duplication of their data on separate drives successfully for decades. It is the oldest iteration of RAID. And as long as everything works as intended, when one drive fails, you simply install a spare drive, the files get copied to the spare, and you're back in business.
But this is only if everything works as intended. And sometimes things go awry with any of the RAID implementations due to the single point of failure built into the process: the RAID Controller. The RAID controller can be either software or hardware, but if that controller fails you risk corruption of the data on both drives in that moment of failure.
Given these considerations, my decision for our files was to keep it simple. Just one or more production hard drives that get manually backed up (individually, using software, as needed) to a second hard drive that gets disconnected and stored when the backup is complete. If I were to do this better, I'd have a third copy on the cloud but I don't.
NAS versus DAS
So, we're going to have files on one or more hard drives feeding music to our DAC. But where are the drives located and how are they connected?
The immediate answer I got from several friends was: get a NAS (Network Attached Storage) device.
My response was: okay, but why do I need to spend several hundred to a thousand dollars on an empty box with a small computer running Linux inside so I can plug internal hard drives into it and then connect that box to my computer? Yes, it is neat and tidy. Yes, it keeps the drives cool at the right operating temperature. Yes, I can optionally set it up with RAID (don't want to do that). Yes, I can put the box anywhere in my house that I can run an Ethernet cable to.
If you are nodding your head through all of the "Yes" statements above—get a NAS. You'll love it. Synology and several other companies make great NAS boxes. It can be an excellent solution.
These Synology models are well liked by music collectors, photographers, and videophiles. Other brands to consider in this 4-8 drive category for personal and small business use include QNAP, Buffalo, Western Digital, and Seagate among others. These truly are compact, elegant devices. They also eliminate a lot of wires. Instead of a USB cable and a power cord for EACH hard drive, there is only a single USB cable and a single power cord for the entire NAS array of hard drives. The lack of clutter makes me envious!
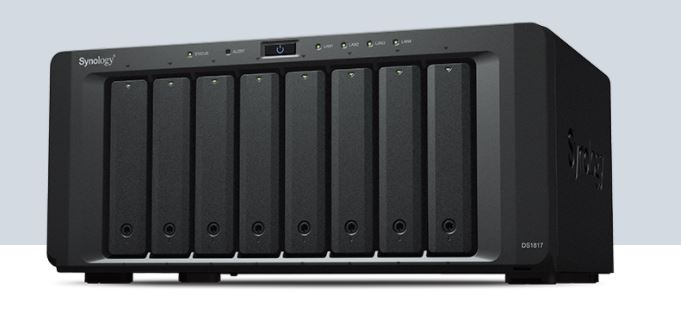
Synology DS 1817 (image courtesy of Synology)
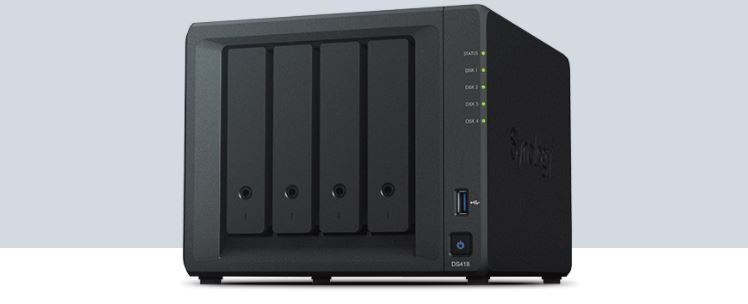
Synology DS 418 (image courtesy of Synology)
But, I'm a cheapskate when it comes to things like this. If I bought the NAS for several hundred dollars, I'd still need to buy the hard drives to put inside it. And, how big a NAS box do I buy? If I buy a four drive NAS box, and then run out of space in those four drives, I have to either buy a second NAS, or I'd need to upgrade the capacity of the drives and replace them. And if I'm serious about backup, I'll need two NAS boxes so I can backup one to the other.
For more about DAS and NAS, I refer you to Hans Beekhuyzen's video, Why I prefer DAS over NAS, listed under Resources For Getting Better Educated in Part 2 of this series.
External USB Hard Drives and DAS
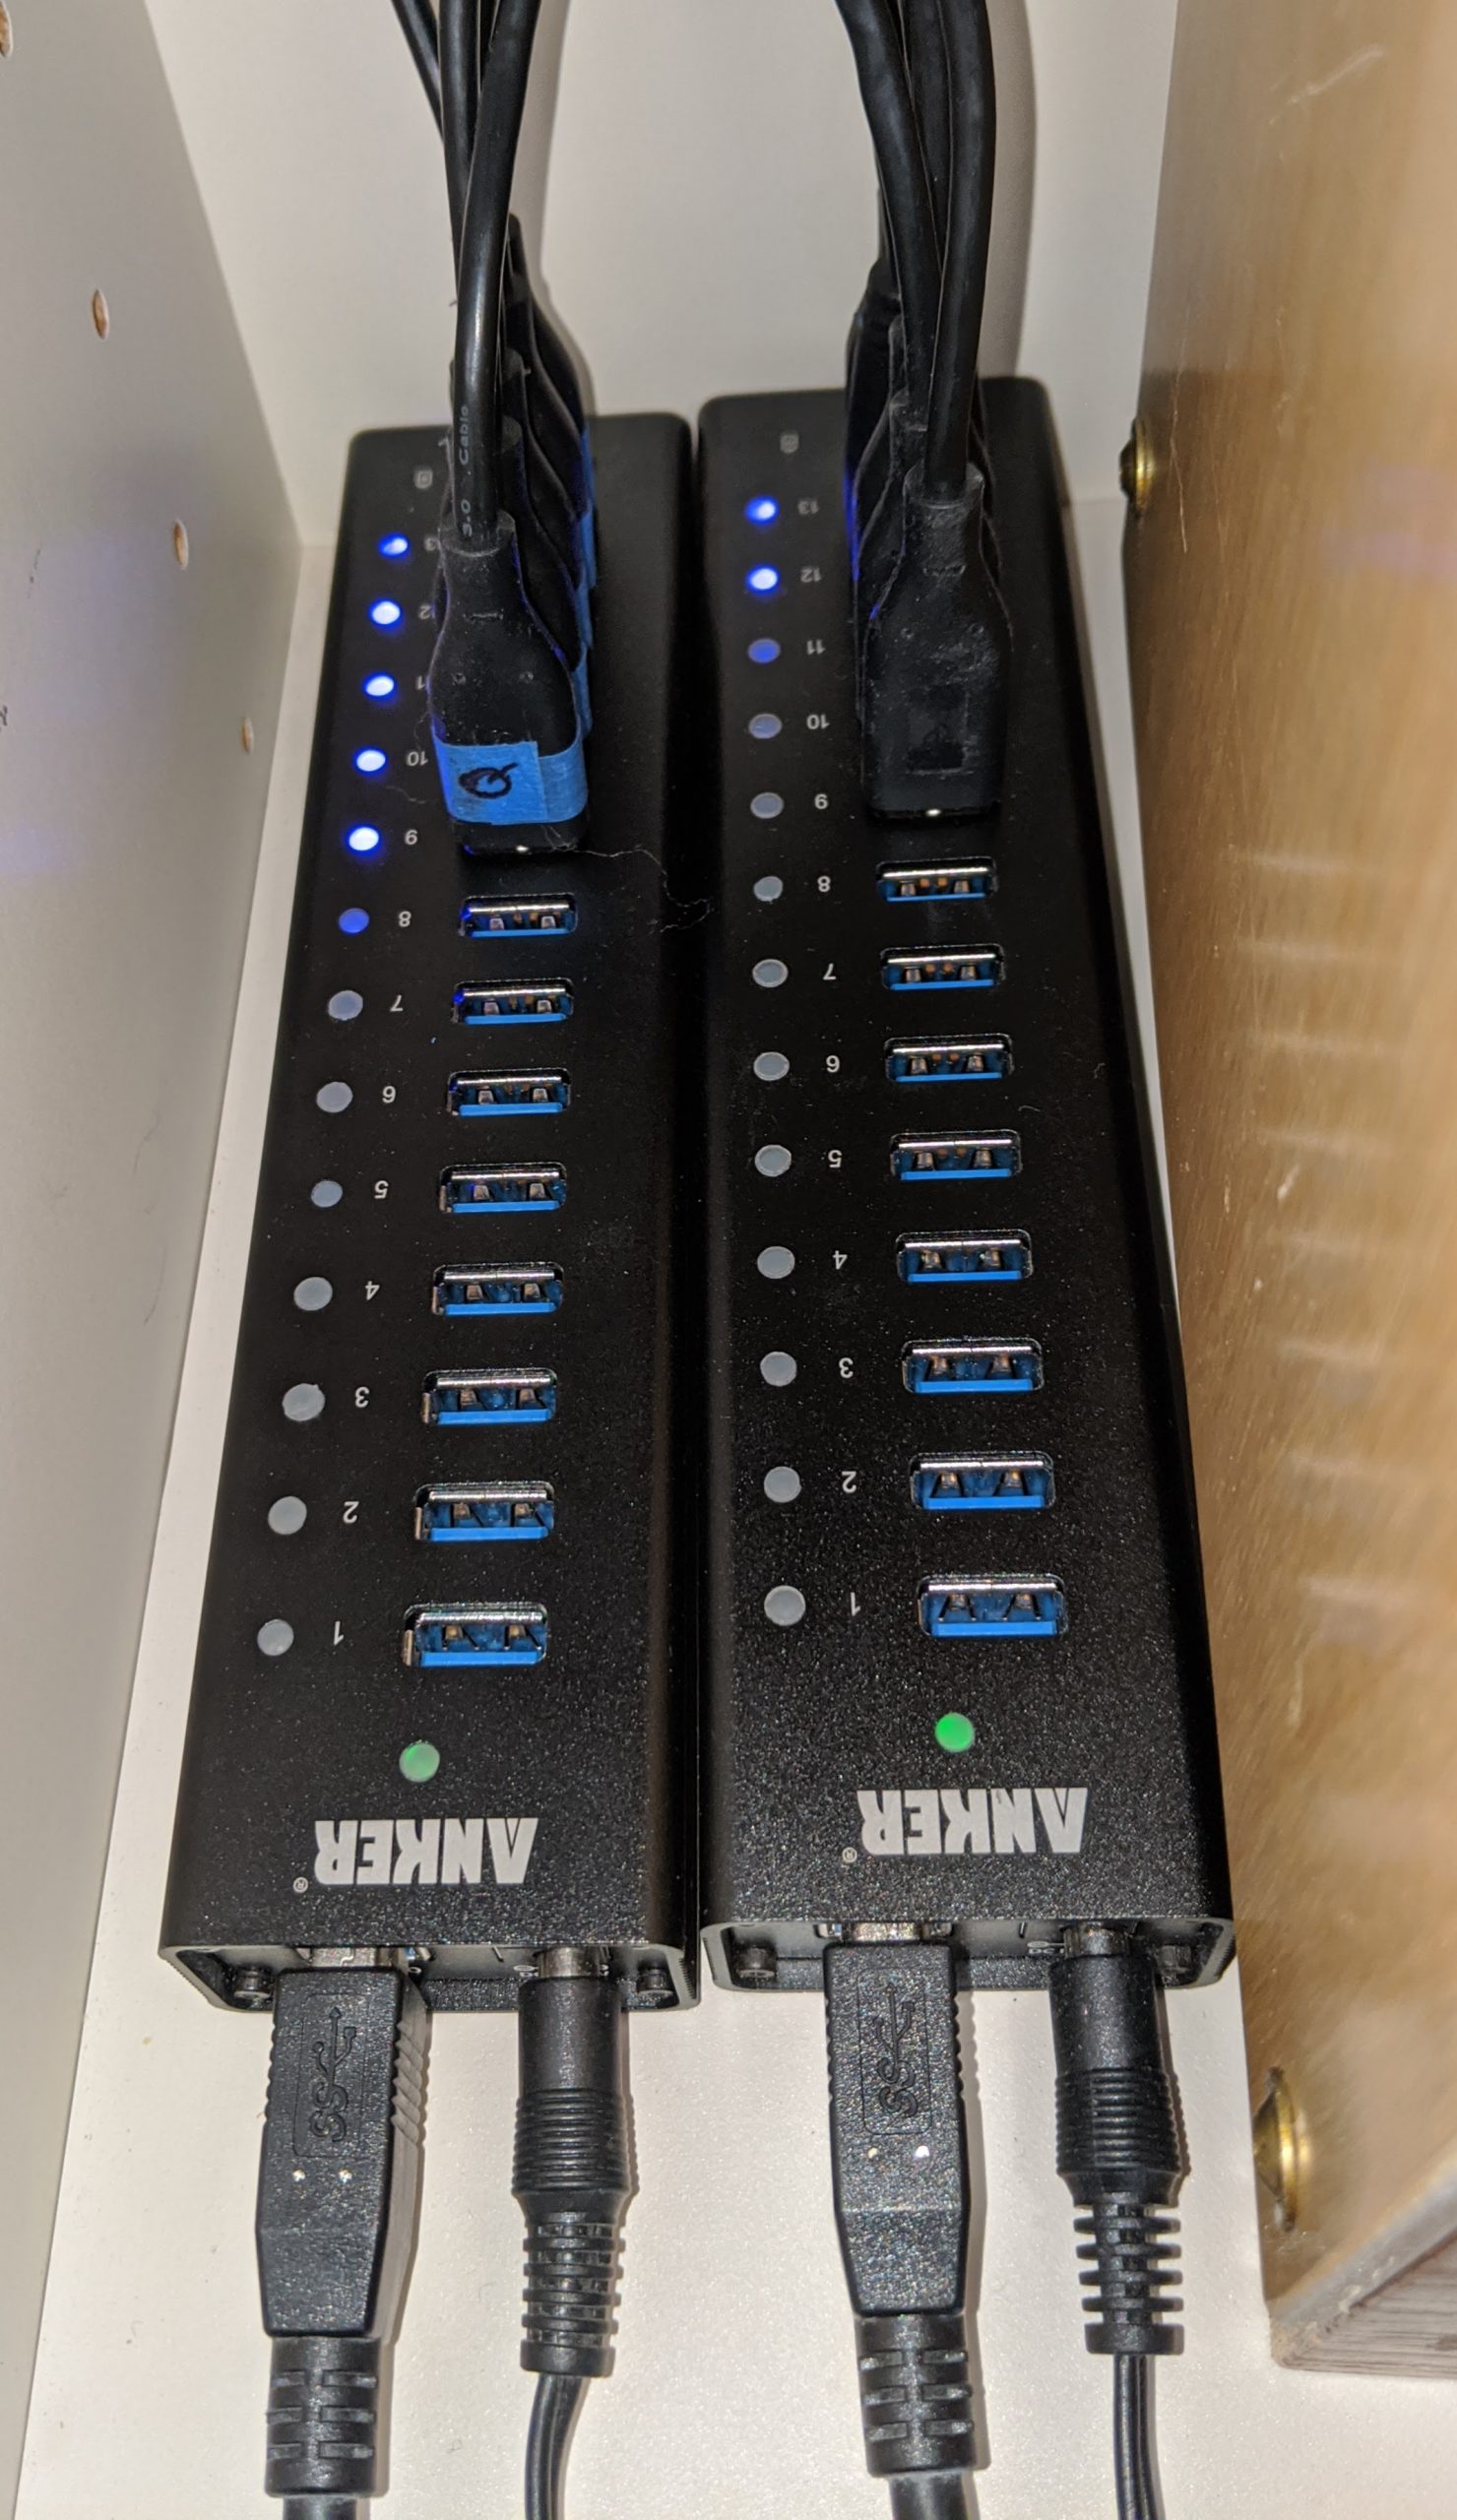
So, I took the cheapskate's path out of this issue. I bought a powered USB 3.0 hub recommended by a friend (an Anker AH241 13 port selling for $80 on Amazon) into which I could plug multiple external USB hard drives. Works like champ. And because it's powered, it doesn't rely on the computer to power the USB connection so the number of drives that can be supported is greater than would be the case with a non-powered hub.
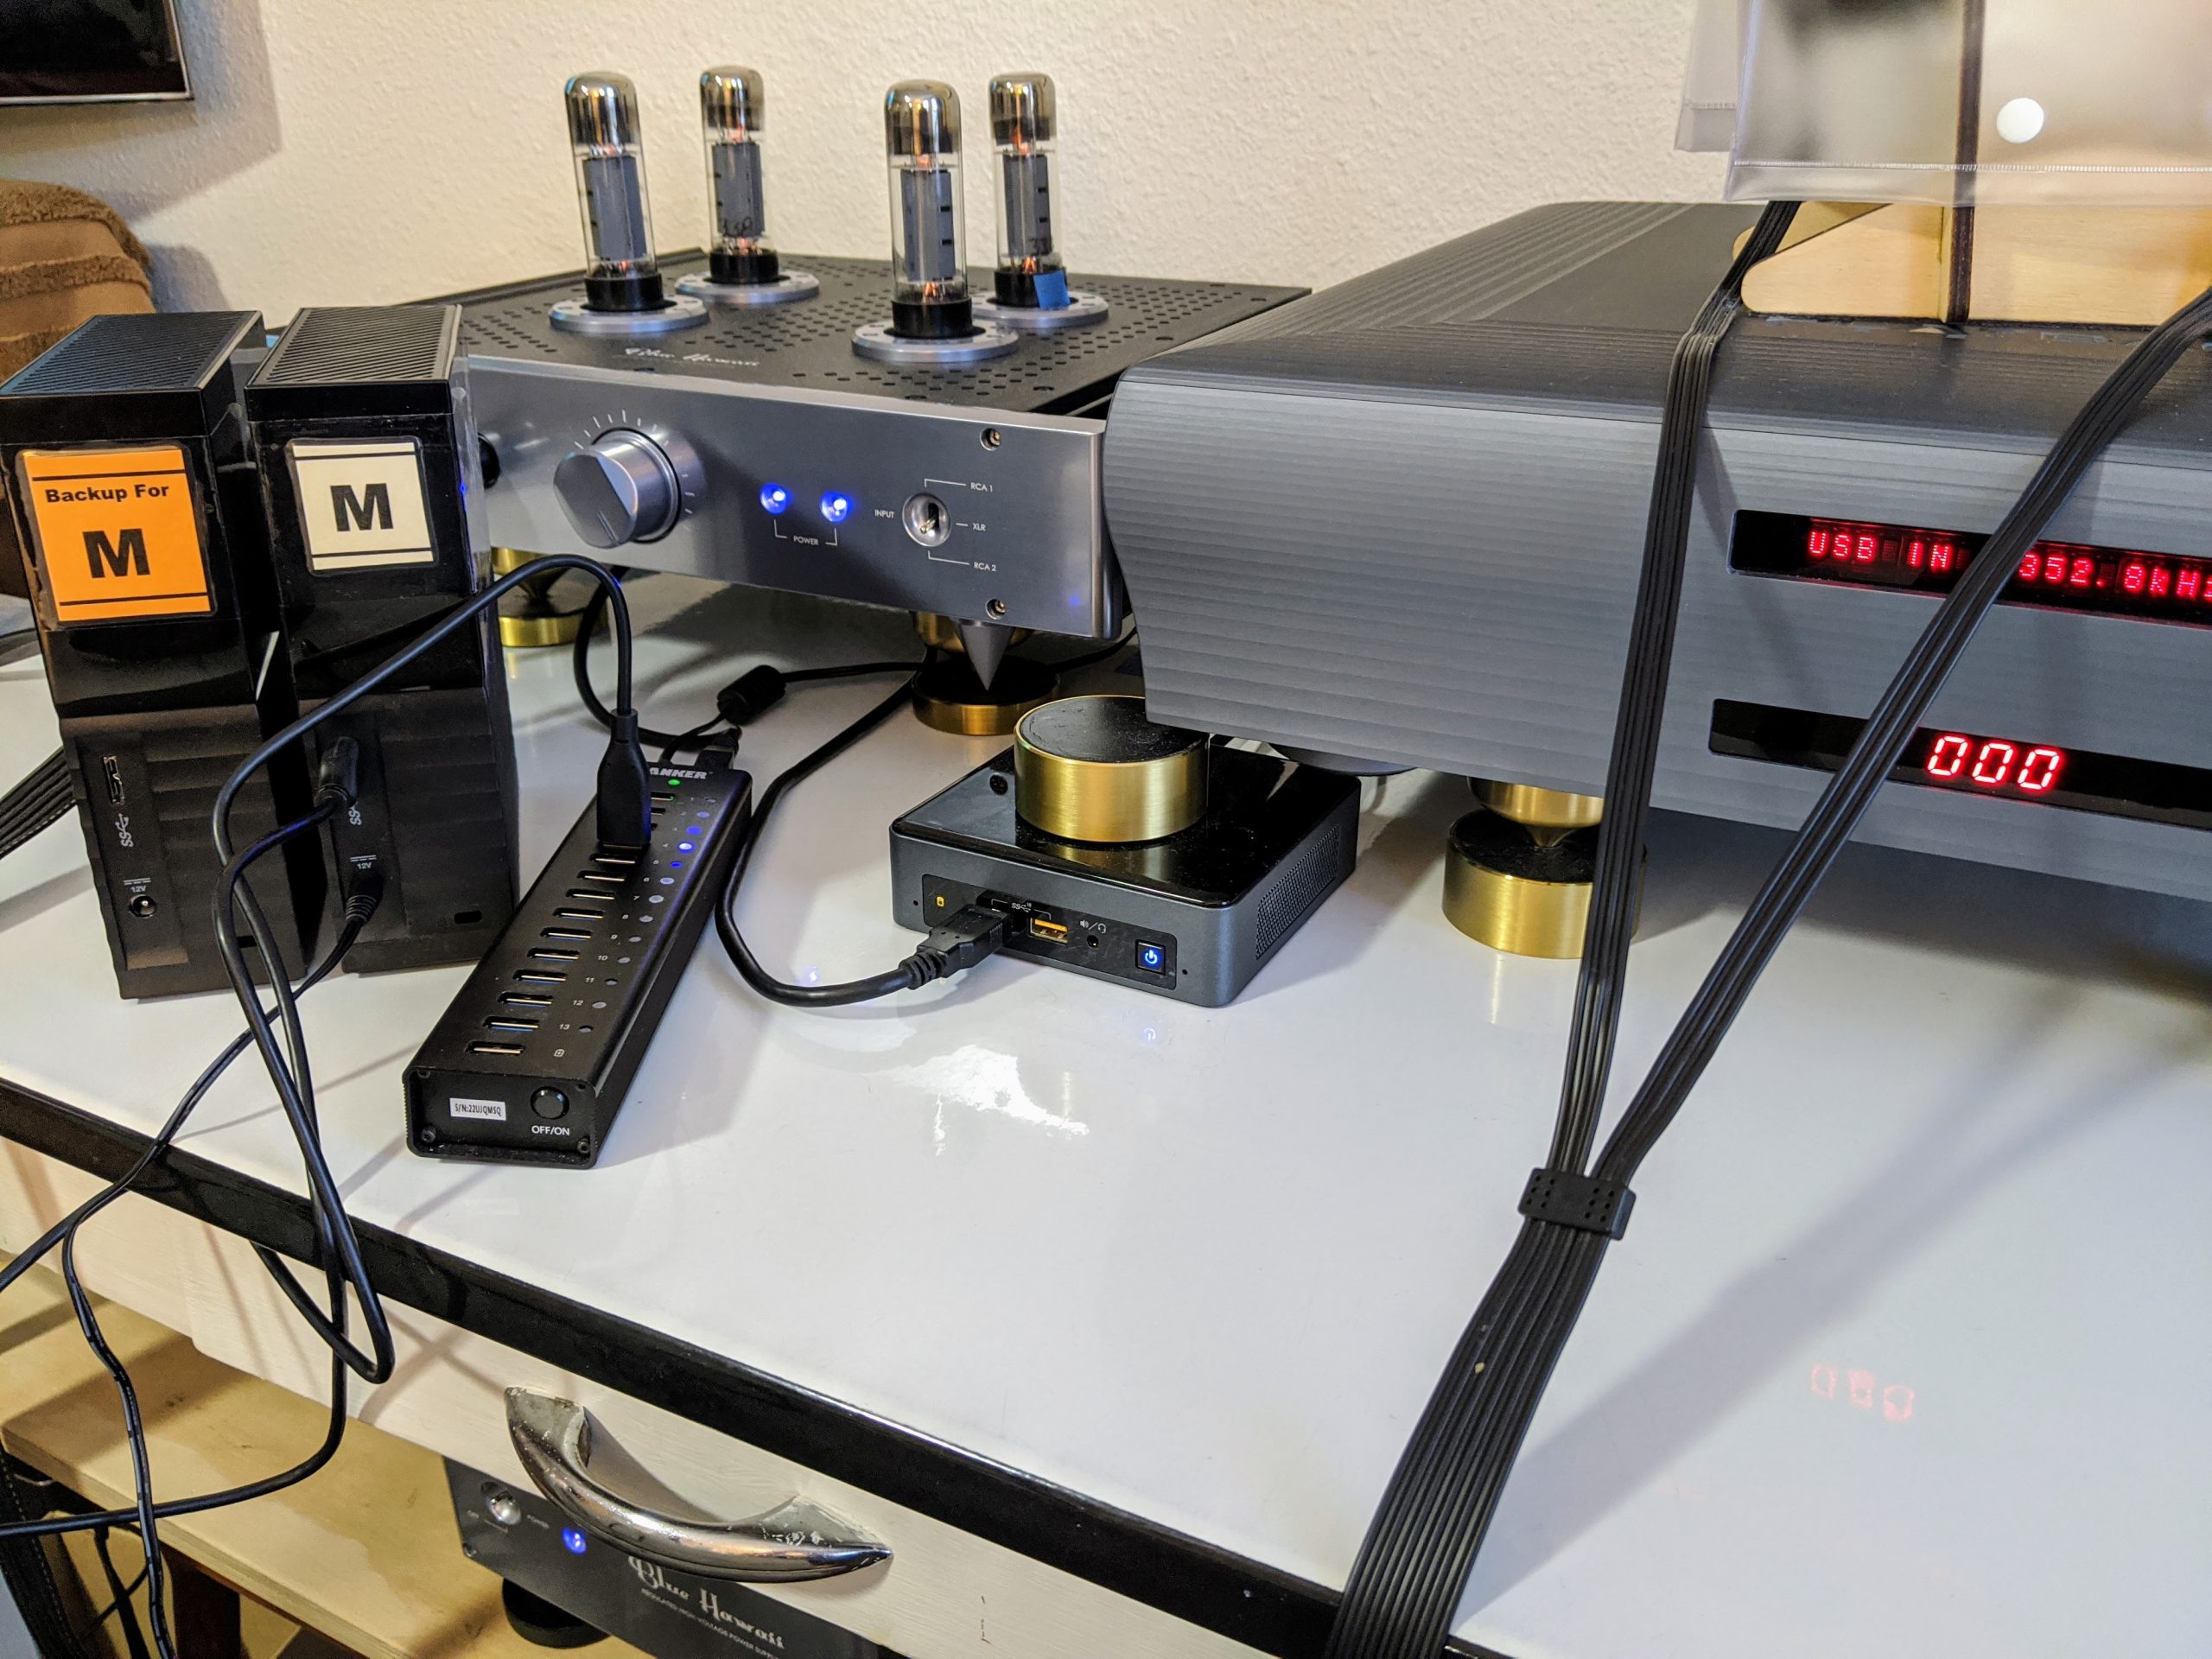
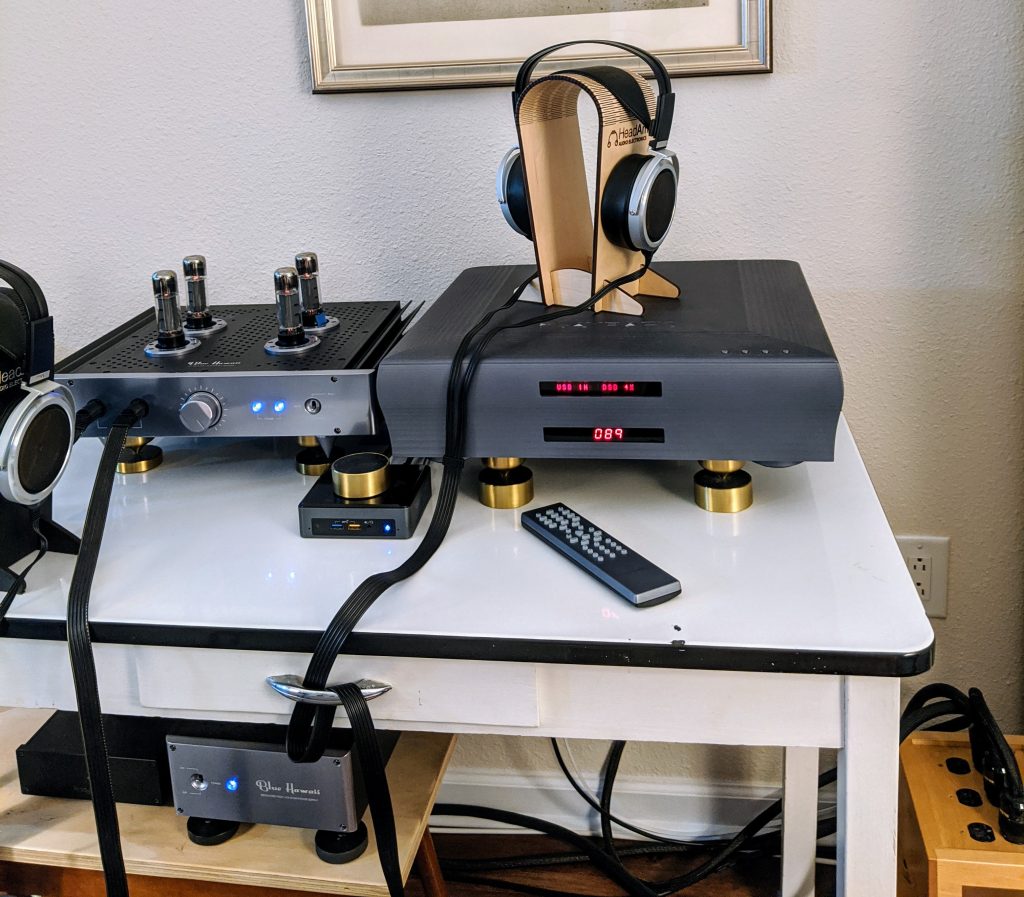
First Iteration of Our Digital Audio System
Our system consists of a Western Digital My Book 8TB external USB hard drive (with matching backup drive) connected to Anker powered USB hub, connected via USB to Intel i5 NUC with TeddyPardo power supply (hidden under the table) running JRiver Media Center. The NUC connects to a Playback Designs MPD-8 DAC using Straight Wire USB cable. The DAC connects via Silent Source Signature single-ended interconnect cables to a HeadAmp Blue Hawaii Special Edition electrostatic headphone amplifier (BHSE) outfitted with NOS Siemens EL-34 tubes driving STAX SR-009S electrostatic earspeakers (out of picture). Power to all devices comes via Silent Source Signature and Music Reference power cables connected to a Walker Audio Velocitor Power Line Enhancer on a dedicated Velocitor stand. Walker Audio Valid Points and Resonance Control Discs throughout.
Note that the backup hard drive (with the orange label) is not connected; the backup drive is simply sitting offline until time to do a backup and would normally be in a cabinet out of the way.
We now have a few more hard drives and have added a second USB powered hub so we can run each hub into a different port on the Intel NUC. (We've also added a second NUC to create the "Stage 2" iteration of our system, described further along.)
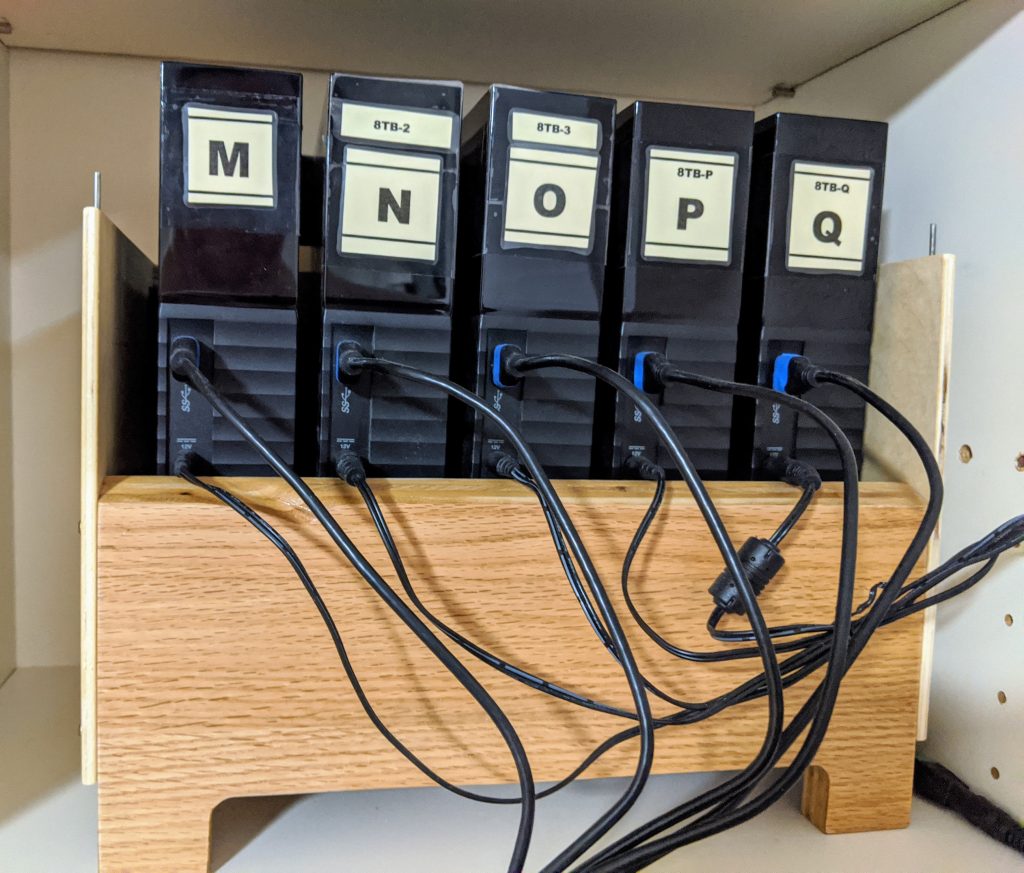
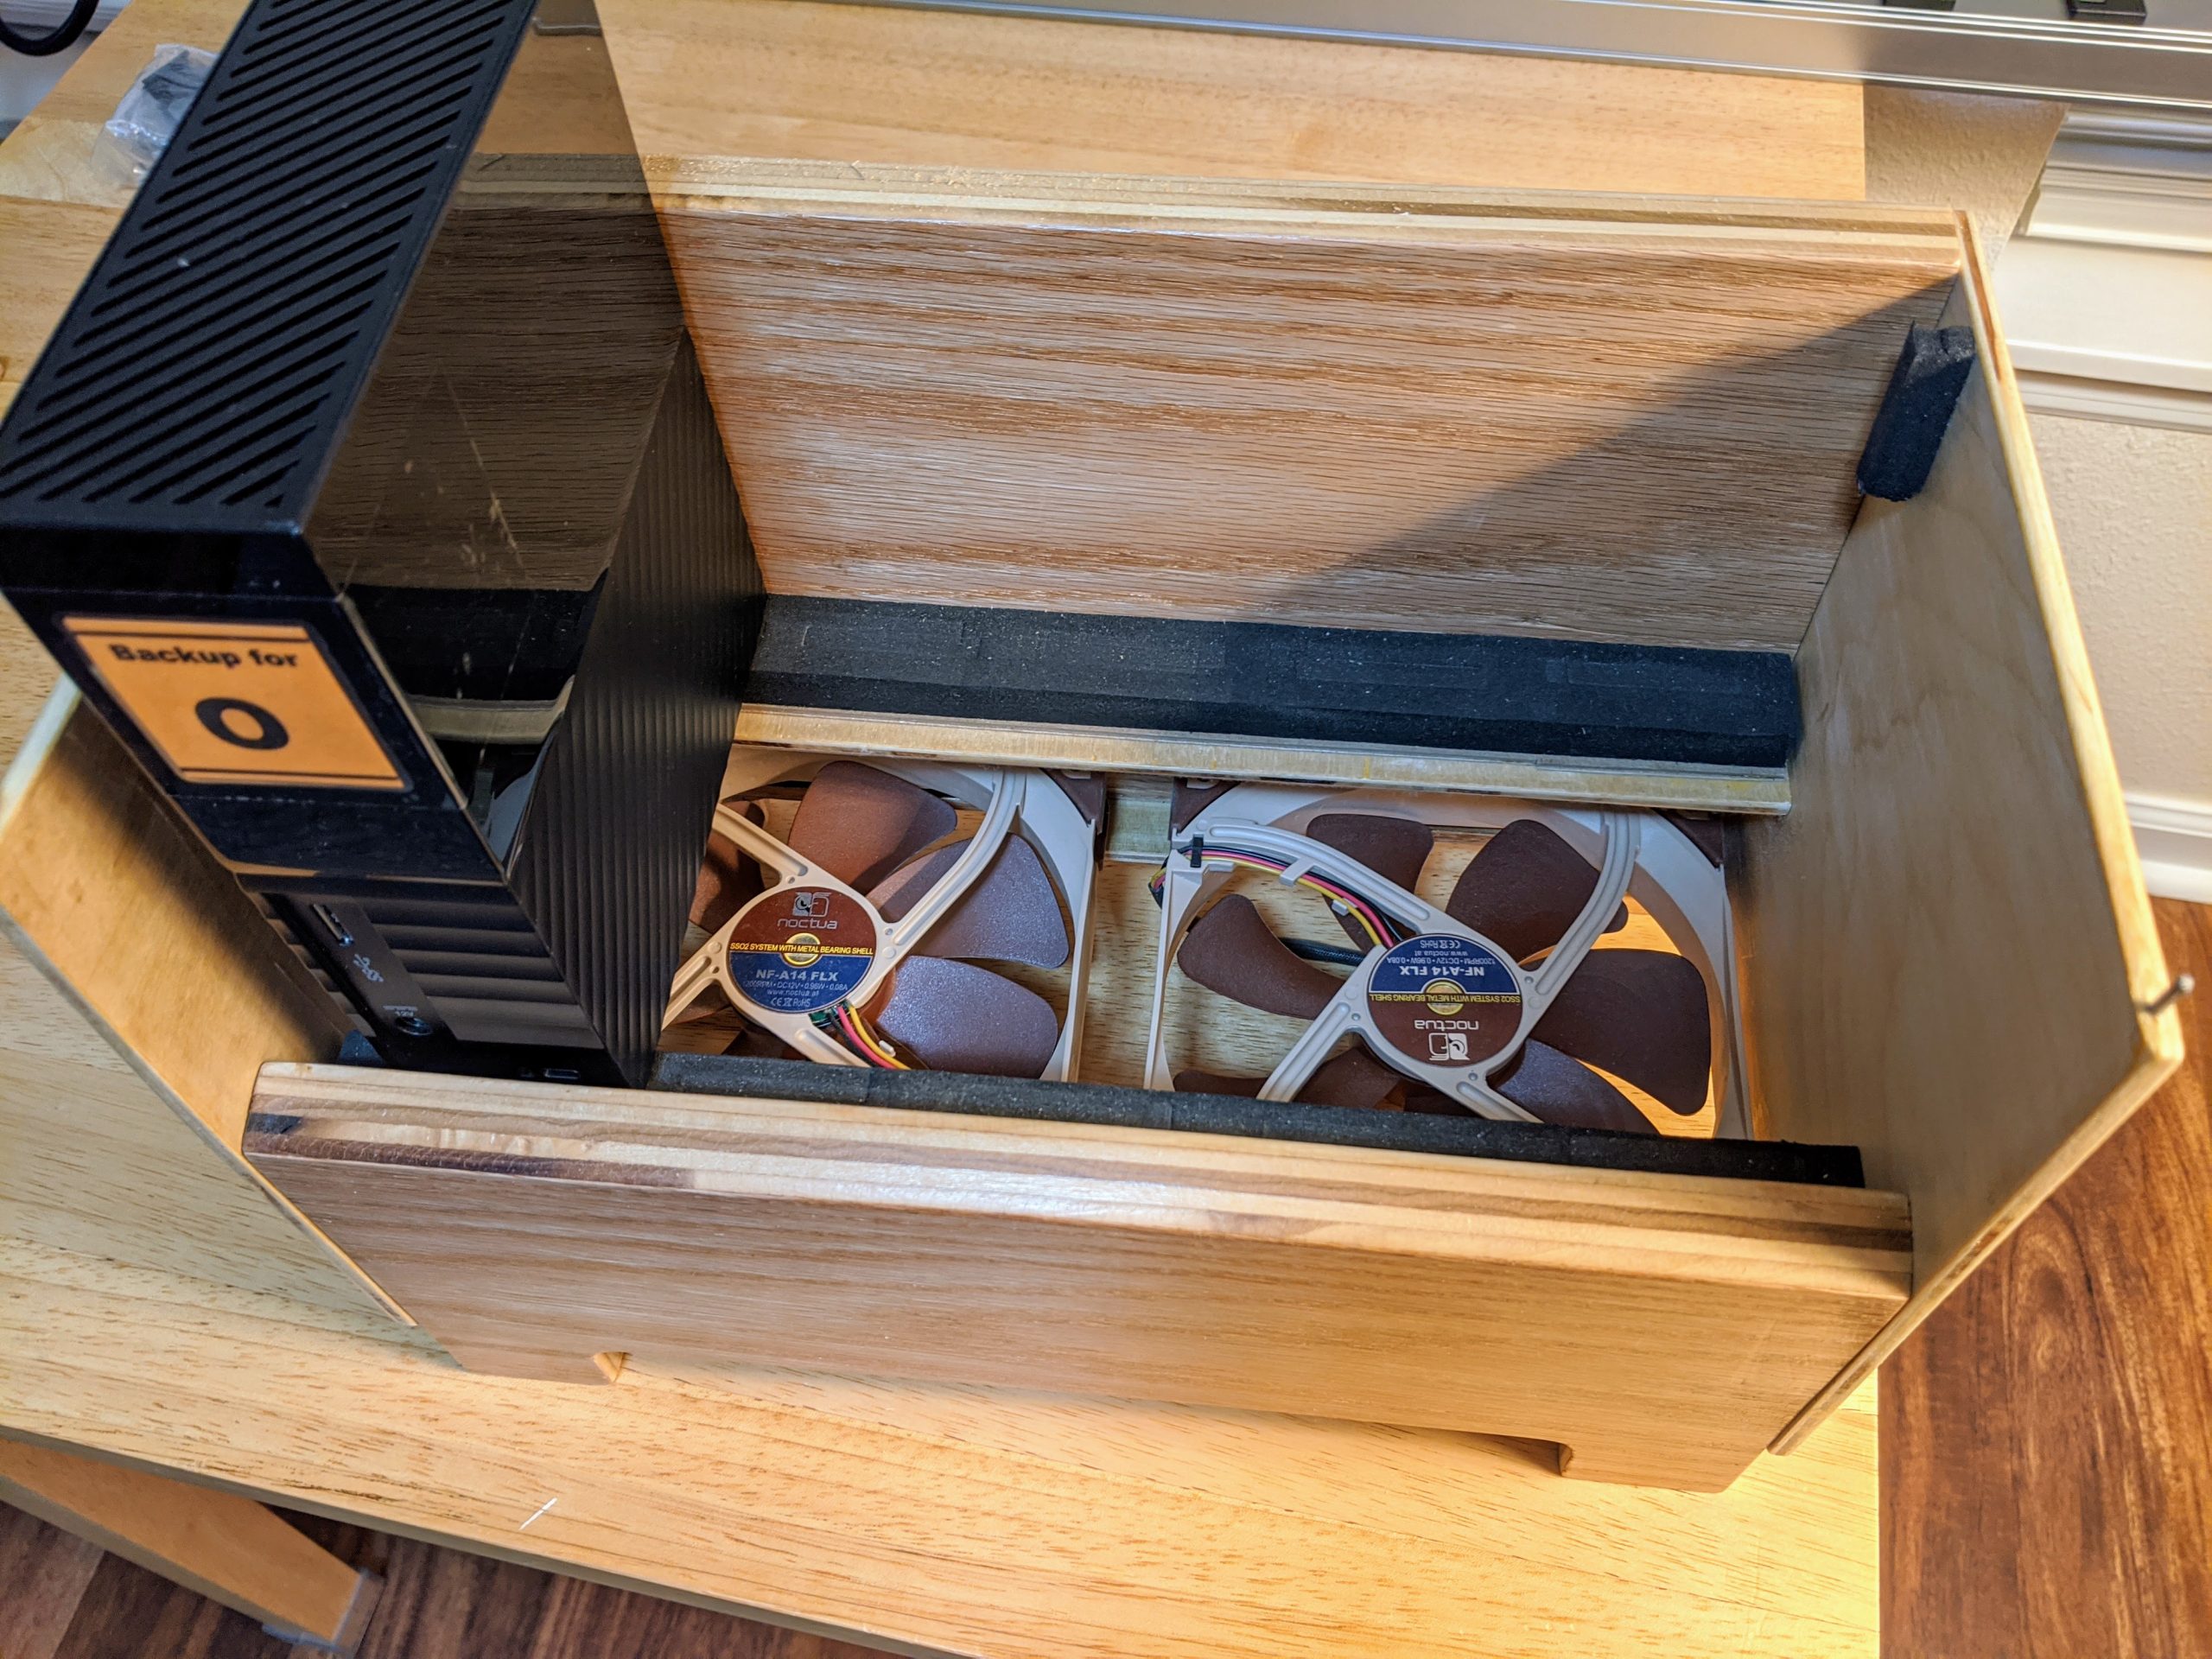
Our strategy of multiple USB external drives has worked out well for us and has given us lots of flexibility to meet our needs over time. With just one or two external USB hard drives at the start, we were able to add a drive, then another, and another as our storage needs expanded. (And, yes I understand drives can be added to NAS boxes as well.) Today, this is our hard drive storage—still all external USB drives:

External USB hard drives on DIY stand with low noise computer fans mounted underneath.
Some further thoughts on external USB hard drives and hard drives generally:
- Don't fill any hard drive beyond 80% of its capacity. They need breathing room to operate. If they get too full, they get slow and there is no space for "administrative overhead" needed by the drive's firmware to manage the drive.
- I typically will fill a drive to 70-80% and then add a new drive to my system, adding any additional files onto this empty new drive. The "filled" drive now becomes "locked down." It is still a production drive, but its content is now static except for corrections and updates to the metadata of files already stored on it.
- Once a drive's status changes to "locked down", regular backups are no longer required as with drives to which I'm regularly adding new files. I will do an incremental backup of a "locked down" drive if I make any changes to files on the drive (like editing metadata), but not otherwise.
- Unplugging and ejecting drives—just be cautious. The risk when disconnecting any removable drive is that it may still be writing data to the disc when it loses power. This will result in data loss and possible file corruption. So be sure any write process has ended before disconnecting (ejecting) or powering down a drive. The most secure process is "Eject" the drive and allow the operating system to tell you it is now safe to remove the drive. Alternatively, power down the computer to which the drive is attached and then unplug the drive.
- With version 1809 in 2018, Windows 10 changed its policy default setting to a more conservative "Quick Removal" policy setting. This was a change from the previous default setting of "Better Performance" [see Microsoft documentation]. The difference lies in how the system handles write caching. Write caching speeds up performance by letting the drive hold data in the drive's memory cache and write it to disc later. When the policy is set to Quick Removal, write caching is disabled and the drive is ready to be removed at any time. These policy settings can be changed by the user, but for all external drives I leave my settings at Quick Removal with drive caching disabled. (Since I don't use Apple hardware, I can't comment about what may be best practices for Apple computers.)
Diagram of our system—how it is lashed together
Here is an overview of how our PC based, external hard drive based, music system is connected together. A dear audio friend of ours, Brian, helped us think through what might work best for us. We did this in two stages.
Stage 1 – just an external hard drive connected to an Intel i5 NUC and connected by USB to our DAC. I don't normally connect a monitor, keyboard and mouse to the Intel NUC, but instead run it headless. When I do want to directly connect a monitor, keyboard and mouse, we do so using an HDMI cable from the NUC to our widescreen television screen nearby and use a wireless keyboard and mouse. For headless use, I connect with my laptop using Windows Remote Desktop to allow my laptop's monitor, keyboard and mouse to work with the NUC.
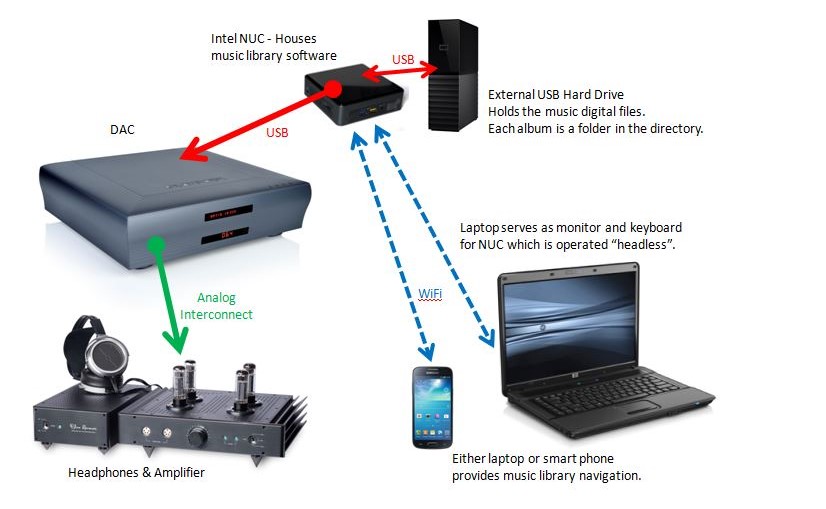
Stage 1 system diagram
Not shown in this diagram is the higher quality aftermarket power supply we added for the NUC. The AC power converters that come with a NUC are electrically noisy. We replaced it with a much higher quality, and electrically quieter, TeddyPardo Teddy19/3 19v 3.5 amp power supply.
Could this be simpler? Yes, eliminate the NUC and simply use the laptop connected to the DAC and external hard drives. Won't sound as good, though; I tried it.
The downside with the Stage 1 configuration is that the disc drives are in the same room where we're listening. They make a bit of noise that I'd just prefer not be in the listening room. Also, the Stage 1 configuration means that software to manage backups, disc health monitoring, and other functions must run on the NUC directly attached to our DAC. I'd rather we be able to strip out from this NUC as many operating process as possible. The fewer processes running, the more likely we can lower the electrical noise in the computer and thus the music system.
These thoughts led to the following Stage 2 system configuration. We added another Intel i5 NUC that would manage the disc drives and become the server for our player. We connected the two NUCs with Ethernet Cat 7 cable and a TP-Link Ethernet Switch. While we were at it, we also connected the laptop to the Ethernet switch as well. Now, these three computers (Laptop, Player_NUC and Server_NUC) all communicate together across this dedicated Ethernet network. Connection to the wider outside world is via the Wi-Fi built into each of the computers and connecting to our home network router.

Stage 2 system diagram
And you may ask, why don't you just connect your NUCs and laptops directly to the home network router? Two reasons: 1) when we first set this up we were in a house where it was not easy to pull an Ethernet cable from the listening room to the router location; 2) now that we're in an apartment with only a single wall separating this system from the router located in the next room, Ann won't let me drill a hole through the wall. Ah, well.
There is also a secondary music system in Ann's office comprised of tablet, another DAC, headphones and headphones amplifier. This secondary system also runs an instance of JRiver on her tablet and has access to the same library of music via a Wi-Fi connection to the Server_NUC.
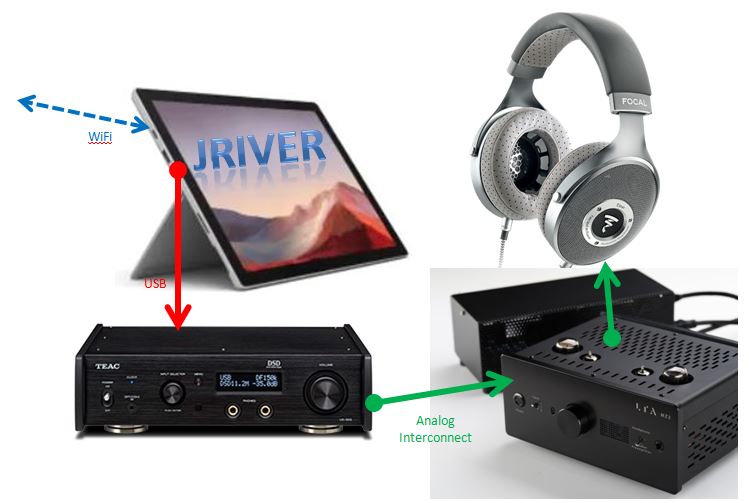
Secondary office system – has access to all of the same music available on the main system via a Wi-Fi connection to the Server_NUC and a separate instance of JRiver Media Center running on the tablet.
Roon or JRiver Media Center – Getting Music from Storage to the DAC
After visiting with several friends to experience their digital music systems, we knew that we wanted some type of music library capability using a searchable database. Our library of digital music was going to grow. Simply navigating up and down a directory folder structure was not going to give us the degree of access to our music library we would want. As classical music listeners, we also wanted to be able to see the various performances we had of a given work, and only a database could provide that to us.
In our vinyl days, I built a custom Access database in which I loaded every work on every album on our shelves. That database was how we found the music we wanted to play (Yes, I'm obsessive about this, but it's part of the hobby that I enjoy—I'm a "collector" of music and all that goes with that term.) So, we knew we would want something similar for our digital music collection
This personal need to take a deeper dive into my musical library meant I needed a software tool to manage my musical library. Just as with my vinyl, I'd not be able to find the music I wanted if I could only scroll through the directory tree as I had browsed my record shelves looking at the spines of the album covers.
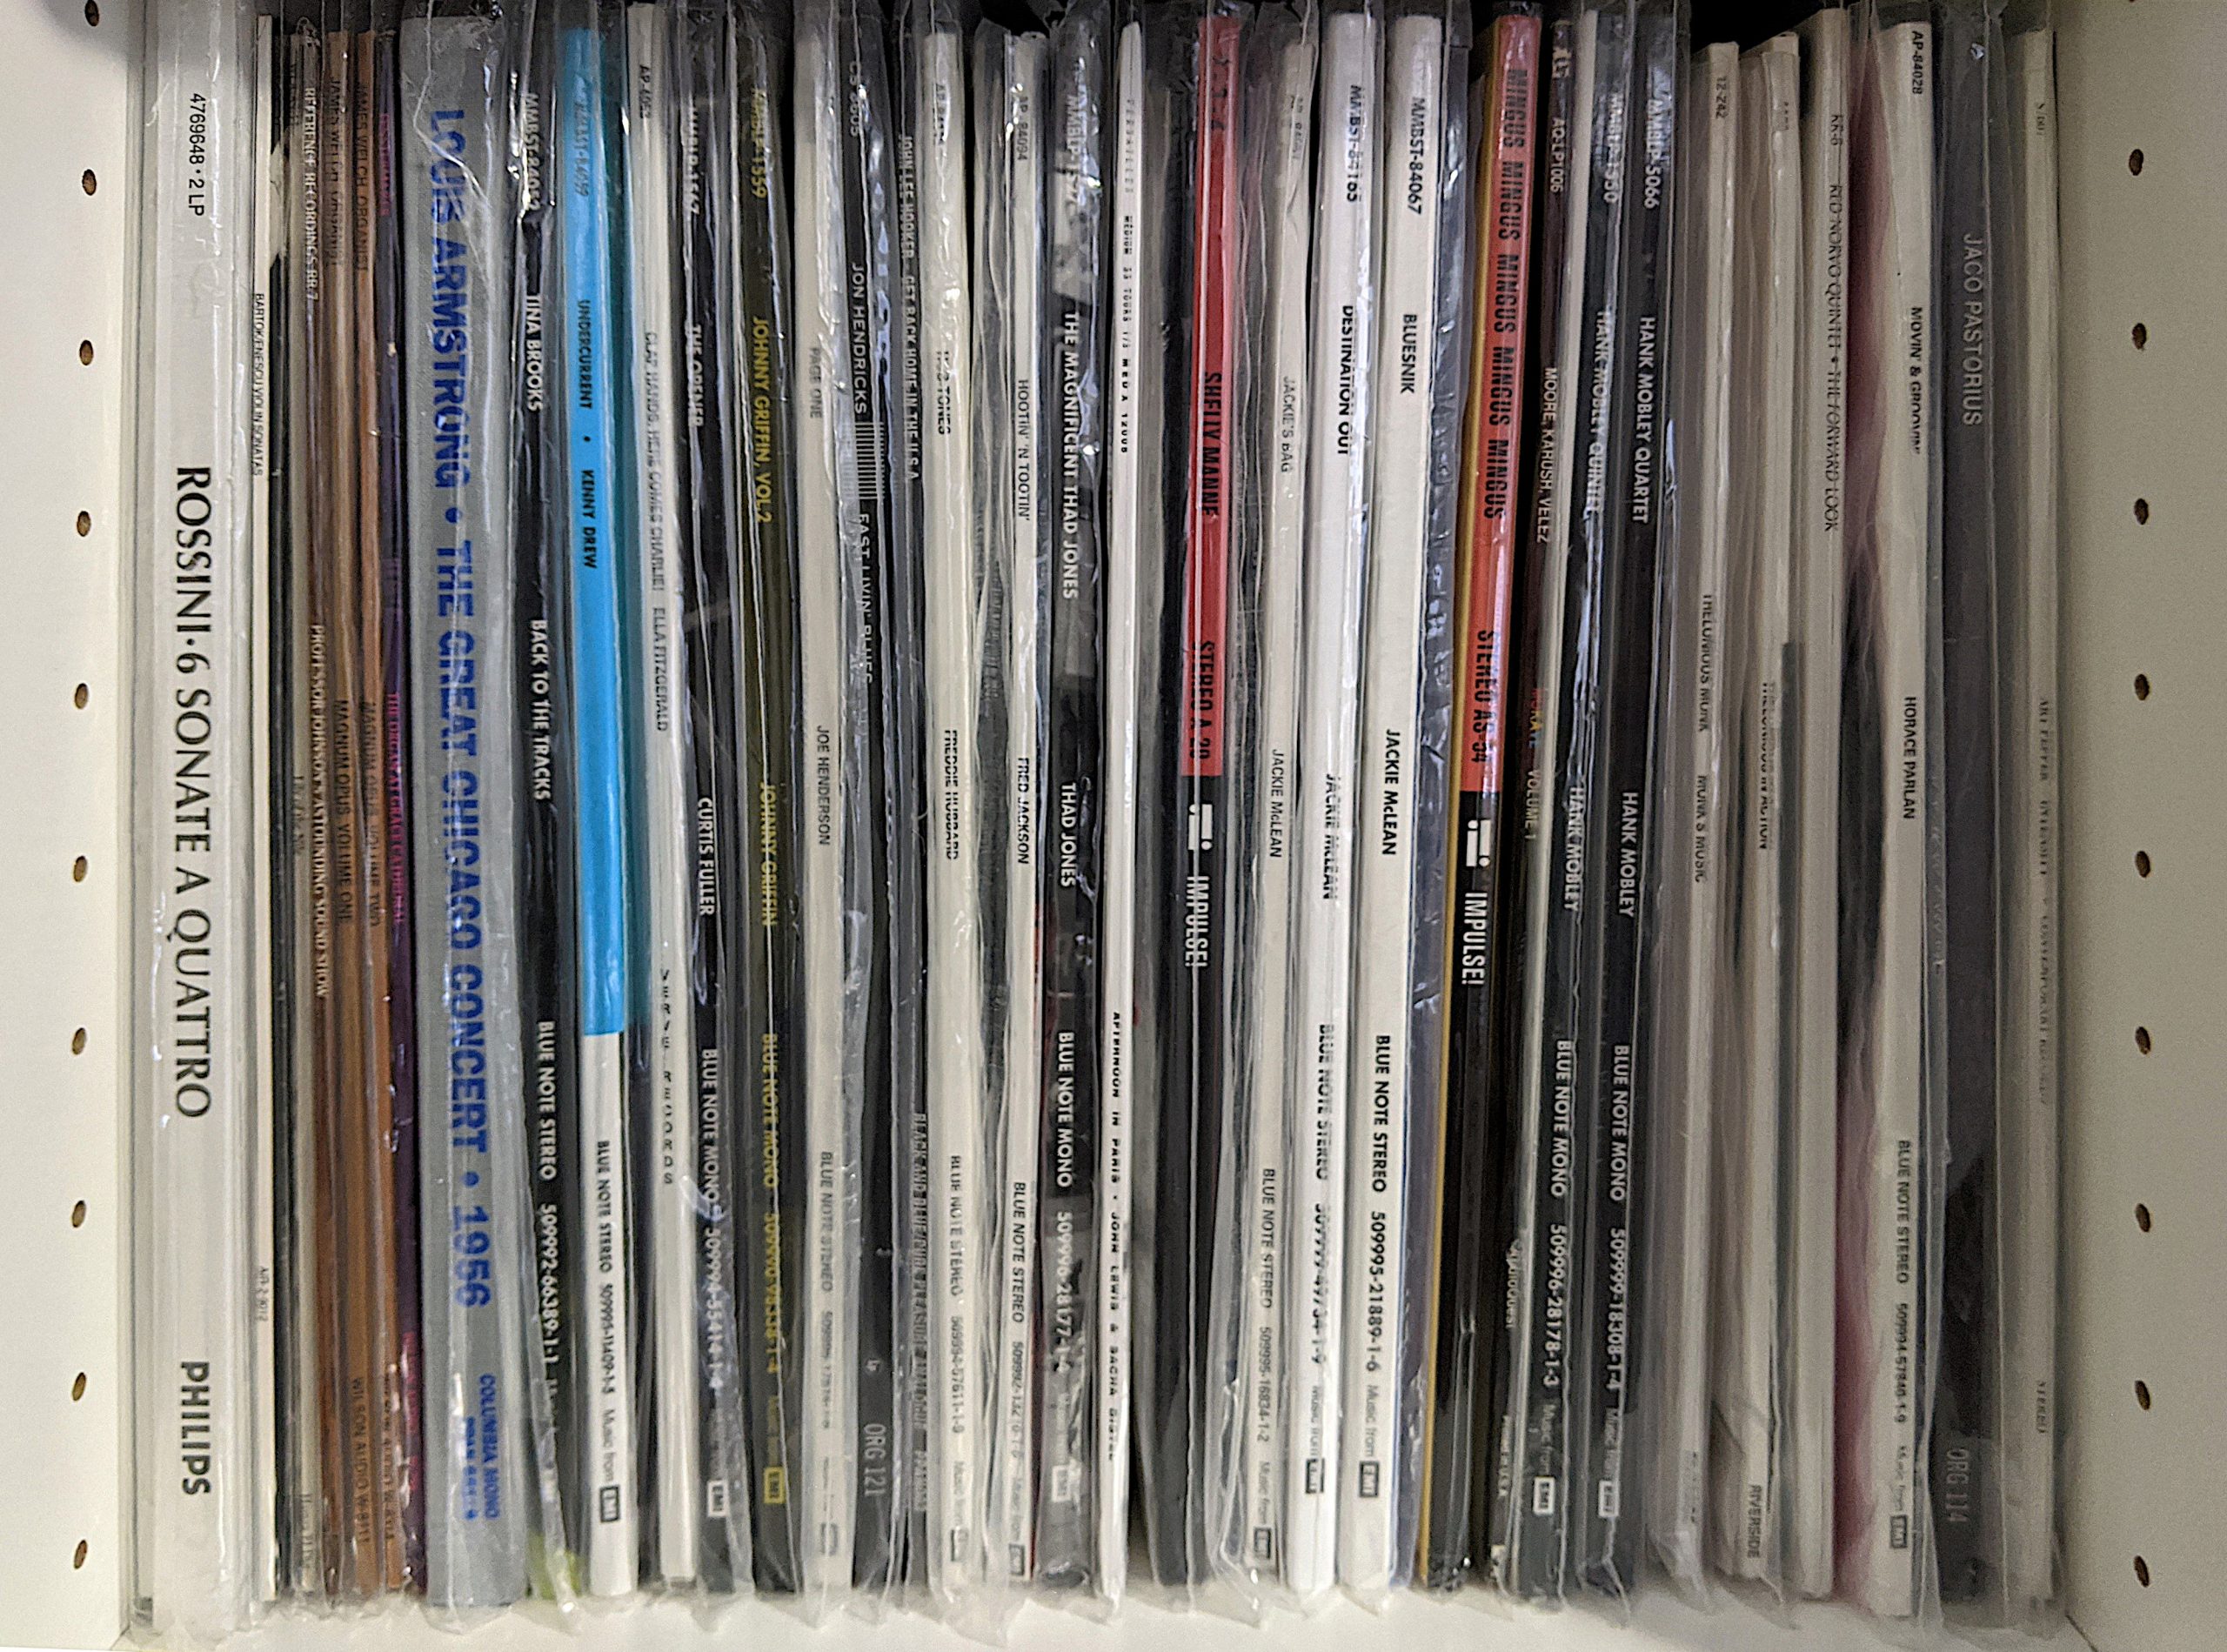
Browsing the shelves sorta works for jazz and popular music because you're typically looking for a particular album.
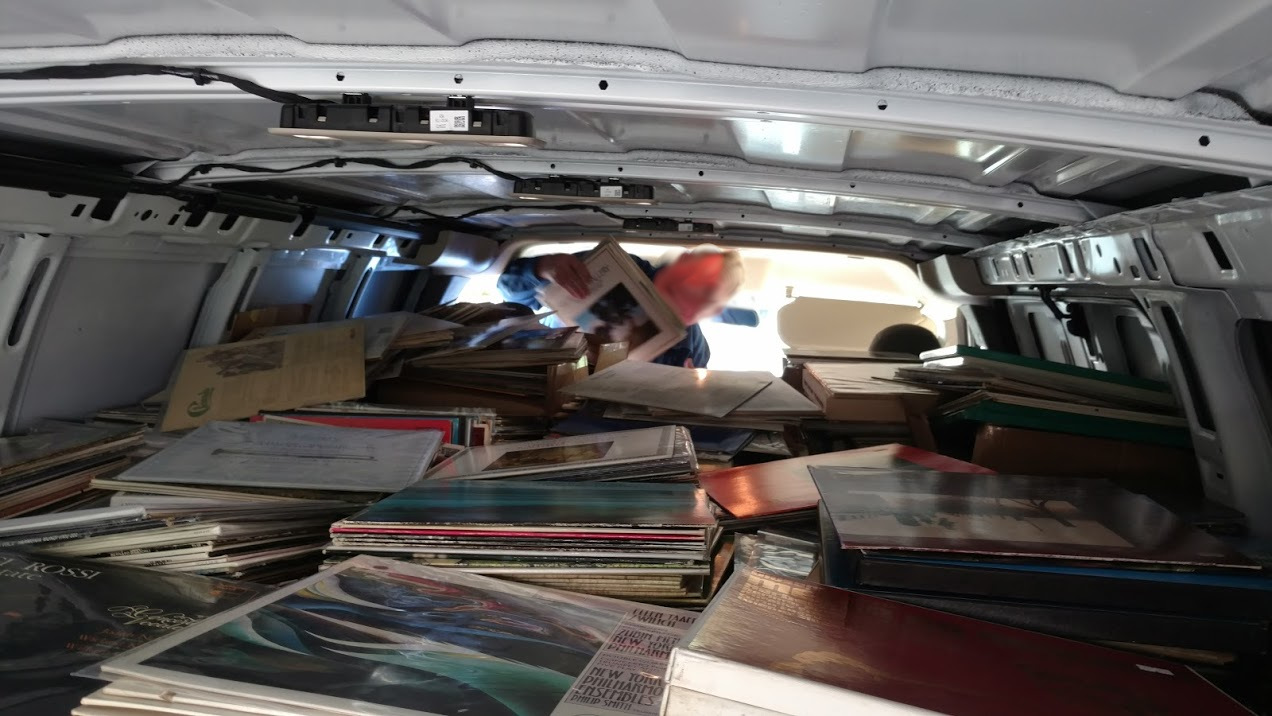
But the classical music albums on the far left are a mystery. Browsing a directory folder tree is just as mysterious—particularly when album titles often do not list all the works contained on the album.
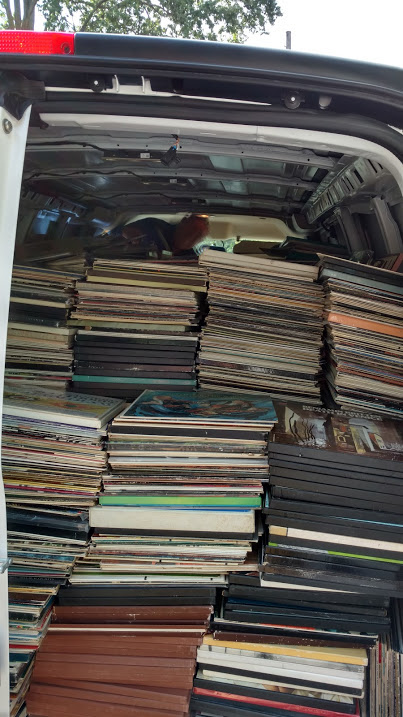
The process is almost as challenging as looking through this pile of my records loaded in a cargo van following the bulk sale. How do you ever find a particular work, let alone the several different performances of that work by different artists?
And yes, this same problem presents itself in jazz and popular music when trying to find different covers of the same song but by different artists. Which different artists in your music collection have recorded renditions / variations on "Goodbye Pork Pie Hat?"
So, a database was definitely a requirement!
And this meant either Roon or JRiver.
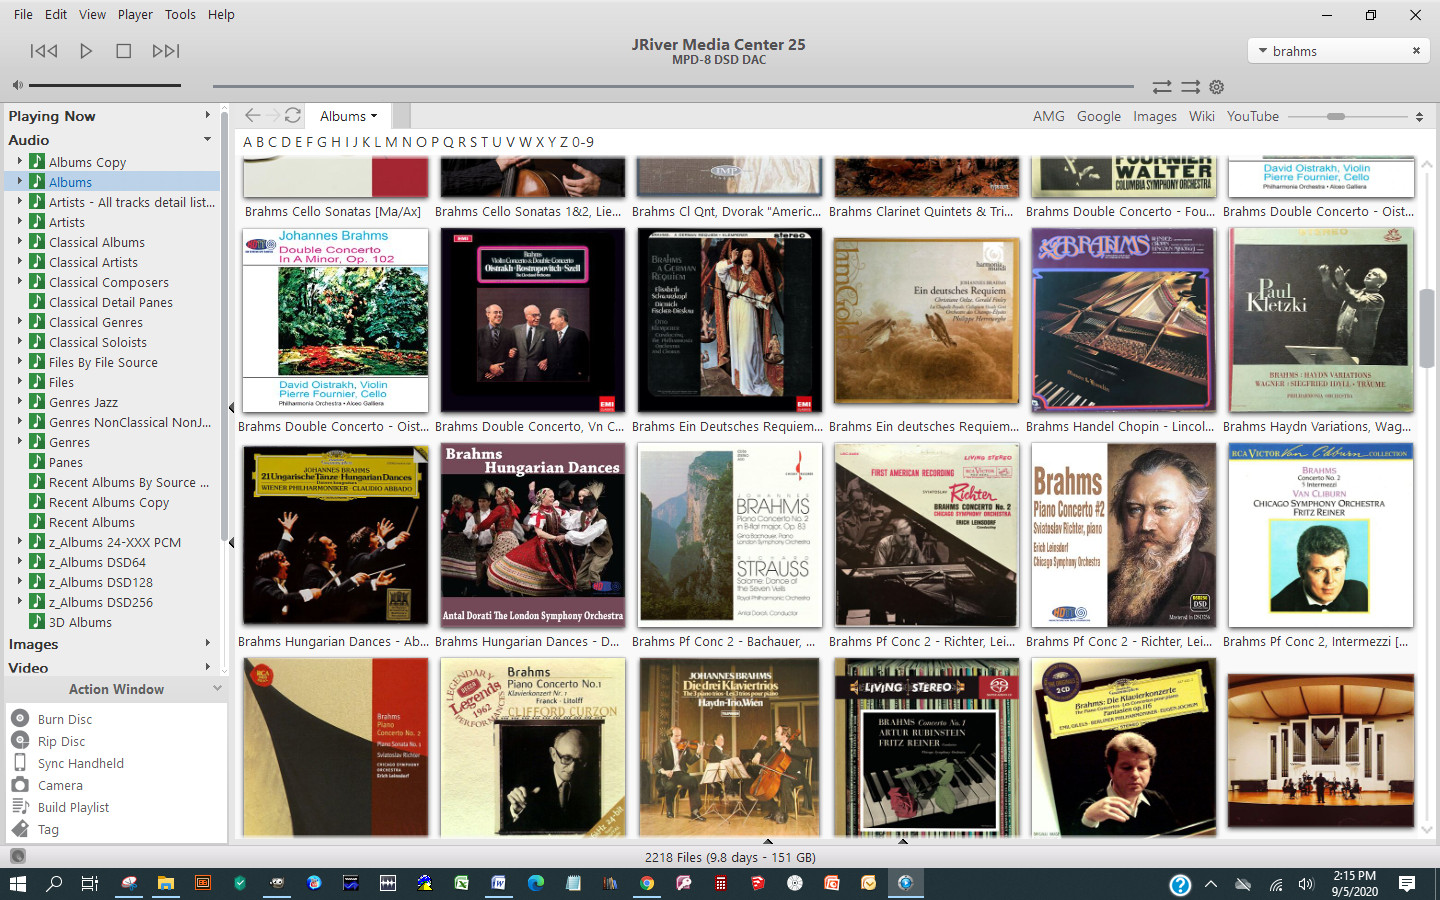
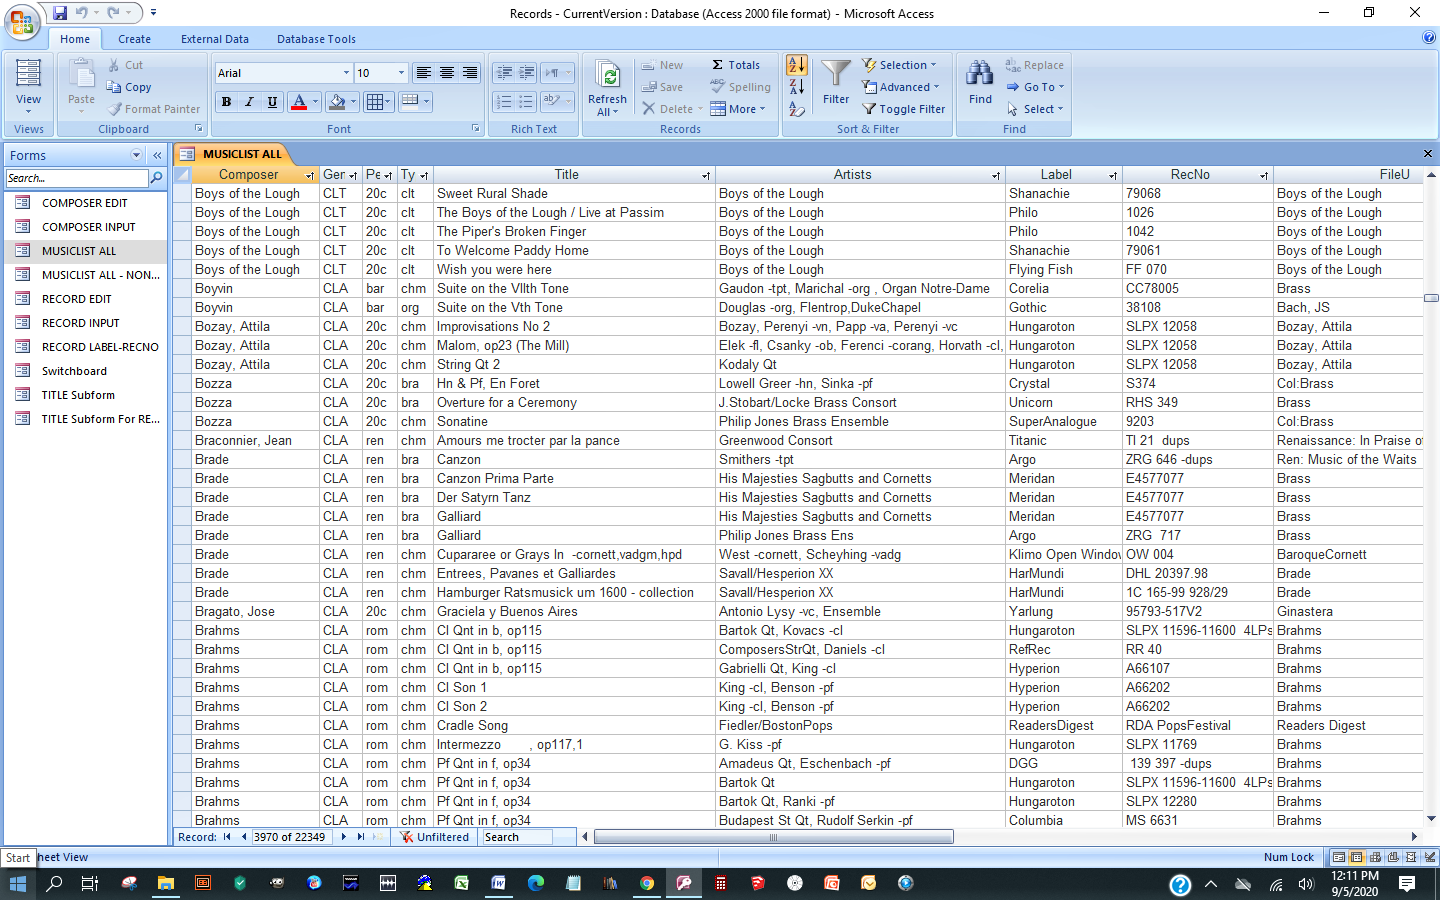
Albums View in JRiver showing only those albums with compositions by Brahms. Roon can also provide this kind of view of your library.
But THIS is the view I wanted to create for looking at my classical music collection, and Roon was not as well suited to doing this (as far as I know):
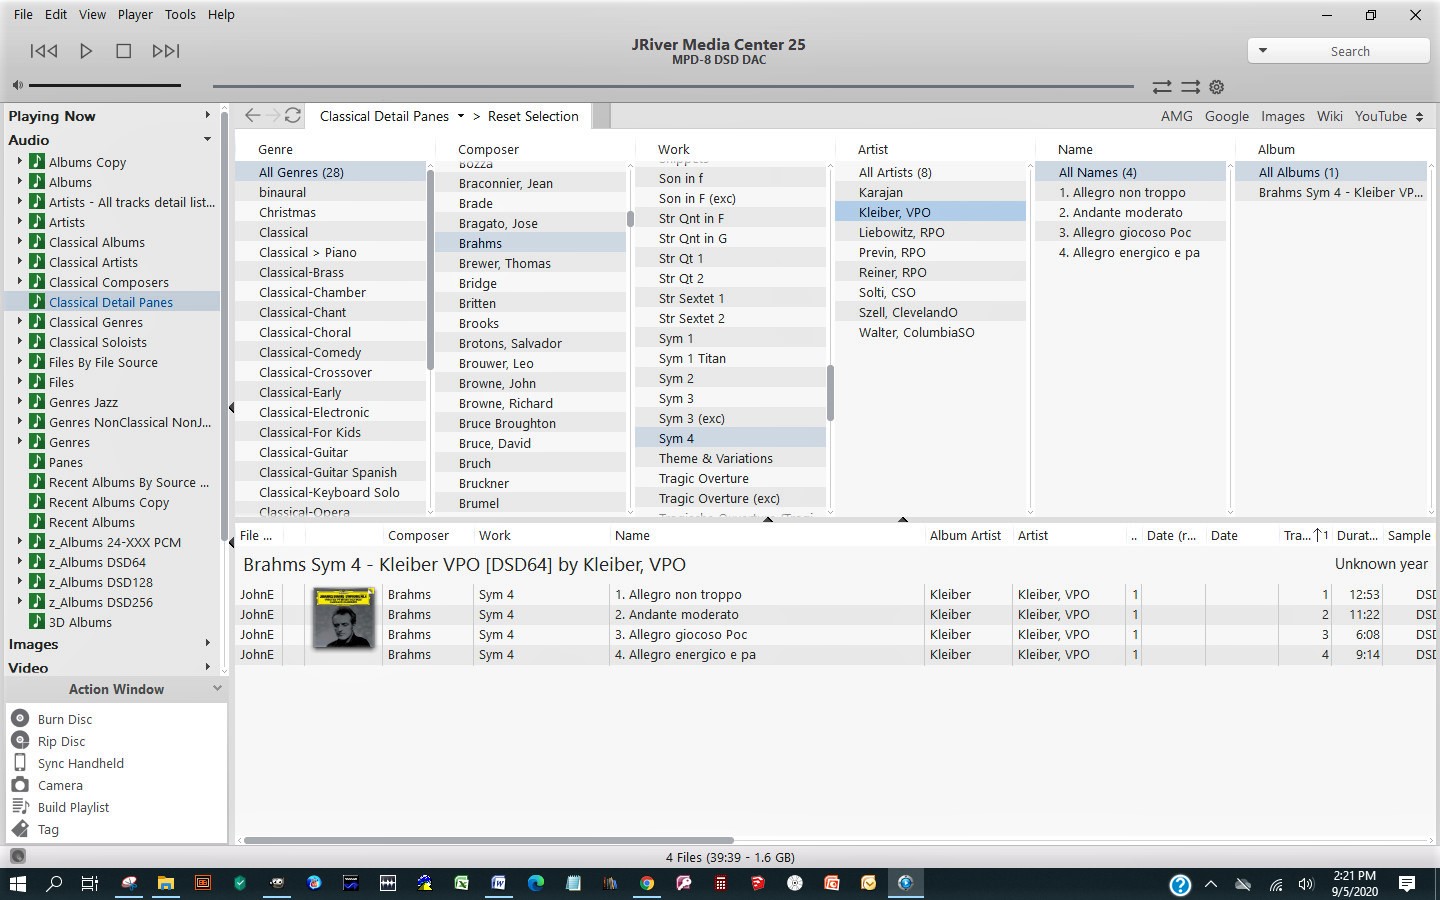
This screen capture shows a custom "Classical Details Pane" view with columns for genre, composer, composition (work), artist, track names (movements), and album name. The Composer selected is Brahms and the work selected is Symphony No. 4. In the artist column you can see that we have eight different performances by various conductors. Clicking on one of them (in this case, Carlos Kleiber and the Vienna Philharmonic Orchestra) displays more information in the bottom pane from which music playback can be launched.
By the way, it is in this Classical Details Panes view that Ann will spend her time whenever she wants to listen to classical music. Not the Albums view.
Metadata makes Roon and JRiver work
Metadata is information stored with each individual file that describes the content of that file. There are dozens of standard metadata fields and you can create custom fields. All of these fields can be edited and the changes saved back to the file so that the edited information now travels with the file wherever the file may go.
In Windows, hovering over a filename in File Explorer will display some of these metadata fields.
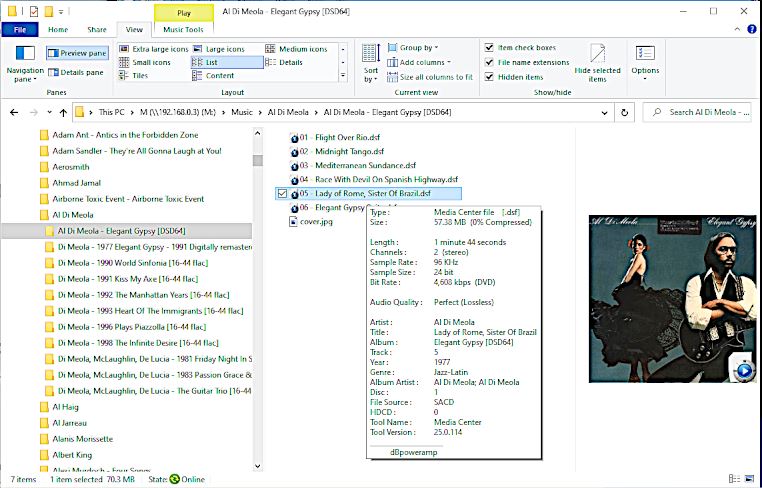
In the window that opens we can see the Length, Channels, Sample Rate, Sample Size, Artist, Title (of the track), Album name, Genre, Album Artist and more. (Note that Windows doesn't recognize the DSD sampling rate and defaults to showing all DSD files as 24-96.)
In JRiver, you'll see this view of the album:

Whether in Roon or JRiver, seeing good quality information about one's music requires some investment of effort. Good quality information depends on good quality metadata in your files.
On CD rips, you typically will obtain acceptable metadata. I've found dbPowerAmp to work very reliably in providing excellent "bit perfect" rips (the most important factor in ripping). It also extracts good metadata, either from the CD itself or from various online databases when the disc itself seems lacking. Different ripping tools provide differing results, but we don't have time in this article to go into those.
For LP rips or R2R tape rips, it's a very different story. You will end up with a file but no metadata whatsoever. You'll have to enter the metadata you want or rely entirely on the filename you create to display in your directory tree. If you rip a lot of LPs, and if you are careful following a thoughtful and consistent convention for naming your files, you can set JRiver to parse the filename to create your metadata on import. I don't know what Roon may do in this regard.
And keep in mind that WAV files and DFF files do not support more that minimal storage of metadata in the file itself. To store metadata, use FLAC and DSF. For this reason, I always rip CDs to FLAC and convert any DFF files to DSF. (And, no, I do not hear any difference in the sound of a FLAC file compared to a WAV file. I have listened carefully and, in my system, to my ears, they sound identical. I recognize other careful listeners experience a different result in their systems.)
Which is easier to use, Roon or JRiver?
I've not used Roon, so any comments I can offer are based purely on observations with friends who do use it and generally like it very much. Two of my audio friends and I use JRiver. Three other friends use Roon.
Overall, if you're not keen on managing and updating metadata in your files, and your sources are either CD rips or downloads, Roon is likely to be easier to learn and to use. This is because Roon Labs have invested huge effort in developing their own metadata for albums. As long as Roon can find enough data to identify the album, Roon will match it to its own extensive library of information about that album and will expand on the information your download or CD rip file includes.
But, for this to work Roon must be able to identify the album and match it.
Case in point, a friend of mine spent a lot of time ripping his CDs and putting the files on hard drives. He reorganized a lot of the tracks into different folders based on how he wanted to build his own playlists. He navigated his music by browsing his directory folders, which he'd named in a way that was meaningful to him but had no direct relationship to the CD's structure or the metadata on the CD. After a few years of this, he tried Roon. And he was very disappointed; just not happy at all. But this is not Roon's fault. My friend had destroyed any way Roon might have had to match his files to Roon's database and then give him all that rich information about his music that he was expecting (and that other Roon users get).
Another friend approached using Roon very differently. He didn't want to input metadata, he only listened to downloads or ripped CDs, and he would keep all the information for a given album in its own folder as delivered by the rip or the download. This friend loves Roon. As he says "I don't want to build the watch, I just want to know what time it is." Brilliant. Just let Roon handle all of this; it very largely will.
In my case, I'm more inclined to "build the watch" and have fun doing it.
JRiver provides much more flexibility to someone like me. Plus, JRiver is designed to work as a library for multiple media types. Do you have a large digital photo collection? JRiver will handle it. How about a large video collection? JRiver will handle it. Essentially, JRiver is a very capable and very flexible database tool for media of all types, not just music. Just be prepared to invest a bit more time learning how to use JRiver and to massaging the metadata in your music files.
Again, it was my friend, Brian, who introduced me to JRiver and taught me how to use it. He's used JRiver for over 14 years and loves it because it can also handle his extensive classic films collection. Of course, he started a long time ago and has climbed the learning curve over all his use of this software. New users should assume they need to find a guide, as I did. (And just of clarification, this is not because JRiver is opaque in operation. It is because there are SO MANY capabilities built into it that the complexity of the offerings can be daunting to the novice.)
And with this, I think we will bring PART 3 to a close. In Part 4, I will talk some about what kinds of digital files we've found that we very much like and seek out, the sources for hi res downloads that we've come to trust and why, and a few examples of sonically outstanding digital files from different labels.
If you have questions or comments, I welcome them.
Links to other Parts in this series:
Yes, There Really is Music After Vinyl - Introduction
Yes, There Really is Music After Vinyl - Part 2
Yes, There Really is Music After Vinyl - Part 4
Downsizing Journey Update: Four Years with the Playback Designs MPD-8
So, You're Planning to Sell Your Collection of LPs?
Product images used in the schematics are the courtesy of their respective manufacturers. All other images by Rushton Paul except as noted.