You are reading the older HTML site
Positive Feedback ISSUE
4Magnepan Tweaks, Part 3 - The (Almost) Ultimate Tweak!
by Ed Morawski
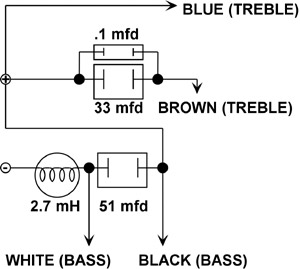
The Magnepans come with pretty cheap crossover components—not much cheaper than any other mass-produced speaker, mind you, but cheap from an audiophile standpoint. They had to save money somewhere to keep those prices down. While the tweeter portion is okay, the low-end portion is awful, with a low-cost electrolytic cap and an iron core inductor. Magnepan uses the iron core mainly because of its cost, but also because it has very low DC resistance and small size for its value (2.8 mH). However, iron core inductors are known to introduce lots of distortion and the caps... well, let's just say there are better ones.
Do you want to vastly improve the sound of your Maggies? How much do you want to spend? The only suitable part to use is a foil coil, because it has low DC resistance. You need to replace the capacitor, and while you're at it, you might as well ditch those weird steel speaker binding posts. www.partsexpress.com has the parts. You will need two 2.7 mH 16 ga. foil inductors ($17.95 each) and two Solen 51 mfd 400 volt polypropylene capacitors ($18.40 each). These values are slightly different from stock, but it really won't matter. WBT binding posts will set you back around $35 on sale, more if not.
If you really want to go full bore, you can use Hovland caps. They don't make anything larger than 10 mfd, so you'll have to parallel several (at about $40 apiece!) to make the 50 mfd required. You should also replace the 33.1 mfd caps for the high range, though you might want to save those for a future upgrade.
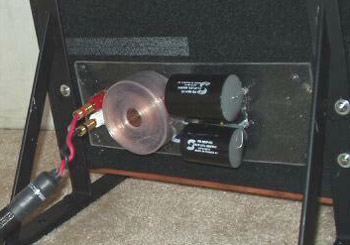
The MG12s are unique in that the factory crossover is mounted in the front area of the speaker, under the sock. (As far as I know, it is mounted in the back on all other models.) This presents some problems when fitting the larger crossover parts. The best solution is to mount them externally. I mounted the parts on a piece of Plexiglas, then screwed the Plexiglas plate to the back of the speaker.
Remove the legs and the speaker connection plate and disconnect all of the wires. Look at the bottom of the speaker. Mine had staples holding the sock closed, others were sewn. Either way, you need to open up the sock all the way across the bottom and pull it up enough to get inside the front cavity and disconnect the four wires. I didn't bother to take off the side wood trim, and was able to work with no problem.
The left and right speakers are different, so here is the sequence:
LEFT SPEAKER: BROWN BLUE BLACK WHITE
RIGHT SPEAKER: BLACK WHITE BROWN BLUE

Pull off each wire (they have spade terminals), then—if you want—remove all the old parts with wire cutters. If you think you may want to preserve the old crossover, leave everything in place, just don't get confused with all the wires. I laid the parts out on the Plexiglas, drilled holes for the wires, and used hot glue to secure them. I mounted the WBT binding posts and wired everything from the back, using as little wire as possible by arranging the caps and coils so they could connect directly to each other. With some careful positioning, you should only need one piece of wire.

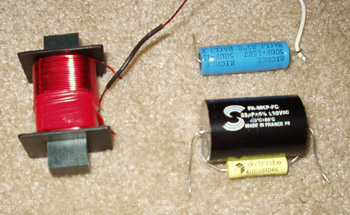
Old crossover parts
While we're on the subject of wire, you will need about two feet to connect each crossover back to the speaker. I bought some pure silver wire insulated with Teflon on eBay for $100. You should use at least some form of Teflon-insulated wire, preferably silver-plated copper of about 16 gauge. Whatever wire you use, mark it with colored tape or labels the same color as the factory ones so you will always have a reference.
Put everything back together and test it before closing up the sock. If everything sounds good, staple the sock and, if you want, you can screw a piece of one-inch molding stained to match the side trim pieces. This makes for a nice, neat appearance.

New crossover installed
Now that everything is upgraded, the caps will have to break in again, perhaps another 100 hours or so, but you will notice an immediate improvement. On my speakers, the midrange is stunningly smooth and clear, and the bass seems to go much lower with more slam. The bass keeps improving during the break-in process. I turned off my subwoofer weeks ago, and don't miss it at all.
