You are reading the older HTML site
Positive Feedback ISSUE
43may/june 2009
acoustic system international
Resonators
as reviewed by Marshall Nack

|
MARSHALL NACK'S SYSTEM
LOUDSPEAKERS
ELECTRONICS
SOURCES
CABLES
ACCESSORIES
|
Taking Inventory
As an audiophile in good standing, you know it pays to periodically re-assess your accumulated tweaks. It's not uncommon to wake up one day and find yesterday's panacea has subtly morphed into today's culprit. You have to look back every now and then.
I go through this exercise roughly once a year. This past December I came to the conclusion that all of the Harmonix RFA-78i Room Tuning dots deployed on the sound room walls had to go. Yesterday they were indispensable; today I found them contributing to my issues. In their place I put up a complement of Marigo VPS SuperDots, but I won't sell the Harmonix RFA-78i. They work; they just address different issues than I have right now. The last time I did this comparison it came out the other way around. Just as with wires, I find it's useful to maintain a small library of each tweak category.
However, there are two room tuning tweaks that have proven their effectiveness every go 'round and are permanent fixtures in my room: the Argent Room Lenses and the Acoustic System International Resonators.
The Exception
I was one of the early adopters when the Resonators were first brought across the Atlantic from France about seven years ago. It was simple: they were demonstrated in my room; they wowed me; I acquired a quartet.
The Resonators are placed on the room's walls according to the instructions provided. When sound energy activates them, they become secondary sources of energy themselves. Given that, how do you think they affect the sound? You would logically expect it to become softer, more full-bodied, and also blurry, right? Well, that's only partially true.
Yes, they add gobs of body and make the sound round, softening sharp treble edges in transients. The resulting sound is less mechanical and more acoustic. But, unexpectedly, the Resonators' major impact is improved dimensionality and imaging.
And one more thing. Over time I noticed an effect not replicated by any other tweak. Listeners pick up side and rear room cues because the Resonators bring the sound out into the room. Without them, the sound hangs like a dead fish up at the plane of the speakers because, if you are like me, our rooms have been treated to tame reflections and resonances. This is a necessary step, but it has the undesirable side effect of creating a dead zone. Ideally, you want the room to participate in a controlled way.
Suffice it to say, the Resonators' effects are only partially predictable. I hear what I described above with a quartet of them—but that's nothing compared to what I heard at my former publishers' house. He installed a full complement, including the exotic Platinum ones, and the memory lingers. I've always had it in the back of my mind to experience the complete set, and so we come to the present article.
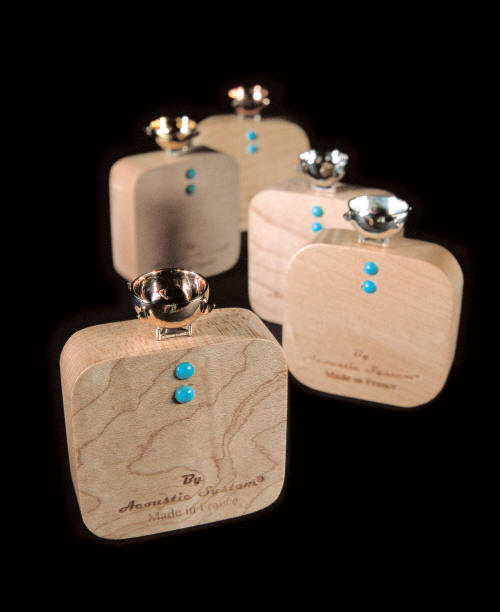
The Resonators come in five different metals (group shot at top), each with their own characteristic effects. Going into this review I had them deployed around the room based on tips gleaned from various Internet reviews.
One Basic placed high in the center of the front wall.
A Gold positioned similarly high in the center of the rear wall.
Two Silvers, one above each of the speakers, at close to ceiling height.
First re-positioning
The importers plan was to walk me through progressive stages. First he had me rearrange the quartet I already owned.
The Basic was moved to the base of the front wall, and centered.
The Gold went about midway up and again centered. If this isn't possible because you have a window or the like there, then find a support, like your rack, and place it on a shelf. Mine went on the CD transport, on the top shelf.
One Silver should be centered high on the front wall.
The other Silver went high and centered on the back wall.
Then he instructed me to identify the side with "the narrow gap" on the Basic Resonator and face that towards the listener. "What's that you say?" This is where it gets interesting.
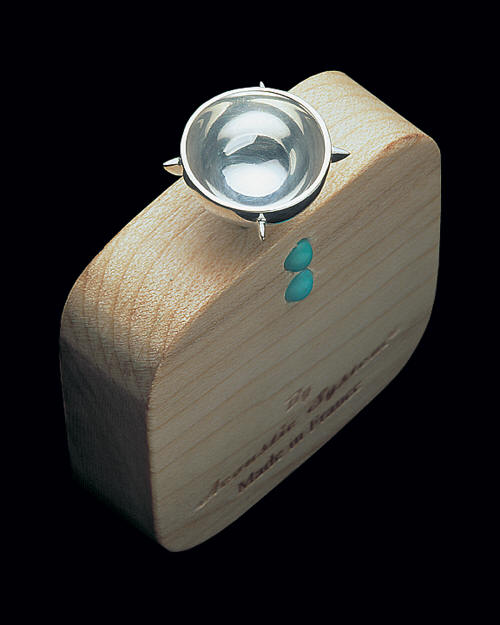
Place the Resonator flat side down on a sheet of white paper. Use a pencil to trace its circumference, noting where the four antennae protrude, and measure the distance between them. The distances are not equal. The gap between one set of antennae is smaller than the rest. This is the "narrow gap" side he was referring to. He wanted the "narrow gap" of all three front wall Resonators facing the listening position. He also wanted the Gold cup in the middle position tilted back away from the listener.
OK. And the results?
I cued up Bookie's Cookbook, a well-recorded jazz quintet led by bassist Walter Booker (Mapleshade 07232).


It was just as the importer forecast: imaging improved, bass got tighter, and there was more brilliance on top. On the negative side, soundstage width constricted. The effects were seemingly wholly predictable.
Upon hearing this feedback, he honed in on the soundstage width and told me to rotate the Gold and Silver bowls on the front wall to point the "wide gap" towards the listener (this is the side opposite the narrow gap). Results? The stage got wider and focus dropped a notch, again, exactly as he said. Talk about targeted results!
What's happening is the side of the Resonator facing the listener controls focus. The "narrow gap" side yields maximum focus. The "wide gap" increases stage width. The importer likes to start customers with high focus because it gives the most dramatic initial impression. Also, having that Gold tilted back towards the front wall serves to throw a deeper stage.
The Resonator at the baseboard impacts the low frequencies most; the one in the middle of the front wall controls the midrange; the one near the ceiling, the highs. You can rotate them individually between wide and narrow gap for varying bands of focus, or do the whole lot.
So right from the get-go I learned the Resonators are not truly plug-n-play. They can be tweaked for specific effects. I also learned this tweaking information has never been published and goes well beyond what's out on the Internet.
Next Step - Treat the Sidewalls
Moving up to the next level, locate the first reflection points—the point along the sidewall midway between you and the speaker on the opposite wall. Place a Silver Resonator up near the ceiling at that point on each side. Drop it the same distance from the ceiling as the Silver over at the top of the front wall. The "wide gap" should be facing out.
Now you've compounded the benefits of the first quartet and achieved refinement. The sidewall Silvers clarified image outlines and began rounding them. With this level of Resonator application, three up front, one on each sidewall, and one on the back wall, the familiar confines of your soundroom drop away. Playback appears to be happening in an open, large space. Walls and speakers disappear and the noise level drops. Your brain is used to hard cues; boundary cues get softer. The physical room is no longer limiting the perceived stage.
Perhaps the effects are best appreciated if you were to take them out again—you would hear a bigger sound with more explosive dynamics, but it would seem distinctly gritty, edgy and lacking control.
Upgrading to Gold
After this I was instructed to do the following:
Replace the front center Gold with a Gold Special.
Replace the first reflection Silvers with Gold.
Replace the Silver on the back wall with Gold Special.
I cued up another reference CD for sound and performance, Bartok Piano Concertos, with Pierre Boulez and various orchestras and soloists (DG B3885-02).
In general, you can think of the metals' color and temper (or hardness) as a good indicator of how they sound when activated. They sound like they look. Silver doesn't resonate much below the midband, so it adds treble energy and transient snap. With the Silver bowls, I heard mostly the action of the bow from double basses. High-pitched instruments like cymbals and muted trumpet come forward.
Since gold, on the other hand, doesn't resonate much in the treble, it shifts energy to the midrange and lower. Swapping out the Silver for Gold replacements added a heck of a lot of warmth, weight and fullness. The double basses acquired more wood sound. The Gold Special is even rosier than the Gold and is warmer, with more midrange bloom and a bit looser bottom.
The copper component in the Basic has less warmth and its hardness complements the low frequencies. Platinum is more whitish than gold and is the hardest of the lot. Consequently, it is the most neutral and disperses energy evenly over the frequency bandwidth.
Platinum Arrives
When the Platinum came in, I was instructed to put it in the middle of the front wall, replacing the Gold Special. As expected, tonal balance shifted up towards the treble, temperature cooled off, and the low-end lost some heft. Unexpectedly, the low-end had more punch and crispness.

Everything got tighter. The Platinum's biggest impact was the sharpening of imaging and resolution. Suddenly the view was clear as a bell, with seemingly zero obscurity. If you want to hear every note played, clearly and evenly across the frequency spectrum, with exact placement and full-body, the Platinum is your man.
The only thing was the midband had a bit of dryness—I missed the Gold Special's bloom. So, I told my story to the importer, who promptly said, "Of course! Now you have three whitish Resonators along the front wall. Take the Gold Special and replace the Silver on top." And sure enough, the bloom in the mids came back, along with a slight dip in the treble.
No more critical comments. This was the cat's meow. It was starting to make sense.
a Little Sidebar
Ever since high-end designers decided to remove tone controls we have had to resort to other means to adjust system tonal balance. Often the replacement controls employed were footers or cables.
In this context, I hasten to point out the Resonator tool-kit has got to be the most effective means I've come across for adjusting overall system balance. The range from metal to metal is very wide. In addition, the height of the Resonators from the ceiling is important. Begin with the Resonators 10″ from the ceiling. Drop them an inch—you will get more bass. Raise them an inch—you will introduce more treble.
Four Silvers on the Front Wall
That's it for the different metals. Now we moved on to varying Resonator placements. I was instructed to place a Silver in the top and bottom corners of the front wall. (This was in addition to the three Resonators already arrayed vertically in the center of the front wall.) Note: Unlike the placement instructions for most wall treatment products, the Resonators in the corners should be placed quite close, within 1" to 2″, of the sidewalls.
If you crave the illusion of depth, you'll love this. Images stretched front to back in layers with really incredible 3-dimensionality. The sound became wet and liquid. Transients, sustained notes, everything had rounded edges. And from disc to disc, everything sounded pretty.
But these effects were a bit much for me. I wasn't hearing enough differences in source material, and the enhanced 3-D had begun to seem exaggerated. Also, the soundstage had begun to shift in an unnatural way.
Other than depth shrinking and the loss of ambiance, I preferred the resolution and crisp edges of my usual ceiling corner treatment, the grandé 60 mm Marigo VPS Super dots. (Note: I'm only using one Marigo dot in each ceiling corner, much less than the manufacturers recommended three, which I found way overkill.)
Other Locations
I tried a few other iterations, such as putting a Silver in an adjacent room or the kitchen. Surprisingly, every location had an effect on the soundstage and the rounding action. But as with the four Silvers at the top and bottom corners of the front wall, it was too much.

I should note that I left most of my existing room treatments in place. In addition to the Marigo VPS SuperDots in all ceiling corners and some glass surfaces, I have 3″ thick absorber panels at the first reflection points. And, of course, the Argent Room Lenses are always there. Also note, my front wall is irregularly shaped.
This and That
After a lengthy R & D period of five years, the Resonators hit the consumer market about seven years ago. The Resonators you purchase today look no different from the earlier ones. They haven't changed in all that time. The only continuing R & D is trying out new metals.
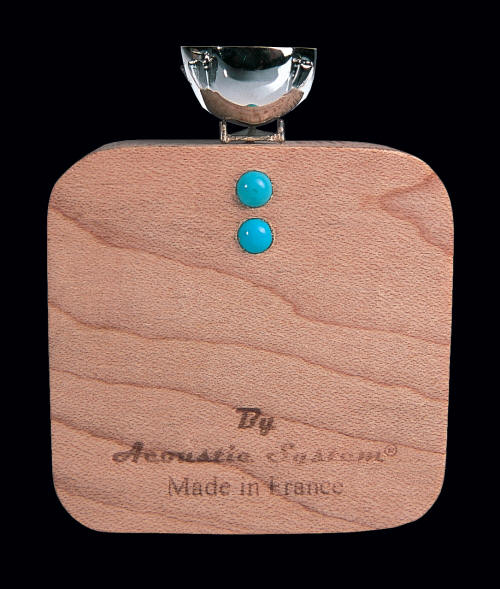
All have the same shape, a miniature bowl with four antennae protruding from the rim, sitting on maple wood bases. There are two kinds of maple bases. Gold, Gold Special, and Platinum use a thicker base. The ones for the Basic and Silver are thinner and made from a softer variety of maple wood. You may want to label the bases with a permanent marker. The little tripod on top of the wood base is sterling silver and should be left alone. Don't pull it out or push it into the wood. Changing the tripod's height will affect the sound.
Another recommendation is to tag the Gold Specials for easy identification, as they closely resemble the regular Gold. Put an X on the bottom of the Specials. You may also want to mark the narrow side of each bowl.
Don't polish the Basic and the Silver. These get mellower as they oxidize. Periodic dusting is all that's required—no polishing. The Gold and Platinum should be dusted and polished.
The placement instructions packaged with the product (also available on the importers website) are a good start, but for optimum performance, contact the importer directly. If the Resonators are misapplied, they can work against you.
Conclusion
Acoustic System International's Resonators come in five different metals ranging from the Basic through the Platinum in ascending order of desirability and, unfortunately for us, ascending order of price. The more expensive metals improve the sound of the room to a greater degree.
Note that last sentence: the Resonators work on your room, not your components.
I found placement of a sextet of Resonators—three along the front wall, one on the rear, and another two at the first reflection points on each sidewall—optimum. This will give you the major benefits for about $2550 USD. You'll find edginess greatly reduced as images become rounded, grain and the noise level will drop, and everything acquires a nice acoustic patina. Walls and speakers disappear and your sound-room will evidence the kind of dimensional illusion that you get in much larger rooms that have been treated with many ASC Tube Traps. For even more impact, upgrade metals to the Gold and Gold Special in place of the Silver bowls. The Gold bowls will introduce a major weight gain and more bloom. Cost here is about $6250. To hear the cat's meow, swap in a Platinum. You'll be staggered by the 3-D soundstage and imaging.
Audiophile room treatments are used to control reflections and room anomalies. The trouble is they have the unwanted side effect of subduing the music's liveliness and natural free-spiritedness. All it takes is a few dots or absorbers placed around the room to wind up with a dry and lifeless presentation.
The Resonators, on the other hand, actually embellish these very qualities of liveliness and natural free-spiritedness. The Resonators agitate when sound strikes them and become secondary sources of sound energy. Listeners then pick up cues from the sides and rear. They bring the room back into the equation.
To put them in perspective, you might think of their sonic benefits as on par with a bunch of ASC Tube Traps. These can easily set you back $2550, the price of a starter sextet of Resonators. On the other hand, they'll give you more bang for the buck than a Class A interconnect, which costs upwards of $3K per meter. And for the price of two of these Class A wires, you can get the Gold Resonators and effect a huge improvement in your soundroom. Unlike the wires, however, which get swapped periodically for the latest flavor of the month, the Resonators will become a permanent addition. Once you've tried them, they won't be leaving. Marshall Nack
Resonators
Basic: $250
Silver: $550
Gold: $1200
Gold Special: $1200
Platinum: $2800
US Distributor
Avatar Acoustics
Fayetteville, Georgia 30215
web address:
www.avataracoustics.com

