|
You are reading the older HTML site Positive Feedback ISSUE july/august 2007
Analog Tube Audio - Replacement Spindle Bearing for Garrard 301 and 401
Turntables, The
Kokomo Kit
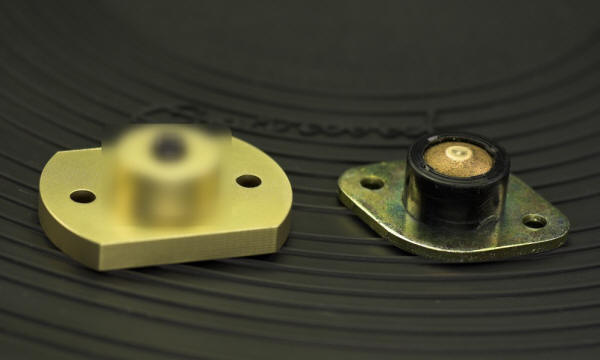
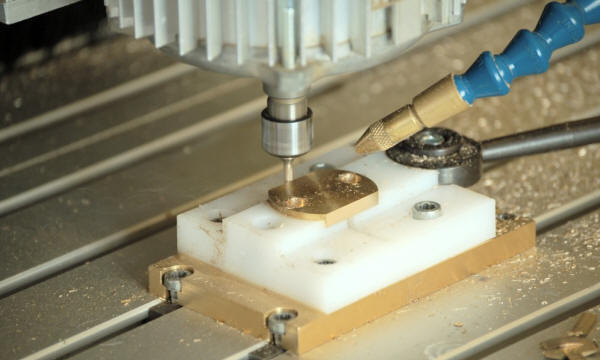
Analog Tube Audio (ATA) is a small company in Bremerhaven, Germany, that manufactures products related to vinyl. These products include a MC step-up transformer, a phono stage and add-on enhancements to tonearms and turntables. The most well known product of ATA is probably the bronze knife edge bearings for SME 3009, 3010, and 3012 tonearms. Besides being a replacement for your worn SME bearing, many users feel the ATA bearing outperforms the original SME bearing. Other products include RCA conversion kits for the SME 3000 series and armboards for Verdier turntables. The latest replacement/upgrade products from ATA are replacement bearings for Garrard 301 and 401 turntables. Since I am always interested in new tweaks for my Garrard 401, when Robert Graetke, the owner/designer of ATA, contacted me I was more than willing to give his new bearing replacement kit a try. The spindle bearing in the Garrard 401 is really a thrust plate. This thrust plate consists of a copper dome held in place in a piece of plastic. The flat bottom of the spindle rests on top of the copper dome and spins on top of it. The copper dome is softer than the steel spindle so it wears as the steel spindle turns against it. When the copper bearing is new, the rate at which the copper is worn off is fairly rapid. However, eventually a dynamic equilibrium is established whereby the flat area on the top of the copper bearing is sufficiently large that the downward pressure caused by the weight of the spindle and platter is spread over a large enough area that the copper stops wearing away. After that there is just normal wear on the copper thrust plate. Unfortunately, friction is a function of the surface area of the two surfaces that are in contact. With the Garrard copper thrust plate, as the flat area on the top of the copper bearing gets larger over time, the amount of friction between the thrust plate and the steel spindle increases. When I disassembled the spindle bearing assembly on my Garrard 401 I found the flat spot on top of my copper thrust plate to be approximately 3/32nds of an inch in diameter. Since this particular bearing had less than 1500 hours on it other copper thrust plates with more hours of use would have an even larger diameter flat area. The ATA replacement kit consists of a ceramic ball bearing and a new bottom plate. The bottom plate, which is CNC milled from a solid piece of bronze, has milled into one side a cup that holds the ceramic ball bearing. With the ATA bearing in place the flat bottom of the spindle rests on the ceramic ball bearing that is being held in place in the cup that was machined into the bottom plate. The amount of surface contact between the ceramic ball bearing and the flat bottom of the spindle is very small. Thus, the friction between the ceramic ball bearing and the spindle is significantly less than the friction between the spindle and the copper thrust plate. Where turntables are concerned, less spindle bearing friction is usually very good - less noise (rumble) and greater speed stability are the usual benefits.
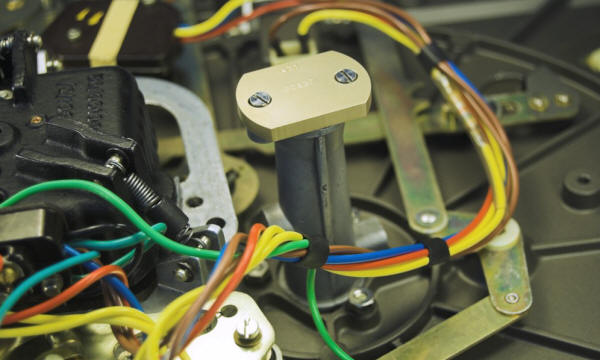
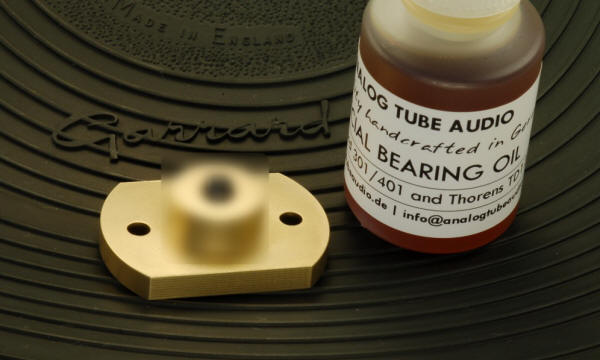
Installing the kit is a very simple process. The only hard part may be getting access to the bolts that hold the bottom plate onto the spindle bearing housing. Mr. Graetke has promised a detailed installation manual with photos. Until then, what follows is a step by step guide to installing the ATA bearing kit: 1. Remove the platter. If the platter will not lift off, lift the platter up an 1/8th inch and hold it up with shims. Put a small block of wood on top of the spindle and gently rap the wood block with a hammer. That should free the platter from the spindle. 2. You now need to get access to the two bolts that hold the bottom plate onto the spindle bearing housing. As you look down onto the turntable with the platter removed you will see the three bolts that hold the spindle bearing assembly to the turntable frame. You can unscrew these bolts (there is a nut and a lock washer on the other side) and by some careful wiggling remove the spindle bearing assembly from the turntable. Installing the ATA kit is now a very simple process. Unfortunately, the ATA bottom plate is larger than the original Garrard bottom plate. The spindle bearing assembly with the ATA bottom plate installed will not fit back through the hole it came out of. So you should not unscrew those three bolts and remove the spindle bearing assembly. Instead, you will need to find a way to get access to the bottom of your turntable which can be very simple if you have a skeletal plinth like mine or it can be very time consuming depending on how your turntable is fastened to its plinth. 3. Once you have access to the two bolts fastening the bottom plate to the spindle bearing housing, unscrew the two bolts (be careful not to lose the lock washers) and set the two bolts and lock washers aside. 4. Remove the bottom plate and very carefully remove the gasket that you found between the bottom plate and the spindle bearing housing. You will need to reuse the gasket so treat it very carefully. 5. Now push down on the spindle itself very gently. This will force the piece of plastic that holds the copper dome and the spindle itself to come out of the bottom of the bearing shaft housing. You can discard the piece of plastic with copper dome as you won't need it again. 6. You now need to clean the spindle and the inside of the spindle shaft. A careful wipe with a lint free cloth should be sufficient. You want to get rid of all of the old oil which may contain contaminants such as small particles of copper. 7. Place the old gasket on the ATA bottom plate on the side that has the cup to hold the bearing. Be sure to carefully match up the bolt holes. Fill the bearing cup with the oil of your choice and place the bearing in the cup. 8. Reinsert the spindle into the spindle shaft after coating it with a thin film of oil. Then place the ATA bottom plate onto the bottom of the spindle shaft housing. I found that if I had the turntable on its side the ball bearing would not drop out of the cup as I fitted the ATA bottom plate to the bottom of the shaft housing. Actually, I kept one hand on the spindle as it protruded from the top of the spindle shaft. This allowed me to keep pressure on the ball bearing as I moved the ATA bottom plate into position with my other hand. You don't want to have the ball bearing drop out of the cup. 9. Now screw in the two bolts and lock washers so that the bottom plate is held securely—tight, but not too tight. Always remember Frank Schroeder's adage, "the next condition after very tight is very loose". 10. You now need to get your turntable reattached to your plinth. 11. Once the turntable is attached to the plinth unscrew the bolt next to the spindle that covers the oil reservoir. Fill the reservoir with oil and screw the bolt back in. Also make sure the felt pad around the spindle is saturated with oil. 12. Put the platter back on the turntable. You are done. The above twelve step program can be accomplished in five minutes, assuming you can quickly get access to the underside of the turntable. While I was going through the above 12 step program, instead of the gun oil I usually use, I used the small squeeze bottle of oil for Garrard 301/401s that ATA also sells. Mr. Graetke had sent along the bottle of oil with the bearing kit. Thus, when I sat down to listen to what changes the new bearing had wrought, I was actually listening to two changes—a new bearing and a new oil. I know I should have put the new bearing in with the gun oil, listened and then changed the oil and listened again. However, while getting access to underside of my turntable is easy, reassembly is a lengthy process as I have to carefully re-level everything and then realign the two tonearms which are on top of freestanding pods. Not wanting to go through that process twice, I put in the new bearing with the new oil.
Once everything was reassembled, I used my hand to give the platter a spin. The platter kept spinning and spinning. I stopped it, spun it again and looked at my watch. Two minutes later the platter was still spinning. Obviously, the new bearing had far less friction than the old thrust plate. With that visual confirmation that the new bearing was far lower in friction I started to play music. The first record I put on was one I had been playing a lot recently, The White Stripes Elephant. A very well recorded rock album, made entirely in the analog domain. As soon as the needle hit the vinyl I know that there had been an improvement in the sound. There was a clarity to the sound that had not been there before. I was hearing things that I had heard before, but instead of them being slightly fuzzy or blurred, they were now clear and distinct. I played all four sides of the two LP album. On every cut I was hearing clearly things that I had heard before, but hadn't realized how veiled or obscured they had been. Amazing. The next LP on the platter was Nirvana Unplugged in New York. This is an album I take with me to the audio shows. I know it very well. Again I was hearing details I had not heard before. What was most noticeable was the subtle changing of the textures of Kurt Cobain's voice. This was not something that I had really noticed before. Now the changes in texture were perfectly clear. Next up was the 45rpm reissue of Louis Armstrong's St. James Infirmary. I've played this LP many, many times. Again I was hearing subtle little details that I had not heard before. I spent the rest of the afternoon playing album after album. Classical, rock, pop—it did not matter what the genre was. The sound was always clearer with more subtle detail. This new bearing really works. The bearing kit costs 79 Euros with VAT, 66.39 Euros without VAT. The 20ml bottle of oil costs 8.50 Euros with VAT, 7.14 Euros without VAT. While 79 Euros may be more than you paid for your used Garrard turntable, you really need to spend the money on the new bearing. To my mind, you have not really heard what your Garrard can do until you put in the new bearing. Highly Recommended.
Analog Tube Audio
In the photos of the Kokomo bearing kit, the detail of the bearing housing is deliberately fuzzed out. When ATA introduced their SME replacement knife edge bearings copycats in the Far East quickly came out with bearings for less money that looked identical to the ATA bearings, but which were made from a different grade of bronze and not machined to as high a tolerance. These copycat products had a negative impact on ATA's sales. Mr. Graeke hopes to slow down the copycat manufacturers in copying the Garrard bearings by keeping the precise details as close to his vest as possible. This includes no pictures of the bearing housing and no details of the manufacturer or grade of ceramic bearing used. The size and hardness of the ceramic bearing are critical. If the hardness of the ceramic ball bearing is too high the ball bearing will wear a small indentation into the flat bottom of the steel spindle. This increases the surface area in contact and thus, increases friction which defeats the purpose of the bearing. It also damages the spindle shaft bearing surface. The size and the hardness of the ceramic bearing also affect the sound. The ceramic bearing that is supplied in the kit is the one that is soft enough not to damage the spindle shaft bearing surface but also sounded the best of all the different bearings that Mr. Graetke tested.
|