|
You are reading the older HTML site
Positive Feedback ISSUE
18
Pushing the envelope - taking the Magnepan 3.6R
to the extreme!
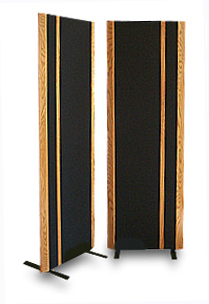
First let me cover some basics for people who are not familiar with the stock 3.6Rs. The 3.6R is a three-way speaker, with a planar/magnetic midrange/bass panel and a true ribbon tweeter. Its specifications include a sensitivity of 85dB and impedance of 4 ohms, but believe me when I say that the 3.6Rs need a strong amplifier to make them sing. Use a high-current amp that provides clean power without clipping, and you'll be rewarded with a deep, wide soundstage and very good dynamics, even with stock 3.6Rs. The 3.6Rs do some things better than most speakers. Their natural tone through the midrange and seamless, cohesive transition throughout the frequency range cannot be matched by any comparably priced box speakers (at least any that I've heard), but their weaknesses can be disturbing. They don't do bass particularly well, and fair poorly in the imaging department. They also lack the dynamic impact in the lower registers of good box designs, and in this era of thunderous home theater sound effects, that eliminates 60 percent of their potential market. Many people refer to the 3.6Rs' limitations as being inherent to the design, but I've never really been convinced of that. I've heard many times that it is necessary to move a lot of air to deliver low-frequency dynamic impact, but the bass and midrange panels of the 3.6Rs are quite large. The first thing that strikes you about the Magnepan 3.6s is how open and natural they sound. You immediately realize that most of what you hear in typical box speakers are the boxes. The next thing that strikes you is how differently these speakers express themselves when compared to conventional box designs. The sound has tremendous scale and clarity. Music flows from these speakers in a big open wave, though it doesn't jump out at you with the same snap and attack that box speakers provide. The soundstage is huge, with excellent center fill energy and a cohesive presentation. The stage easily extends beyond the outer edges of the speakers when required, if they are given sufficient driving force. Stage depth is quite good, though not as deep as that of other speakers, particularly the Quad ESL 57s or the Apogee Caliper Signature IIs. As mentioned earlier, bass is somewhat lacking, both in extension and fullness, which makes the sound slightly lean. I initially found the tweeters to be a little too bright. Instruments like trumpets, and even woodwind instruments, had too much energy and force. Installing a resistor in series with the ribbons, which can easily be done on the speaker's back plate, robs the 3.6R of some air and transparency, and I do not recommend it as a solution for reducing treble energy. I was able to somewhat tame the problem by moving the speakers closer to the front wall, but with the tradeoff of a loss of soundstage depth. I was able to achieve a compromise between tonality and stage depth, but it left me wanting more of what the compromise had removed. In a nutshell, I wasn't happy enough with the sound of the stock 3.6Rs to be able to live with and enjoy them in the long run. Measuring 24 x 71 x 1.6 inches, the 3.6R is large, but not particularly heavy, so unpacking, assembly, and positioning is not difficult for one person. Magnepan, for reasons known only to them, does not follow the rigid-construction-is-best theory. The stock stands, flimsy at best, are victims of a design-to-a-price policy. Also disappointing are the external crossover boxes, and the way they couple to the speakers. The crossover components for the tweeter/mids are inside the 3.6Rs, but the bass crossover components are mounted in small boxes that attach to the rear of the speakers via metal pins that act as electrical connectors. Small brackets attach the boxes to the speakers, removing stress from the pins. In my opinion, this setup is inadequate. How can speakers that have gotten so much critical acclaim fly in the face of everything we know about the importance of construction integrity and rigidity? In case you haven't noticed, a modification craze has been sweeping through the audio world: Take a component of reasonable quality, add some better parts, and watch it compete with the best. Driven by a sense of frustration and the urge to prove to myself that I could still use a soldering iron, I embarked upon the task of destroying a perfectly good set of speakers. Well, not quite. There are several stages of improvement available for the stock 3.6Rs, and each will provide the inspiration to move to the next. If you have the suitable skills, and are motivated to take on the ultimate upgrade, go for it. If you are of a nervous disposition or have limited funds, try steps 1 and 2, or 1 and 2 in conjunction with 3 and 4, and you will have yourself a nice improvement for under $1000.
Step 1: Ditch the pins that connect the external crossover boxes to the speakers and replace them with custom Cardas "Magnepan" wires, available from www.dedicatedaudio.com for around $200. This worthwhile modification adds a little clarity and transparency to the sound. All that is required is an Allen key (and $200!). Step 2: Remove the fuses and the tweeter attenuation circuitry on the inside of the back plate. Re-crimp the wiring inside the cavity behind the back plate with better, gold-plated crimps. This is very worthwhile. The sound improves in many ways, almost like removing the grille cloths from box speakers. You will get more detail, more air, and even slightly improved bass extension. Do not bypass the fuses unless you are certain that your amp can deliver sufficient power to the speakers at higher SPLs without clipping. Otherwise you may end up having to do an expensive panel/ribbon replacement. Step 3: Replace the stock stands with custom stands that add mass and rigidity to the frame. MYE stands (available at www.myesound.com) seem to be preferred by Magnepan users, and offer very worthwhile improvements for less than $400. I'm cheap, so I decided to build my own stands based on the MYE design and a pair of SoundOrg custom 3.6R stands. Of course, I spent much more than $400. The principal of the MYE design and my design is to mass load the stand for rigidity, and attach the speaker further up the frame to prevent flexing. Then, couple the stand to the floor with vibration-dissipating spikes or brass cones. You will hear improvements in transparency and also a small increase in stage depth and layering. Step 4: Try Magwire speaker cables! I've tried many different speaker cables with my 3.6Rs, including Purist Audio, Sonoran, AudioQuest, AlphaCore Goertz, and Virtual Dynamics Nite IIs. Prior to my discovery of Magwire, the Nite IIs were far and away the best choice in my setup, but the Magwire provides detail and clarity that even the $2200 VDs can't touch. Step 5: Crossover modifications and internal wire upgrade. These are by far the most complex and irreversible of the recommended modifications. Details follow, but I would be happy to provide more to anyone wishing to embark on similar madness. Organize your parts carefully. You will be replacing all internal and external crossover components, and completely rebuilding the crossovers on external boards. You can have the new crossovers fully built before your speakers undergo the knife. (1) Choose a crossover board of suitable proportions. I used two 24 x 12 x 2-inch pieces of solid mahogany, but would have appreciated another 2 or 3 inches in both length and width to allow better spacing of the components. This sounds like a large board, but your new crossover components are going to be much larger than the stock parts, so you will need it.
(2) Remove the back plates from the speakers and replace the internal wiring. Leave 18 inches of wire past the point of leaving the back of the speaker. Pull the leads from the three drivers through the back plate cavities and terminate them with good-quality spades. I used Nordost Flatline cable and AlphaCore solid silver spades. I didn't use spades inside the speaker, but drilled small holes in the ends of the Nordost cables and used the cables themselves as the crimps. (3) Terminate the leads on one side of your new crossover. I used Cardas binding posts (available from www.dedicatedaudio.com). You will need ten sets of binding posts, around $400 if you use the Cardas. Building the crossovers is relatively easy, though some of the soldering maneuvers are tricky, particularly when eight caps need to be wired in parallel. I experimented with isolation under the components with great results, so it's a good idea to leave a little slack on the point-to-point wiring to facilitate this. I tried several materials, including Vibrapods and foam. I got the best results with packaging air bags, but they were a real pain. I used brass cones on the underside of the crossover bases and spiked them into the carpet (www.supercellaudio.com). The results were worth the effort. After around 200 to 300 hours of break-in, the sound was better in every respect. The deficiencies of the stock 3.6Rs were almost fully addressed. Dynamic impact in the lower registers greatly improved. Bass was more extended, tighter, and more tuneful. The highs were effortless and extended, and less shrill. Transparency was greatly improved, as was stage presentation, particularly depth. There was a much-improved sense of layering, with air around instruments that just wasn't there before. The cost of the crossover upgrade and speaker rewire was more than $2500, but it performed beyond its price, at least when taking an audiophile perspective. There is something very special about the Magnepan 3.6Rs, but with modification, they can be elevated into a different league altogether. With the removal of their constraints, and partnered with appropriate equipment (particularly a good, high-powered amp), the 3.6Rs are capable of stellar performance. If you have the inclination, time, and patience to pursue the goal of improving the sound of the stock speakers, I highly recommend trying one or more of these upgrades. Please be sure that you have the necessary skills to perform these modifications. Some of them are difficult to reverse, so you must plan the process carefully. If you have doubts about your ability to complete the mods successfully, the job is better left to one of the many companies that can perform it on your behalf.
|

 It find it odd that the manufacturer of a
speaker with the potential of the Magnepan 3.6R doesn't offer it in a "hot
rod" or SE version, at least not in the U.S. Anyone who has looked closely
at the internals of a 3.6R knows that the internal parts and wiring—and the
standard of workmanship—are below par, and cannot possibly extract the best
performance from this planar design. I come from a manufacturing background,
so I understand the concept of building for a specific market and
controlling costs to deliver a competitive (and profitable) product, but why
oh why must the 3.6R be built like a cheap transistor radio? I estimate that
spending an additional $750 or so at the manufacturing stage would make the
3.6R competitive in the $15,000 market sector, maybe higher.
It find it odd that the manufacturer of a
speaker with the potential of the Magnepan 3.6R doesn't offer it in a "hot
rod" or SE version, at least not in the U.S. Anyone who has looked closely
at the internals of a 3.6R knows that the internal parts and wiring—and the
standard of workmanship—are below par, and cannot possibly extract the best
performance from this planar design. I come from a manufacturing background,
so I understand the concept of building for a specific market and
controlling costs to deliver a competitive (and profitable) product, but why
oh why must the 3.6R be built like a cheap transistor radio? I estimate that
spending an additional $750 or so at the manufacturing stage would make the
3.6R competitive in the $15,000 market sector, maybe higher. 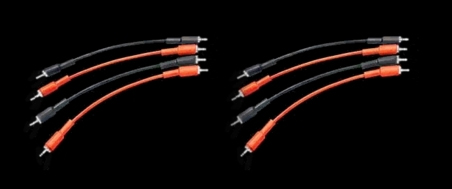
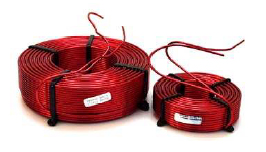 I built my new crossovers using components of
the same value but better quality than the stock components. I used Solen
fast-caps for the larger values, Kimber caps for the middle values, and
Jensen oil/paper caps for the smaller values on the tweeters. I used Solen
iron-core inductors for the bass and AlphaCore air-core inductors on the
mids/highs. (
I built my new crossovers using components of
the same value but better quality than the stock components. I used Solen
fast-caps for the larger values, Kimber caps for the middle values, and
Jensen oil/paper caps for the smaller values on the tweeters. I used Solen
iron-core inductors for the bass and AlphaCore air-core inductors on the
mids/highs. (